
Building .NET applications for the web just got easier and robust with Microsoft’s introduction of .NET Aspire. While this is a great way of building applications for developers, let’s see where this all goes in deployment and management for IT/DevOps teams. This post is a starting point as there are many more scenarios to cover on this topic in the future.
Impatient? If you just want to see where all this ends up in Azure, you can jump to the What’s in Azure section. I wrote this post because I was looking for that too.
As you go through this post, I’ll prefix each section to give a little guidance on which roles a given topic is aligned to. I’d recommend all roles read though the entire post, but this should help how the roles will need to work together.
Here are the list of prefixes for those roles:
- Dev: Developers that will build the code
- Ops: IT/Operations/Infrastructure team that are responsible for the Azure infrastructure, security, management, monitoring, etc.
- DevOps: Both the Dev and Ops team
A GitHub repository has been created for this post which includes the code and scripts used in this post. You can find it at GitHub - conradagramont/AspireDeploy
Screenshots may be hard to read. I stored the high-res versions in the repository for this post in the ‘screenshots’ folder. If you need a better view, please go to the repository.
Table of Contents
- (DevOps) What is .NET Aspire
- (Dev) The Application
- (Dev) Initialize and Commit to GitHub
- (Ops) Planning for deployment
- (DevOps) Connecting GitHub Actions and Azure
- (DevOps) GitHub Actions Deployment
- (DevOps) What’s in Azure
- (Ops) A peek under the hood
- (DevOps) Cleanup & Start Fresh
- (DevOps) How long does it take?
- What’s Next
(DevOps) What is .NET Aspire
Here is how Microsoft describes it:
.NET Aspire is an opinionated, cloud ready stack for building observable, production ready, distributed applications. .NET Aspire is delivered through a collection of NuGet packages that handle specific cloud-native concerns. Cloud-native apps often consist of small, interconnected pieces or microservices rather than a single, monolithic code base. Cloud-native apps generally consume many services, such as databases, messaging, and caching.
(Dev) The Application
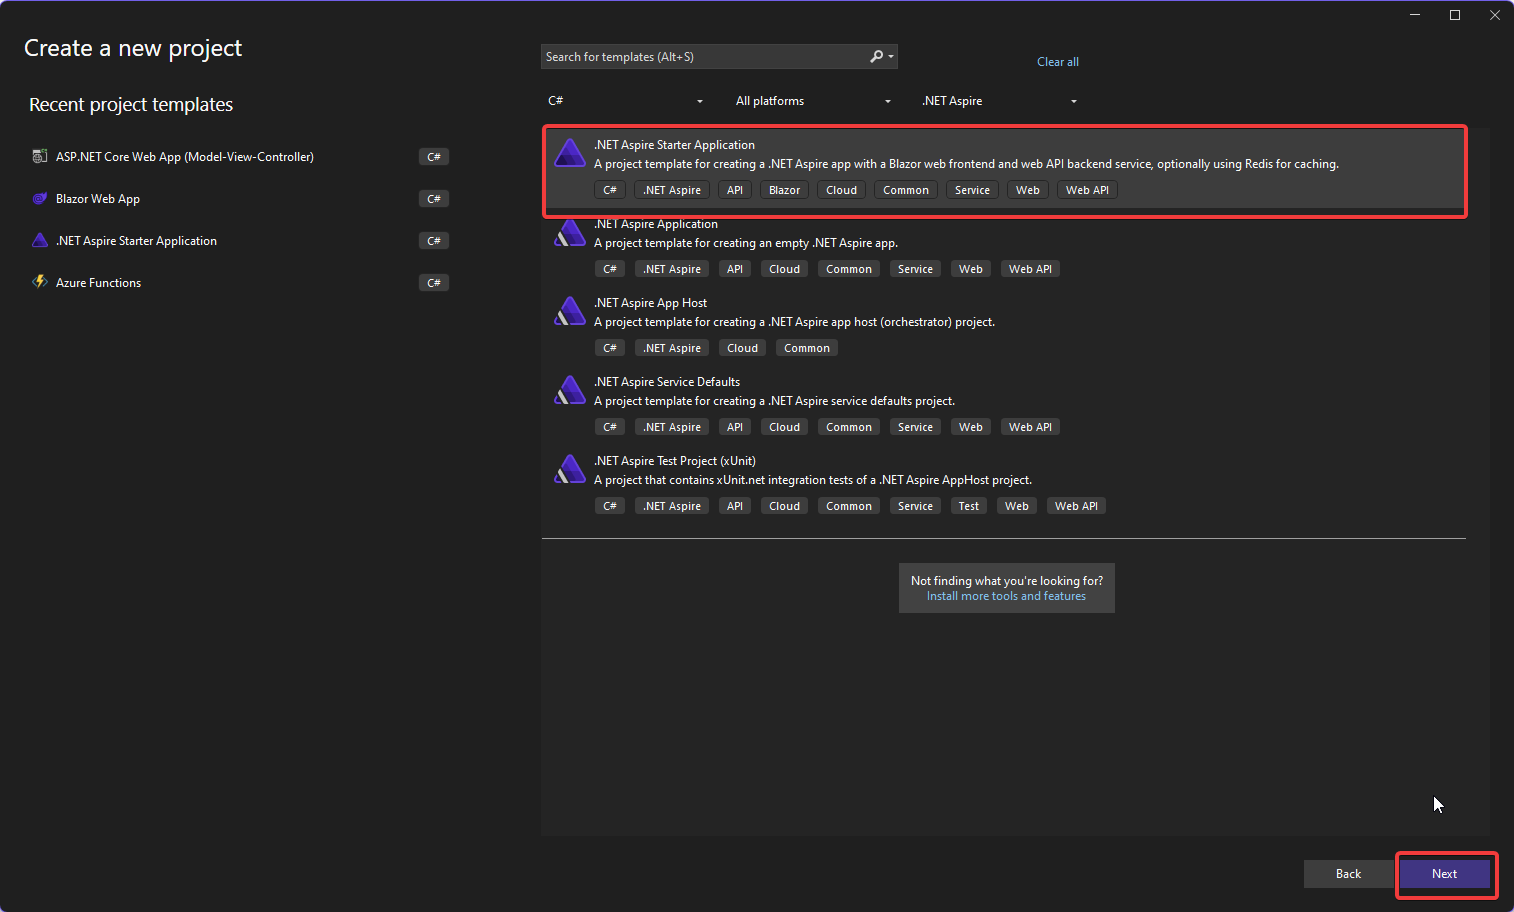
To keep things simple, we’re going to start with the ’.NET Aspire Starter Application’ using Visual Studio 2022 (make sure you have that latest update). While this can be done using Visual Studio Code or via the CLI as well, we’ll use this method for this post.
The following are the screenshots used to create the .NET Aspire project via Microsoft Visual Studio 2022 (I’m using Visual Studio Enterprise, but this will work in other editions as well).
You should follow the guidance based on Microsoft Quickstart and can use VSCode or the CLI based on the instructions on the same page: Quickstart: Build your first .NET Aspire project
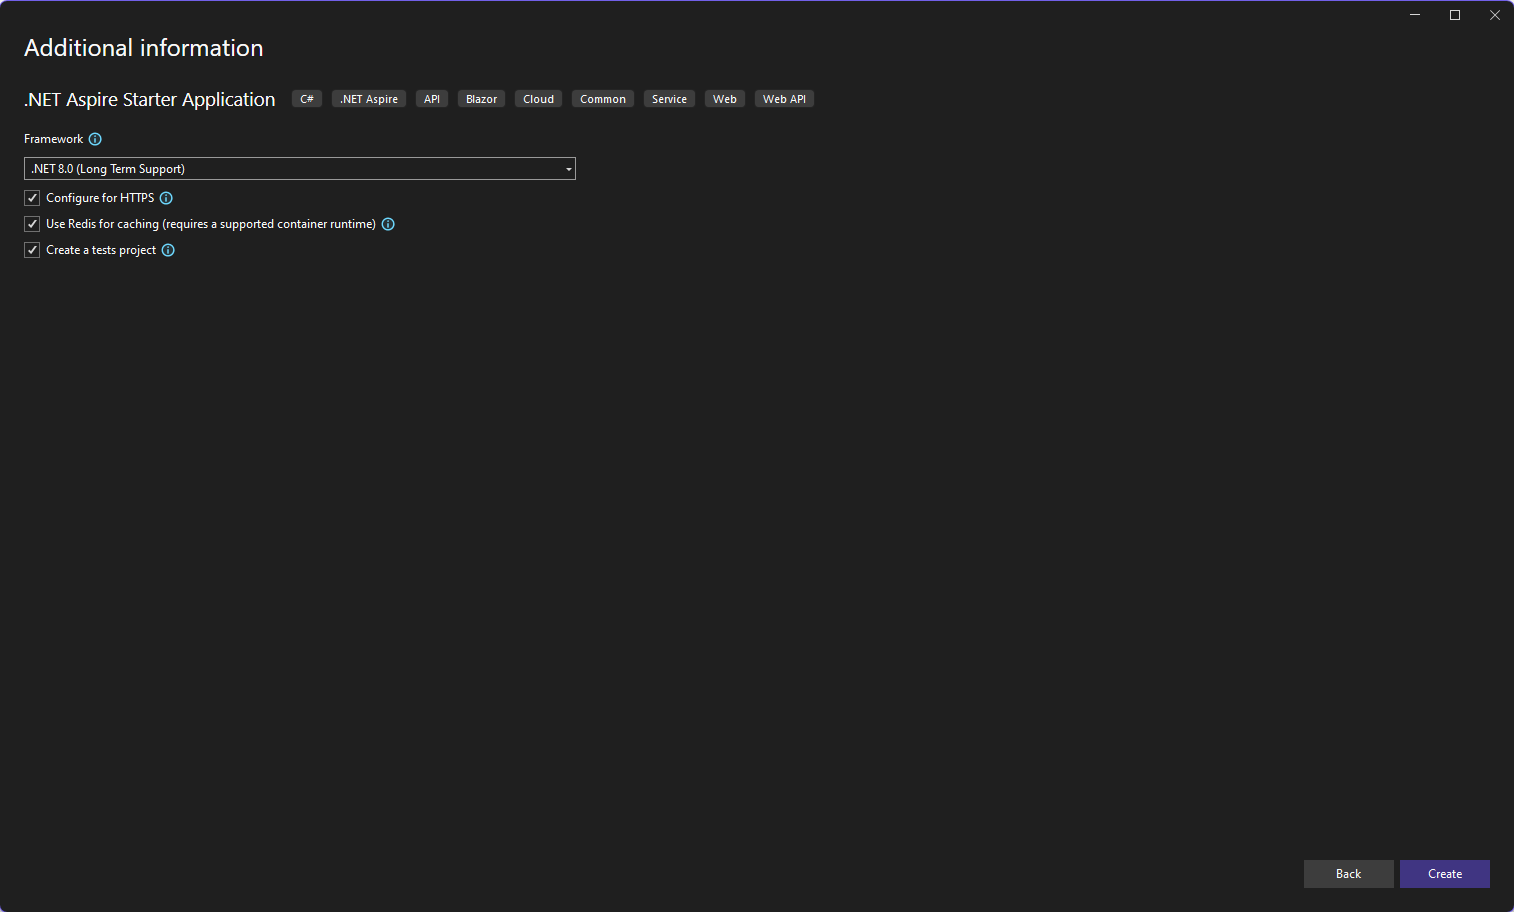
We’re going to name this project, AspireDeploy and save it to c:\dev\ for now.

.NET Aspire has a number of options for connecting to databases and caching services, but we’ll focus on what the new project wizard provides us.
At this point, your project is created, and you should run it to ensure all is good. Below is a screenshot showing the .NET Aspire dashboard showing our resources running, including links to those services. I included a screenshot showing two of those links opened so we can see it all together.

When your start the .NET Aspire project, you’ll see:
- A console which is the local .NET Aspire App Host which then opens the .NET Aspire dashboard
- The .NET Aspire dashboard shows the resources running associated with .NET Aspire, which includes links to those services
- Clicking on the API Service will show the results of the weather API used in the application
- Clicking on the Web Service opens up the main page (I clicked on the Weather link to show the matching results from the API)
There are some requirements for Docker since our deployment is using Redis for Caching. Following the documentation in the Quickstart will give you the details for making all this happen. For this post, we’re going to move forward based on all this working on your local computer.
(Dev) Initialize and Commit to GitHub
Since we’ll be using GitHub as our source repository and then publishing to Azure, we’ll need to do some local steps to get our new code into GitHub. If you’re a pro with GitHub, feel free to use your own magic and skip this section if needed. You may want to close your Visual Studio project to ensure all files can go into your local GIT repository.
Step 1: Open Command Line
- Open the Command Prompt or PowerShell.
Step 2: Navigate to Your Project Folder Use the cd command to navigate to the folder where your .NET code is located. For our example:
cd C:\Dev\AspireDeployStep 3: Initialize a New Git Repository Run the following command to initialize a new Git repository in your project folder:
git initStep 4: Add Your Files to the Repository Add all your project files to the Git repository with:
git add .Step 5: Commit Your Changes Commit your added files with a message describing your initial commit:
git commit -m "Initial commit"Step 6: Create a New Repository on GitHub
- Open your web browser and navigate to GitHub.
- Log in to your GitHub account.
- Click on the + icon in the top-right corner and select “New repository”.
- Enter a name for your repository and choose the desired settings (e.g., public or private).
- Click the “Create repository” button.
Step 7: Link Your Local Repository to the GitHub Repository In the Command Prompt or PowerShell, run the following commands, replacing USERNAME with your GitHub username and REPOSITORY_NAME with the name of your newly created GitHub repository:
# In our example: git remote add origin https://github.com/conradagramont/AspireDeploy.gitgit remote add origin https://github.com/USERNAME/REPOSITORY_NAME.gitStep 8: Push Your Local Repository to GitHub Push your local repository to GitHub using:
git push -u origin masterStep 9: Verify Go back to your GitHub repository page and refresh it. You should see your code pushed to the repository.
By following these steps, you will have successfully initialized a new Git repository for your .NET project, committed your code, and pushed it to a new repository on GitHub.
(Ops) Planning for deployment
It’s best practice for any Azure infrastructure that there be a separation between development (including testing and staging environments) and production. To ensure that what happens in development aligns with production, it’s best to create a consistent method of deployment regardless of environment and keep the development team away from direct management (including roles and permissions) from the production environment.
Conrad’s Soapbox While the tooling exists with .NET Aspire and the azd CLI to deploy directly from a workstation to Azure, this shouldn’t be how you get started (except for maybe you’re a single developer in a sandbox subscription) with any application which includes .NET Aspire. If you start with a CI/CD process from the start, you’ll avoid headaches and refactoring down the road.
Since a key area of using .NET Aspire is automating the deployment and updates of Azure resources, we’ll leverage the Azure Development CLI (azd cli) to do most of the deployment work for us. That said, the Ops team still needs to be a participant in this process.
Install Tools
Here are the command-line interface (CLI) tools that you need to have installed to make the following sections work.
- Azure CLI: https://learn.microsoft.com/en-us/cli/azure/install-azure-cli
- Azure Developer CLI: https://learn.microsoft.com/en-us/azure/developer/azure-developer-cli/install-azd
NOTE: I’m using these on a Windows 11 desktop and PowerShell 7, but this can be done on macOS and Linux.
Azure Subscription
Since we’re going to deploy this in Azure, you’ll need an Azure Subscription. If you only have a single Azure Subscription, I’d encourage you to get another to at least have a clean separation between your development and production environment. A subscription by itself costs you nothing. It provides both a security boundary and allows you to track your costs between the two. There are way more benefits on why to do this from the start, but for now just make sure you have two.
From an Ops perspective, we’d like to have a Resource Group defined as well. As of this posting, this is available as part of the Azure Developer CLI (azd cli)
but it’s in ALPHA stage and thus we’ll skip this for now. The azd cli will create this for us in the infrastructure deployment stage and name
it rg-<environment name>. In our case later, it will be rg-dev.
CAF & Management Groups If you’ve adopted Microsoft Cloud Adoption Framework (CAF), this guidance will help keep you on track by targeting different management groups as you can target them by the environment configuration, including the User-assigned Managed Identities.
(DevOps) Connecting GitHub Actions and Azure
To create the connections we’re looking for, you (Ops person), will need rights to the target Azure subscription AND rights to the GitHub repository (Create Actions variables and secrets).
For this next step, we’re going to ask that our Ops person connect to GitHub and clone the repository that holds the .NET Aspire code. This will also ensure that you don’t have to give the developers more permissions to the Azure Subscription than required.
Here’s an example of cloning the repository to your local Windows workstation using PowerShell. You should replace the URL with the URL of your repository.:
# change folder paths and repository URL as neededcd C:\Devgit clone https://github.com/conradagramont/AspireDeploy.gitThe following is based on Microsoft’s documentation Tutorial: Deploy a .NET Aspire project using the Azure Developer CLI and GitHub Actions but there are some tweaks that I had to go through to make it work (which I’ll cover).
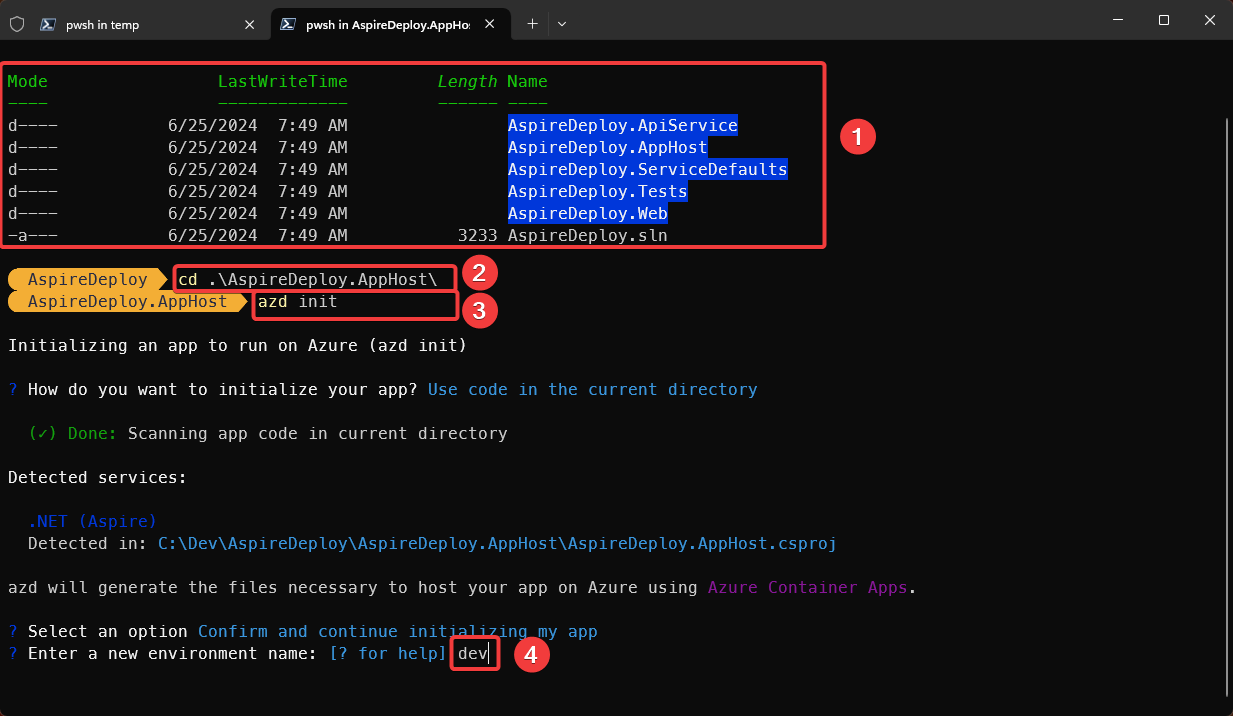
Using PowerShell, run the following command within the AppHost project directory which in our case is C:\Dev\AspireDeploy\AspireDeploy.AppHost:
azd initYou should now see the following:
Next, we’ll need to create a folder path and file used by GitHub Actions. In our case, it’s: C:\Dev\AspireDeploy\.github\workflows\azure-dev.yaml
The sample provided by Microsoft on the earlier provided link works with some modification (at least it did for me).
The following is the yaml file used and the associated changes I needed to make.
name: .NET 8 Aspire to Azure Deployment# For more information on this YAML file, please reference blog: https://agramont.net/blog/devops-intro-deploy-net-aspire-azure-github-actions
on:  workflow_dispatch:  push:    # Run when commits are pushed to mainline branch (main or master)    # Set this to the mainline branch you are using    branches:     - master     - main
permissions:  id-token: write  contents: read
jobs:  build:    runs-on: ubuntu-latest    env:      AZURE_CLIENT_ID: ${{ vars.AZURE_CLIENT_ID }}      AZURE_TENANT_ID: ${{ vars.AZURE_TENANT_ID }}      AZURE_SUBSCRIPTION_ID: ${{ vars.AZURE_SUBSCRIPTION_ID }}      AZURE_CREDENTIALS: ${{ secrets.AZURE_CREDENTIALS }}      AZURE_ENV_NAME: ${{ vars.AZURE_ENV_NAME }}      AZURE_LOCATION: ${{ vars.AZURE_LOCATION }}
    steps:      - name: Checkout        uses: actions/checkout@v4
      - name: Install azd        uses: Azure/setup-azd@v0.1.0
      - name: Install .NET Aspire workload        run: dotnet workload install aspire
      - name: Log in with Azure (Federated Credentials)        if: ${{ env.AZURE_CLIENT_ID != '' }}        run: |          azd auth login `            --client-id "$Env:AZURE_CLIENT_ID" `            --federated-credential-provider "github" `            --tenant-id "$Env:AZURE_TENANT_ID"        shell: pwsh
      - name: Log in with Azure (Client Credentials)        if: ${{ env.AZURE_CREDENTIALS != '' }}        run: |          $info = $Env:AZURE_CREDENTIALS | ConvertFrom-Json -AsHashtable;          Write-Host "::add-mask::$($info.clientSecret)"
          azd auth login `            --client-id "$($info.clientId)" `            --client-secret "$($info.clientSecret)" `            --tenant-id "$($info.tenantId)"        shell: pwsh
      - name: Extract Solution Name        id: extract_solution_name        run: |            # Extract the solution name from the .sln file            SOLUTION_NAME=$(ls *.sln | sed 's/\.sln$//')            echo "Solution Name: $SOLUTION_NAME"            echo "SOLUTION_NAME=$SOLUTION_NAME" >> $GITHUB_ENV
      - name: Provision Infrastructure        run: azd provision --no-prompt        working-directory: ${{ env.SOLUTION_NAME }}.AppHost
      - name: Refresh azd env (pulls latest infrastructure provision)        run: azd env refresh --no-prompt        env:          AZURE_LOCATION: ${{ env.AZURE_LOCATION }}        working-directory: ${{ env.SOLUTION_NAME }}.AppHost
      - name: Deploy Application        run: azd deploy --no-prompt        working-directory: ${{ env.SOLUTION_NAME }}.AppHost
Save it locally, but no need to commit to GitHub as it will crash without the next step (which by the way will ask at the end to commit the changes). With that established, we’ll now go to the big guns and make the connection between Azure and GitHub.
Using PowerShell, run the following commands within the AppHost project directory which in our case is C:\Dev\AspireDeploy\AspireDeploy.AppHost:
azd auth loginazd pipeline configThe first command will handle your authentication in Azure. The second is where the real action happens. It includes:
- Selecting an Azure Subscription
- Azure Region
- Login details for GitHub
Note: There is no need to select the repository in the command above since that’s already defined via the .git configuration in the project.
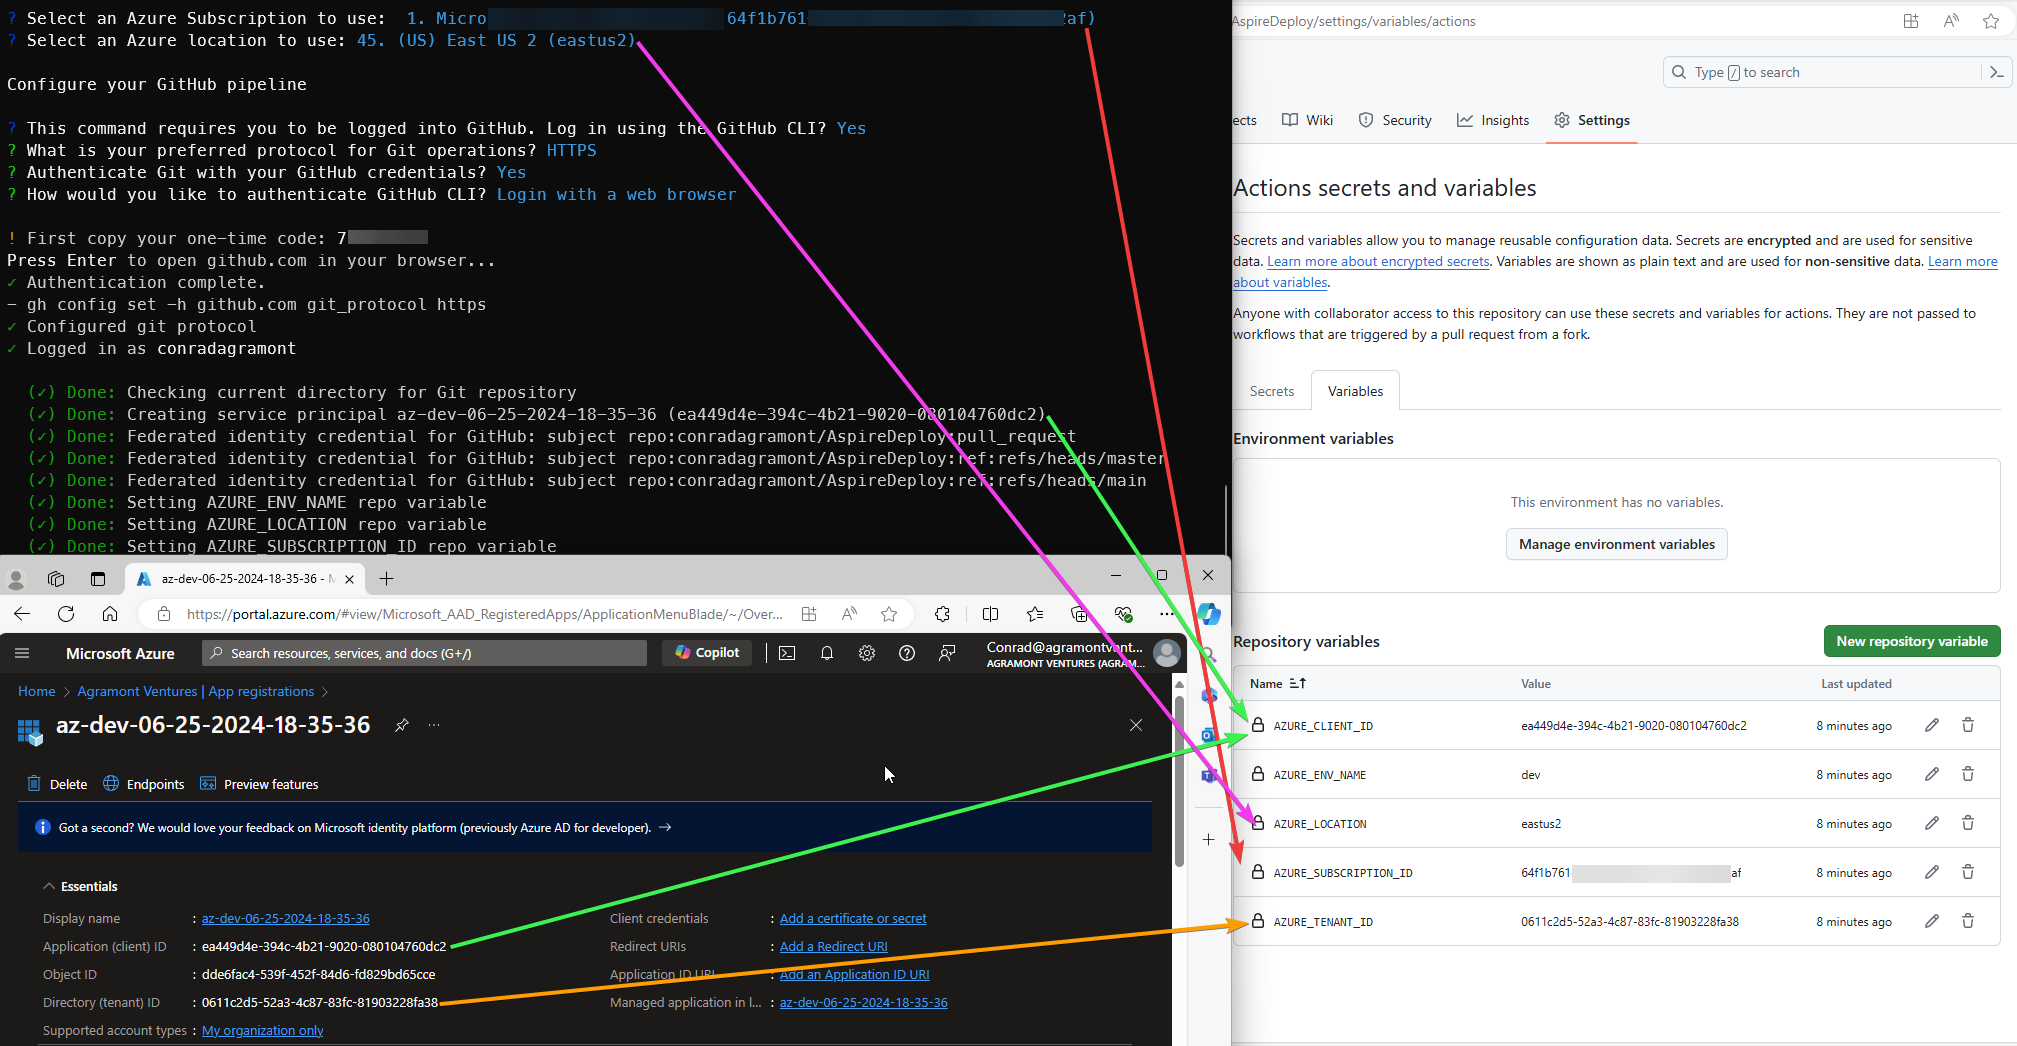
Once completed, You’ll have an Entra ID Application Registration created and the GitHub Repository will have Actions variables with values defined based on what was created in Azure.
You should see something like this in your PowerShell console:
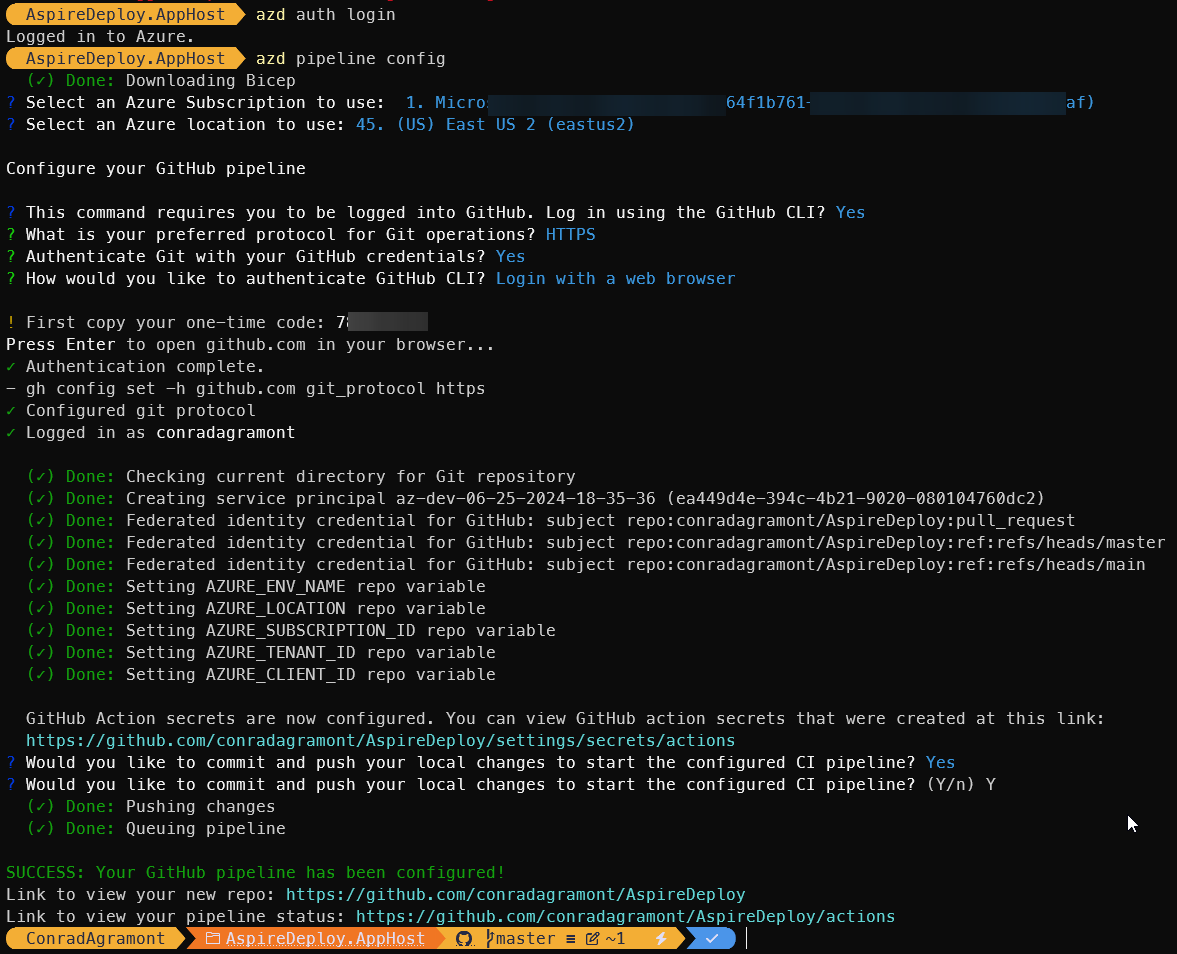
What you won’t have is the application deployed.
However, if you selected Y to the option for `Would you like to commit and push your local changes to start the configured pipeline’ then you might have just jumped the shark (Happy Days reference).
To help connect the dots, the following screenshot shows how the output in the PowerShell console relates to what was created in GitHub settings for Actions and the Azure portal.
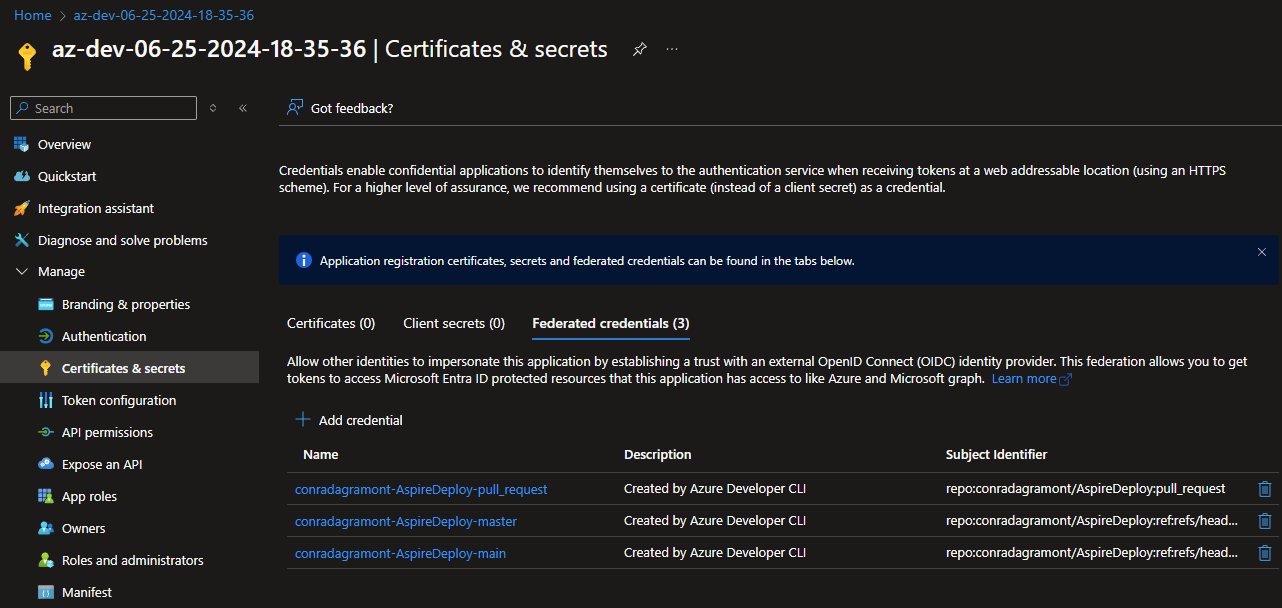
Within the App Registration for your application, you can find the federated credentials also created within the Certificates & Secrets section. Your values will be different
based on the <Organization>-<Repository Name> that you have in GitHub.
The value you see for the federation name below could be concerning since it’s my GitHub name (conradagramont) but that’s because it’s a personal account.
(DevOps) GitHub Actions Deployment
In the previous step, the GitHub Actions workflow should have started. Each time there is a new commit to the repo, this action will take place. For the Quickstart, it will take a few minutes longer the first time as the resources will all be provisioned into Azure. Each other time, depending on if and how many changes are made, will go faster.
When the Actions workflow runs, it will authenticate into Azure based on the “Federation credentials” defined in the App Registration. Then, the wonders of azd cli will take over from there.
(DevOps) What’s in Azure
The following is a summary of what was created in Azure based on the deployment of the .NET Aspire application using GitHub Actions and Azure Developer CLI (azd cli).
The following was created using the ‘azd cli’:
- GitHub Actions variables within the repository
- Entra ID Application Registration (including federated credentials)
The following was created in Azure using ‘GitHub Actions’ (which calls the azd cli):
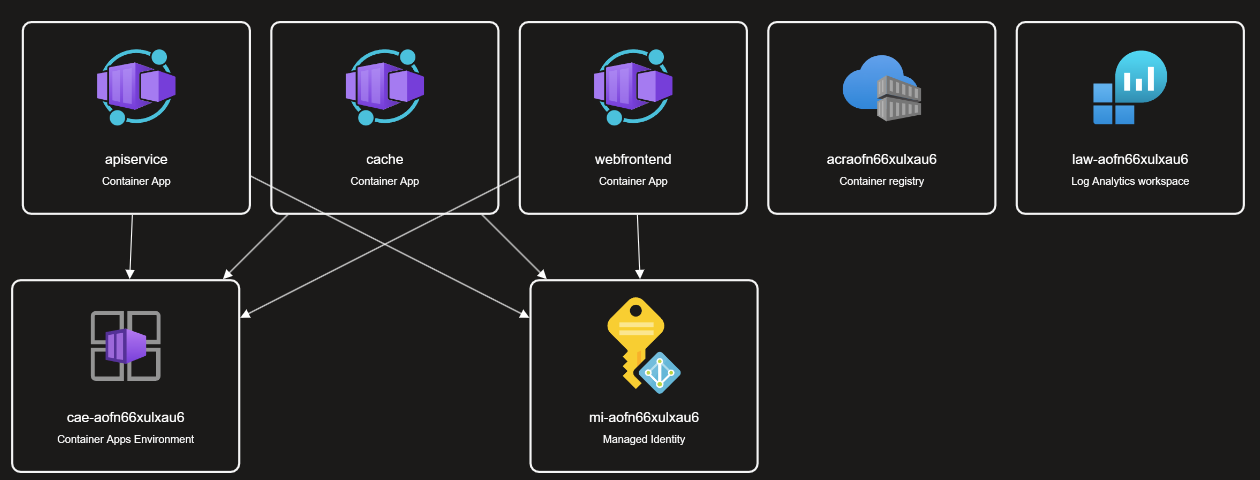
- Resource Group
- Container registry
- Container App – For the Web frontend
- Container App – For the API service
- Container App – For the Cache Service
- Container Apps Environment
- Log Analytics workspace
- Managed Identity
- Tags for the resources
- aspire-resource-name : apiservice
- aspire-resource-name : cache
- aspire-resource-name : webfrontend
- azd-env-name : dev
- azd-service-name : apiservice
- azd-service-name : cache
- azd-service-name : webfrontend
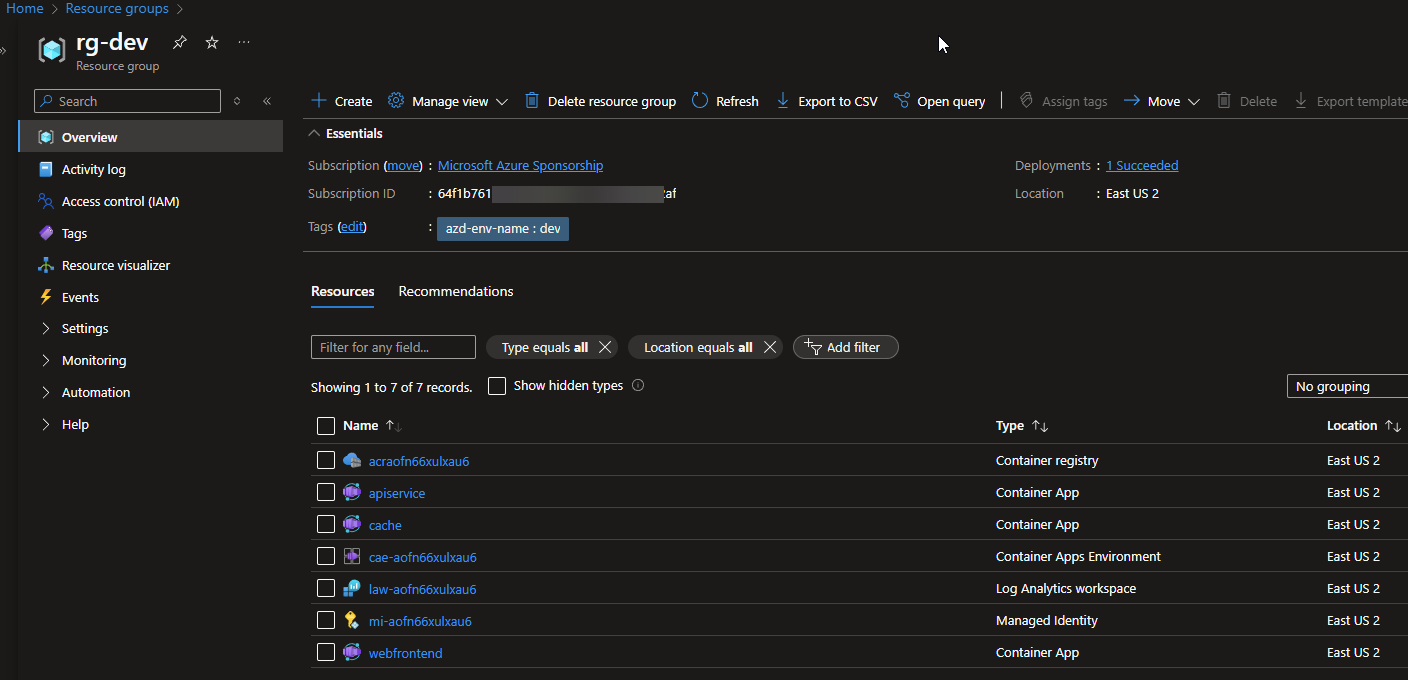
Here you have a visual from within the Azure Resource group:
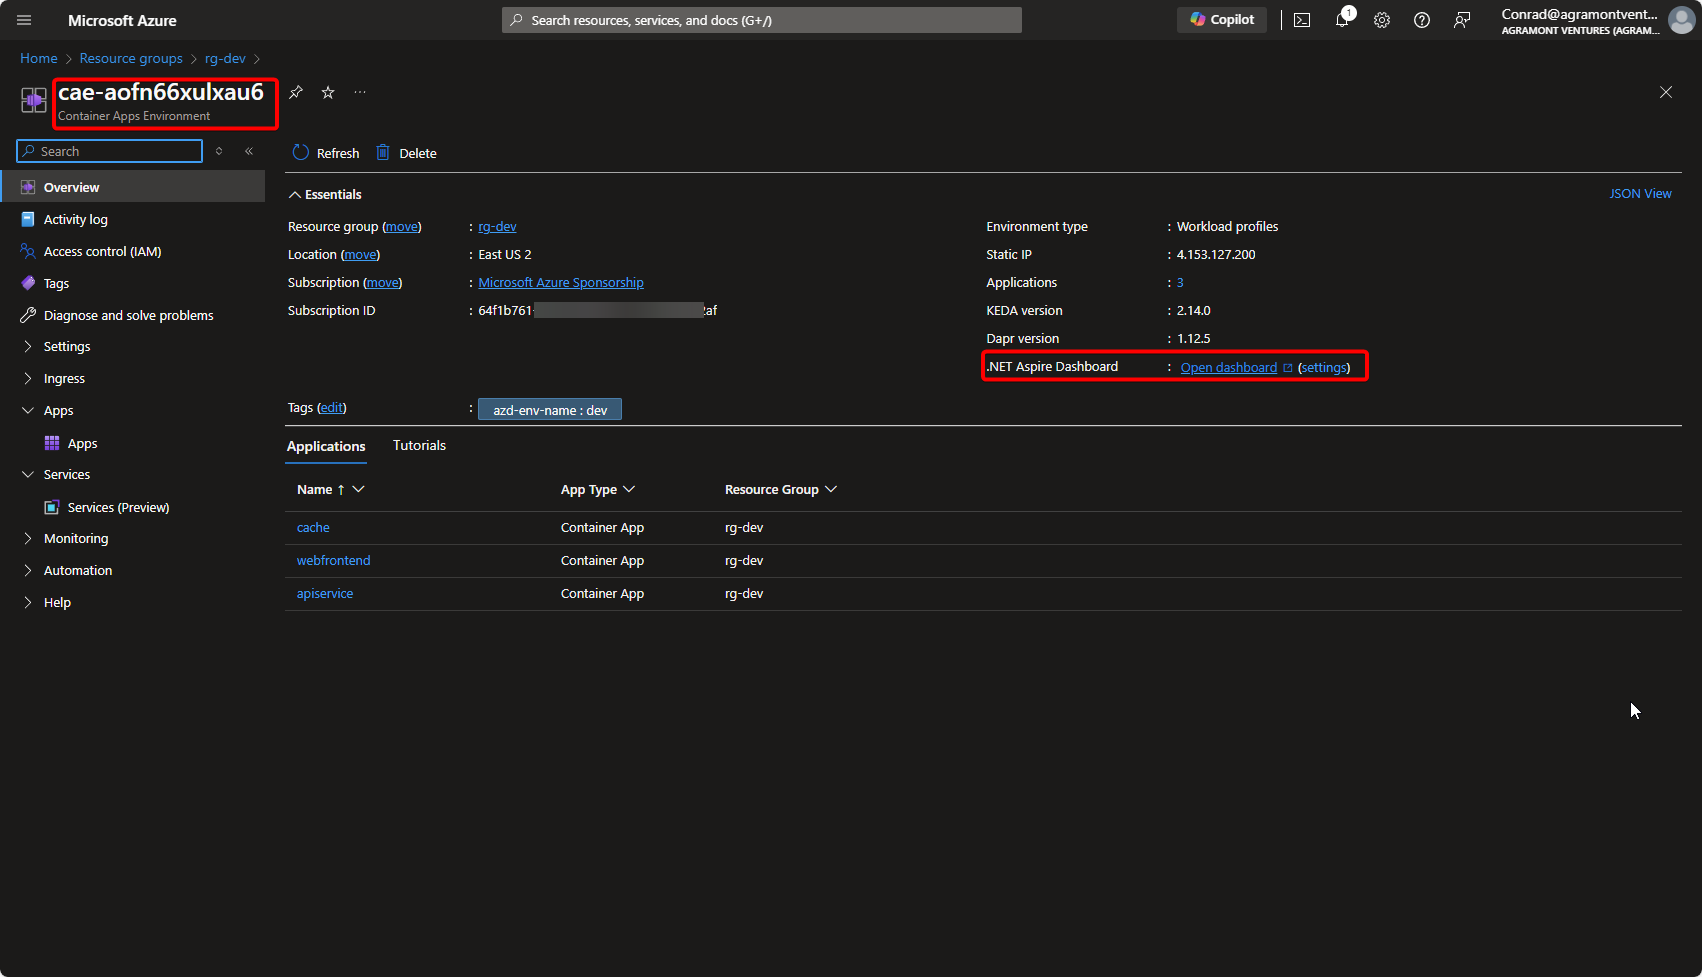
Earlier, we saw a screenshot of the .NET Aspire dashboard. To see this now running in Azure, within the Resource Group view that was created for us, select
the Container Apps Environment (in our case it was named cae-aofn66xulxau6) and you’ll see a
link for Open dashboard for .NET Aspire Dashboard.
Also from within the Resource Group that was created for us, select ‘webfrontend’ Container App. From here, you’ll see a link to the public Application Url that was dynamically created (later, you can add a custom domain and record to meet your needs).
In our case (here is a reference but not active), the URL is: https://webfrontend.bluesea-b592a6a5.eastus2.azurecontainerapps.io
(Ops) A peek under the hood
There’s a few things I discovered in writing this post that I wanted to share with you. These are things that you may want to know about or consider as you move forward with .NET Aspire and Azure.
Azure Tags are used to associate “Environment Name” (in our case, we used dev) to the resources created. This is a good practice to help identify resources and something to consider if you
have many projects going on at the same time within the same Azure subscription.
The actual Azure Tag name is azd-env-name and the value is dev (This was the name given when azd pipeline config was ran). This is something that you can see
in the Azure portal when you view the resources created.
When you run the azd pipeline config command, it creates the following within th GitHub repository settings within Security > Secrets & variables > Actions:
- Secrets:
AZD_INITIAL_ENVIRONMENT_CONFIGand azd cli uses this to authenticate. - Variables:
- AZURE_CLIENT_ID
- AZURE_TENANT_ID
- AZURE_SUBSCRIPTION_ID
- AZURE_ENV_NAME
- AZURE_LOCATION
While running azd can be done both locally and in GitHub Actions, the GitHub Actions workflow is the best way to ensure that the deployment is consistent and secure. This is especially true when you have multiple developers working on the same project.
You could have one or more developers that are deploying to Azure directly from their workstation, but this is not recommended for a production environment. Those developers could be using their own Azure subscription via an Azure Dev/Test subscription, and when they’re ready to push their code to GitHub, the GitHub Actions workflow will take over and deploy to the CI/CD pipeline. Not a bad way to work, but it’s best to have the CI/CD pipeline as the primary deployment method. However, this gives developers the ability to test their changes in near CI/CD pipeline conditions before pushing to the main branch.
(DevOps) Cleanup & Start Fresh
At this point, you have some resources running in Azure which may impact your billing and budget. Another advantage of this automated approach is to periodically delete the Azure resource group used in development. No need to add to your Azure billing if it’s not being used (E.g. weekends, holidays, or just scheduled priorities).
This too could be automated, but that’s a future blog post idea.
Deleting the Azure Resource Group will delete all resources within it. This includes the .NET Aspire application, the Azure Container Apps, the Log Analytics workspace, etc. If you have data you need to keep, make sure you have a backup or export it before deleting the Resource Group.
Deleting the Azure Resource Group should be done using the azd down command. If you delete any other way, the GitHub Action will fail the next time it runs.
This also means your deployment of the .NET Aspire application will not get created.
(I’ll explain how to do this below)
Keep in mind the following after you’ve deleted your Azure resources and deployed a new instance:
- All of the new Azure resources deployed will have new unique ID’s and names in some cases
- The URL’s you used to view the .NET Aspire dashboard, web front end, and API’s will have new URL’s
Thus, any of your integrations, documentation, etc. that rely on this will require updating.
Let’s create a new GitHub Actions workflow to do this.
Create a new file named azure-down.yaml in the .github\workflows folder with the following content:
name: Drop Azure resources via AZD down# For more information on this YAML file, please reference blog: https://agramont.net/blog/devops-intro-deploy-net-aspire-azure-github-actions
on:  workflow_dispatch
permissions:  id-token: write  contents: read
jobs:  build:    runs-on: ubuntu-latest    env:      AZURE_CLIENT_ID: ${{ vars.AZURE_CLIENT_ID }}      AZURE_TENANT_ID: ${{ vars.AZURE_TENANT_ID }}      AZURE_SUBSCRIPTION_ID: ${{ vars.AZURE_SUBSCRIPTION_ID }}      AZURE_CREDENTIALS: ${{ secrets.AZURE_CREDENTIALS }}      AZURE_ENV_NAME: ${{ vars.AZURE_ENV_NAME }}      AZURE_LOCATION: ${{ vars.AZURE_LOCATION }}
    steps:      - name: Checkout        uses: actions/checkout@v4
      - name: Install azd        uses: Azure/setup-azd@v0.1.0
      - name: Install .NET Aspire workload        run: dotnet workload install aspire
      - name: Log in with Azure (Federated Credentials)        if: ${{ env.AZURE_CLIENT_ID != '' }}        run: |          azd auth login `            --client-id "$Env:AZURE_CLIENT_ID" `            --federated-credential-provider "github" `            --tenant-id "$Env:AZURE_TENANT_ID"        shell: pwsh
      - name: Log in with Azure (Client Credentials)        if: ${{ env.AZURE_CREDENTIALS != '' }}        run: |          $info = $Env:AZURE_CREDENTIALS | ConvertFrom-Json -AsHashtable;          Write-Host "::add-mask::$($info.clientSecret)"
          azd auth login `            --client-id "$($info.clientId)" `            --client-secret "$($info.clientSecret)" `            --tenant-id "$($info.tenantId)"        shell: pwsh
      - name: Extract Solution Name        id: extract_solution_name        run: |            # Extract the solution name from the .sln file            SOLUTION_NAME=$(ls *.sln | sed 's/\.sln$//')            echo "Solution Name: $SOLUTION_NAME"            echo "SOLUTION_NAME=$SOLUTION_NAME" >> $GITHUB_ENV
      - name: Refresh azd env (pulls latest infrastructure provision)        run: azd env refresh --no-prompt        env:          AZURE_LOCATION: ${{ env.AZURE_LOCATION }}        working-directory: ${{ env.SOLUTION_NAME }}.AppHost
      - name: Delete Azure resources (includes resources not built via azd and thus using --purge)        run: azd down --force --purge        working-directory: ${{ env.SOLUTION_NAME }}.AppHost
So you deleted the Azure Resource Group without using azd down and trying to sort out what to do next. You might have an error that looks like this coming back from GitHub Actions:
Run azd deploy --no-promptAnalyzing Aspire Application (this might take a moment...)
Deploying services (azd deploy)
Deploying service apiserviceDeploying service apiservice (Logging in to registry)  (x) Failed: Deploying service apiservice
ERROR: failed deploying service 'apiservice': logging in to registry: failed logging into container registry, token: failed getting ACR token: Post
Since our focus of deployment in this post is via GitHub Actions, we’re going to create a new GitHub Actions workflow to force the deployment of the .NET Aspire application.
You won’t need to use this on a regular basis, but this will at least resolve the issue. It’s the same as our first workflow, but we’re only going to tell azd provision to deploy the infrastructure and ignore that fact we haven’t changed the configuration.
Create a new file named azure-force-deploy.yaml in the .github\workflows folder with the following content:
name: Force Deploy Azure resources via AZD provision# For more information on this YAML file, please reference blog: https://agramont.net/blog/devops-intro-deploy-net-aspire-azure-github-actions
on:  workflow_dispatch
permissions:  id-token: write  contents: read
jobs:  build:    runs-on: ubuntu-latest    env:      AZURE_CLIENT_ID: ${{ vars.AZURE_CLIENT_ID }}      AZURE_TENANT_ID: ${{ vars.AZURE_TENANT_ID }}      AZURE_SUBSCRIPTION_ID: ${{ vars.AZURE_SUBSCRIPTION_ID }}      AZURE_CREDENTIALS: ${{ secrets.AZURE_CREDENTIALS }}      AZURE_ENV_NAME: ${{ vars.AZURE_ENV_NAME }}      AZURE_LOCATION: ${{ vars.AZURE_LOCATION }}
    steps:      - name: Checkout        uses: actions/checkout@v4
      - name: Install azd        uses: Azure/setup-azd@v0.1.0
      - name: Install .NET Aspire workload        run: dotnet workload install aspire
      - name: Log in with Azure (Federated Credentials)        if: ${{ env.AZURE_CLIENT_ID != '' }}        run: |          azd auth login `            --client-id "$Env:AZURE_CLIENT_ID" `            --federated-credential-provider "github" `            --tenant-id "$Env:AZURE_TENANT_ID"        shell: pwsh
      - name: Log in with Azure (Client Credentials)        if: ${{ env.AZURE_CREDENTIALS != '' }}        run: |          $info = $Env:AZURE_CREDENTIALS | ConvertFrom-Json -AsHashtable;          Write-Host "::add-mask::$($info.clientSecret)"
          azd auth login `            --client-id "$($info.clientId)" `            --client-secret "$($info.clientSecret)" `            --tenant-id "$($info.tenantId)"        shell: pwsh
      - name: Extract Solution Name        id: extract_solution_name        run: |            # Extract the solution name from the .sln file            SOLUTION_NAME=$(ls *.sln | sed 's/\.sln$//')            echo "Solution Name: $SOLUTION_NAME"            echo "SOLUTION_NAME=$SOLUTION_NAME" >> $GITHUB_ENV
      - name: Force Provision Infrastructure if Deploy Application fail        run: azd provision --no-prompt --no-state        env:          AZURE_LOCATION: ${{ env.AZURE_LOCATION }}        working-directory: ${{ env.SOLUTION_NAME }}.AppHost
If you try the following, the deployment will still fail. I thought I’d mention it here so you don’t waste time trying to figure out why it’s not working.
- Create a new Azure Resource Group in the same subscription and region as the original
- Create a new Azure Resource Group in the same subscription and region as the original. Add the same tags as the original Resource Group.
I was going to add the following to the CI/CD yaml file to handle this situation, but perhaps the application does have a deployment problem and should crash.
Here is what I crafted, but as an example, but I think it’s best to leave it out:
      - name: Deploy Application        id: deployapp        run: azd deploy --no-prompt        working-directory: ${{ env.SOLUTION_NAME }}.AppHost
      - name: Force Provision Infrastructure if Deploy Application fails        if: ${{ failure() && steps.deployapp.conclusion == 'failure' }}        run: azd provision --no-prompt --no-state        working-directory: ${{ env.SOLUTION_NAME }}.AppHost
      - name: Deploy Application (Second attempt)        if: ${{ failure() && steps.deployapp.conclusion == 'failure' }}        run: azd deploy --no-prompt        working-directory: ${{ env.SOLUTION_NAME }}.AppHost
(DevOps) How long does it take?
Here’s a quick rundown of how long given actions took (based on my experience, Internet speed, Workstation performance, etc.) and they rouneded to the minute:
- .NET Aspire project creation: 2 minutes
- Initial GitHub setup: 2 minutes
- azd init and azd pipeline config: 2 minutes
- Running
azd provision --no-promptlocally: 4 minutes - First GitHub Actions run: 5 minutes
- GitHub Actions subsequent runs (no changes): 2 minutes
- Deletion of Azure Resource Group: 30 minutes
What’s Next
Now we have the basics of taking a .NET Aspire application and automating the deployed to Azure using GitHub Actions. There is a more granular level of control of deployment using Bicep which will Generate Bicep from .NET Aspire project model.
Is learning how to develop and operate with .NET Aspire worth the additional learning curve?
Absolutely!
I’ve seen many developers build very cool applications on their dev workstations, and maybe even developed in an Azure subscription with a team. However, when
it’s time to move to production and deal collaborate with the Ops team (you know I love ya’ll), this is where things slow down or break best practices (especially security & monitoring).
.NET Aspire maybe new (tooling and architecture), but it’s built on proven GitHub Actions and Azure services.
A GitHub repository has been created for this post which includes the code and scripts used in this post.
You can find it at GitHub - conradagramont/AspireDeploy
Screenshots may be hard to read. I stored the high-res versions in the repository for this post in the ‘screenshots’ folder. If you need a better view, please go to the repository.