Building modern web and mobile applications frequently have delays and might require refactoring due to a variety of reasons. Especially when leveraging cloud resources such as Microsoft Azure. Here are a few examples:
- UI/UX Design to Implementation: This frequently happens when a design (e.g. built with Figma) has been created and approved to move forward. However, the implementation could stall if the development team selected a UI implementation beyond their experience. An example would be a strong .NET Development team but more skilled in backend services.
- Developer Access to Cloud resources: This is a big one. When cloud resources is a key aspect of the application, getting the resources required to develop and test both locally and then in the cloud for CI/CD can take lots of time. This can impact the project schedule, costs, and the time for both the developers and the IT/Ops team that may need to provision those resources.
- Dev to Production: Translating what was required from development to production from an infrastructure and configuration can lead to an even greater impact. Let’s not forget the testing, staging, and other deployments in between.
While my proposed solution isn’t going to fix all of these issues, it does reduce the impacts by creating some separation of concerns and moving production deployment earlier into the development process.
While the focus on the frontend for AstroAspire is using Astro, many of the same mechanisms can be used with other Nodejs applications. I’ll do my best to call those variations as they come along.
Table of Contents
- Introducing AstroAspire
- What is it?
- What does it do?
- Screenshot Walkthrough
- Defining the project
- GitHub Repo
- Pre-requisites
- Running the app
- Next Steps
Introducing AstroAspire
AstroAspire is both a collection of sample projects and content (including this blog post) to show and explain how to leverage Astro and .NET Aspire working together.
For the first deliverable, we have one called “Basic” which shows a working example of how Astro and .NET Aspire work together, before we add in other service connectors for Azure Key Vault, MySQL on Azure, Redis on Azure, etc.
Here’s the general approach:
- UI/UX Design to Implementation: Astro is great for building modern website which can be a mix of static pages, server side rendered pages, and even API endpoints. It has a great framework and includes powerful yet straightforward approach to utilizing components from React, Preact, Svelte, Vue, and more! Now a project team can leverage resources that specialize in modern web implementation. While AstroAspire will focus more on Astro, the same approach could be used with other frameworks.
- Developer Access to Cloud resources: .NET Aspire simplifies the process of developers using cloud resources quickly for local developers that will create consistency between those developers and into their CI/CD process. It doesn’t force those developers to go full microservices, a monolith, or even a mixture. Whatever the design pattern selected, it’s only going to help orchestrate things locally and once deploy to Microsoft Azure. (At the time of this post, the only target cloud is Azure but there seems to be signs that this will expand) .
- Dev to Production: .NET Aspire is going to reduce issues between development environments and via CI/CD as it coordinates deployment resources locally that will mirror into production. This puts the resources needed for the developers quickly in their hands, but the IT/Ops team can still manage and control the downstream deployments (e.g. production) via environment variables and even some automated deployment scripts using Bicep.
What is it?
AstroAspire Basic is a simple (or shall I say, “Basic”) application in what it does, but the main objective is to show the fundamentals of using Astro and .NET Aspire. In later section, there are lots of screenshots that show the application itself and what the magic of the .NET Aspire Dashboard looks like. Including once deployed to Azure.
What does it do?
For AstroAspire Basic, these are the key capabilities:
- Astro static page that calls Astro API (then the .NET AstroAspire API)
- Astro static page that calls the .NET AstroAspire API directly which required CORS configuration
- Astro page and configuration for Server-Side Rendering (SSR) with Nodejs/Express
- Adding Astro build directly into .NET Aspire as a NPM app
- Integration with Open Telemetry, including showing span and event writing
- Update package.json scripts to work with nodemon and Open Telemetry
- Docker configuration (dockerfile) to work with Astro build process
- Deployment validated via direct from Windows 11 desktop to Azure
- Deployment validated via GitHub Actions to Azure (yml files included)
Screenshot Walkthrough
Going in a bit of a different order here than in my usual posts, we’re going to start with the end, and then go backwards. Let’s start with what the application looks like when we run it and what we see on the backend using the .NET Aspire Dashboard.
The User/API Side
Sometimes it’s nice to see what it all looks like before you take the time to actually keep reading or clone the repo. So, let’s do a little screenshot walkthrough.
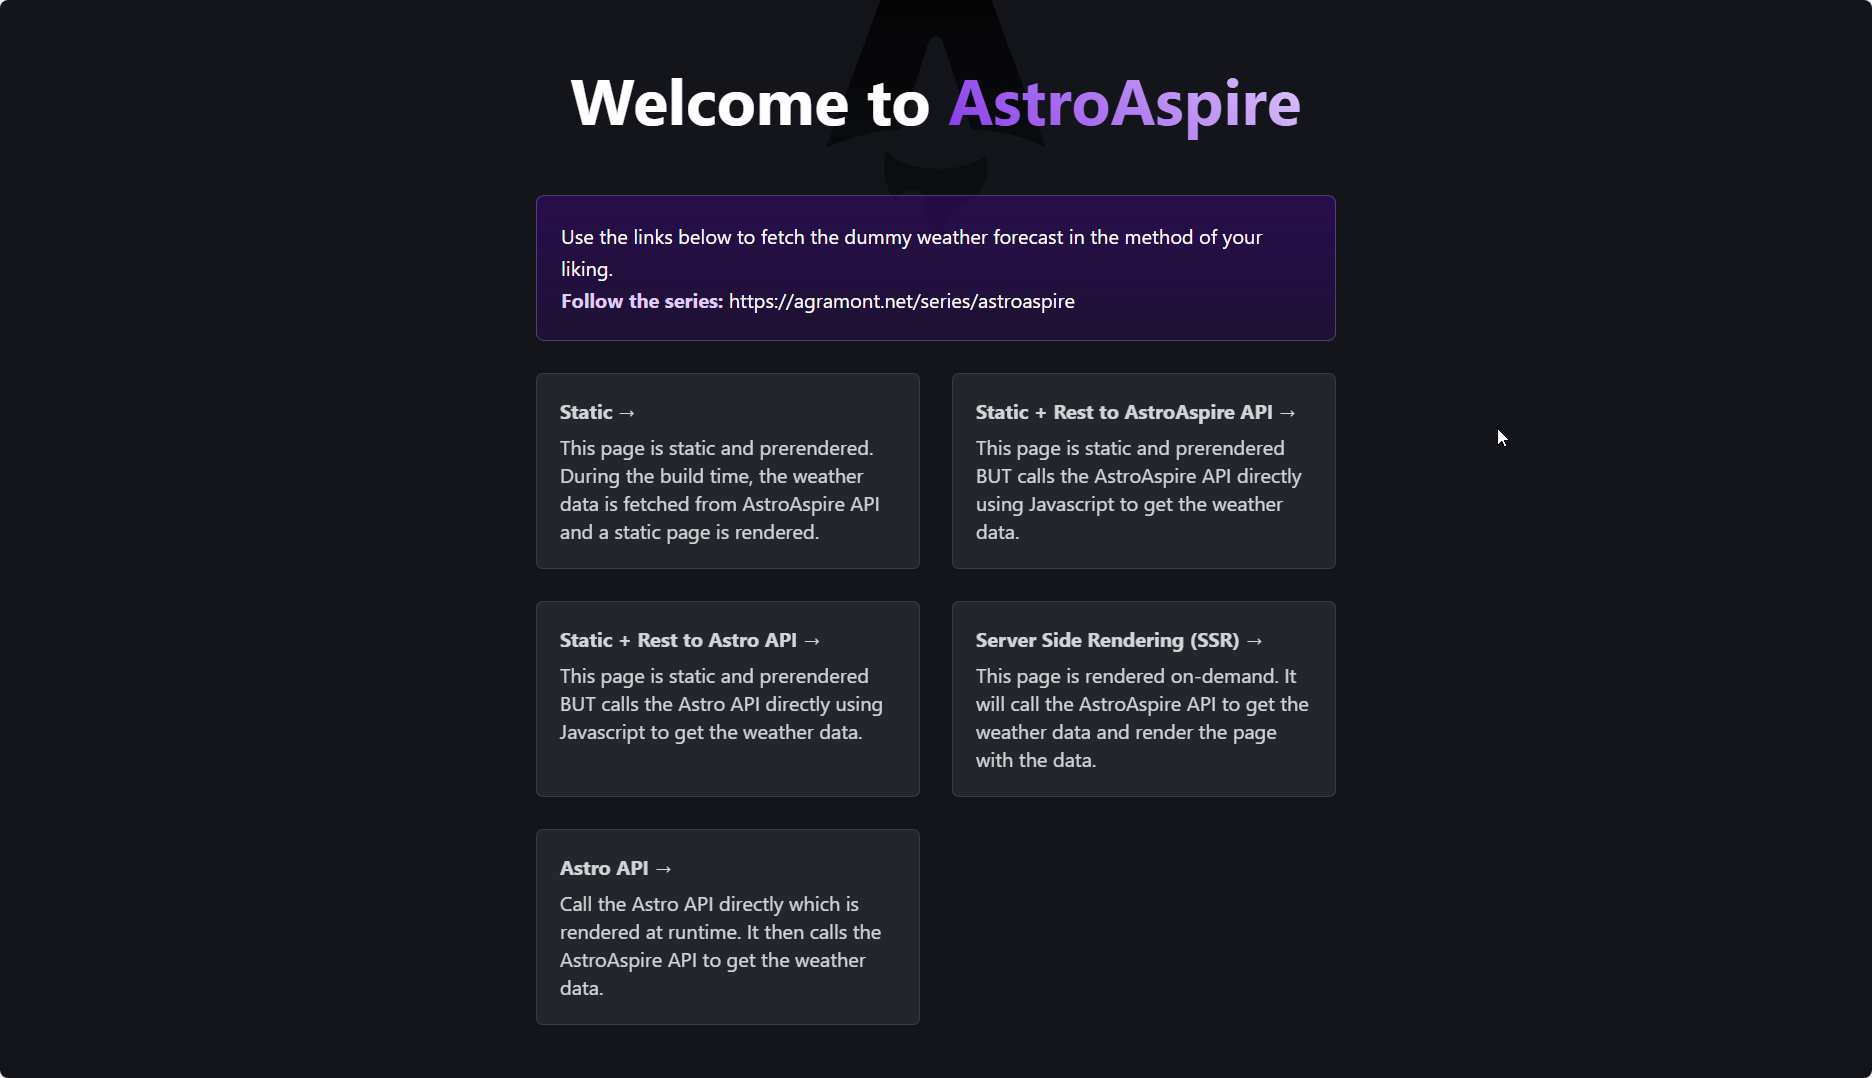
Index
When we run the application, this is the first page you’ll see. Pretty basic, but you’ll see we have a card with links to the pages that render and show data in different ways.
Static
This page is static and prerendered. During the build time, the weather data is directly inserted into the page. Nothing special really.
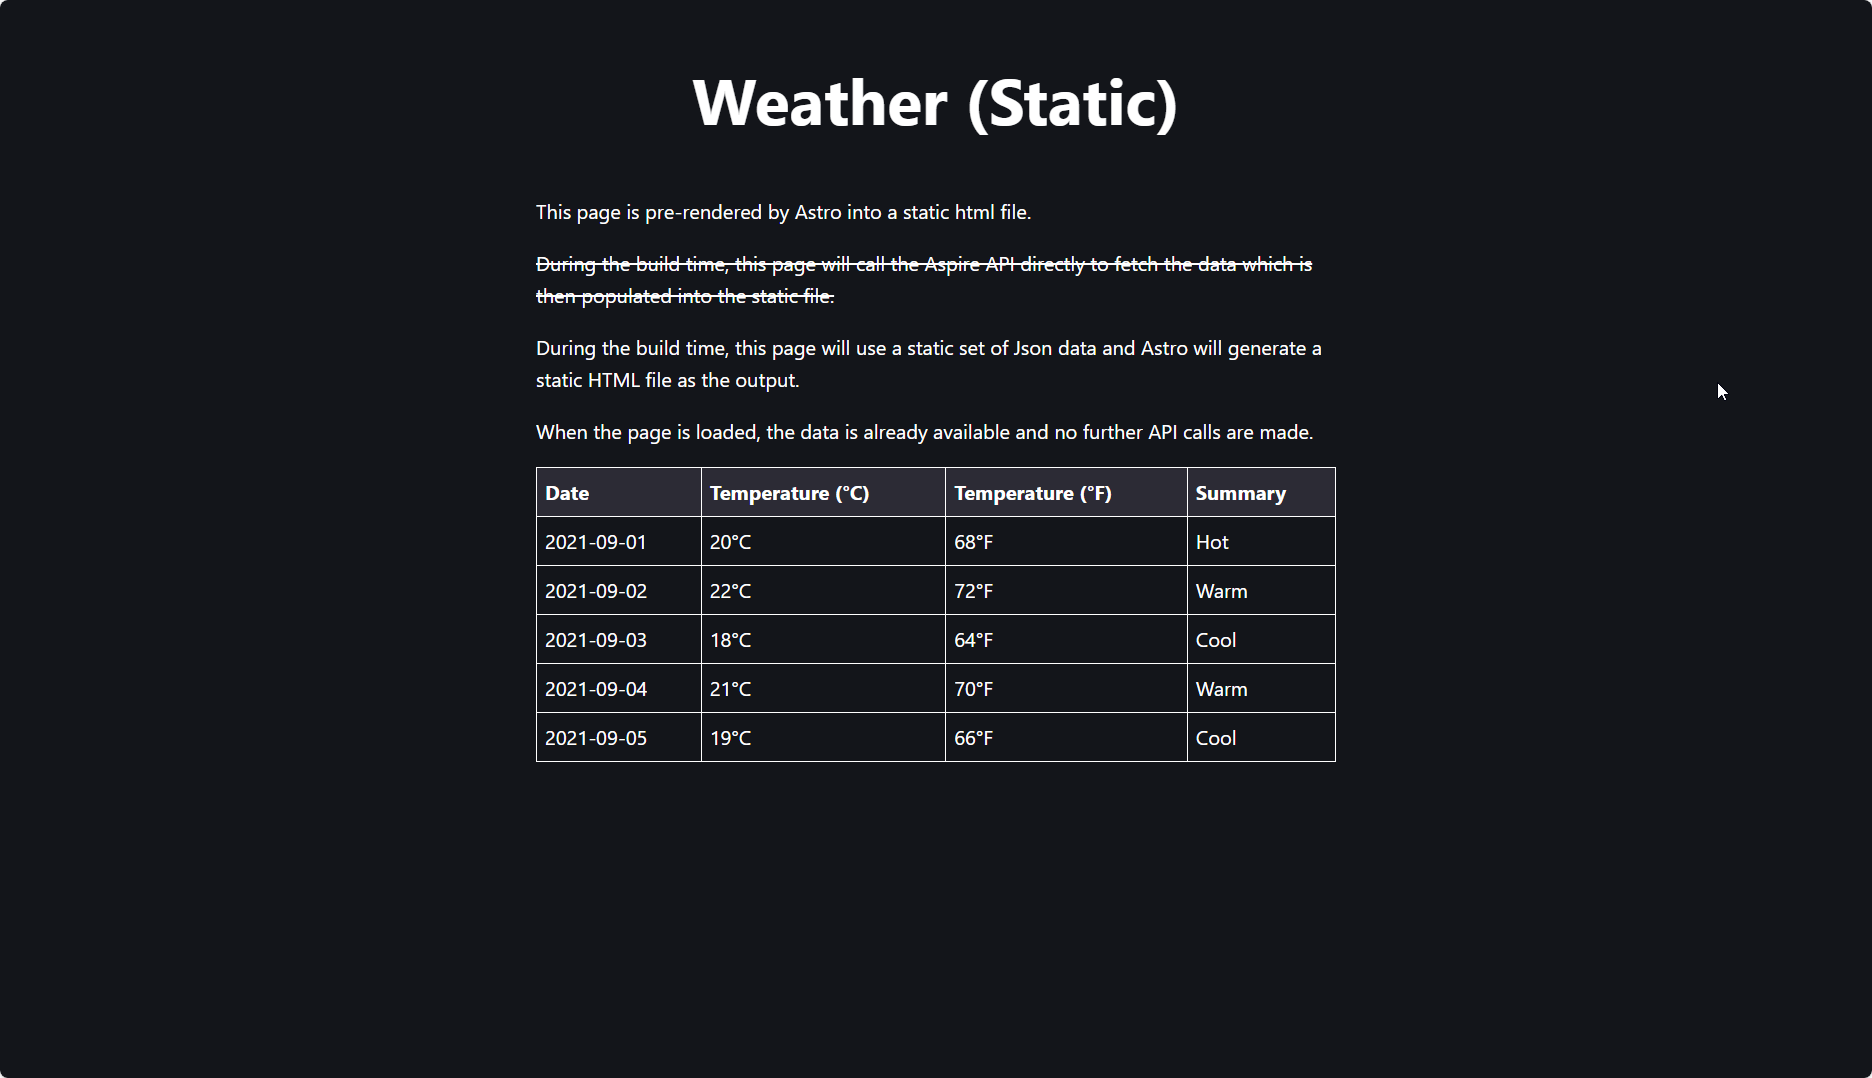
My original intent was to call the AstroAspire API to get the data which then Astro creates a static HTML page for. This worked in local development, but when I deployed to Azure, regardless if did it locally or via GitHub Actions, the API call was not made. It makes sense since the deployment (using azd up) isn’t complete with the API running. For now, I just directly insert the data into the page. I’ll fix this in a later post if I can.
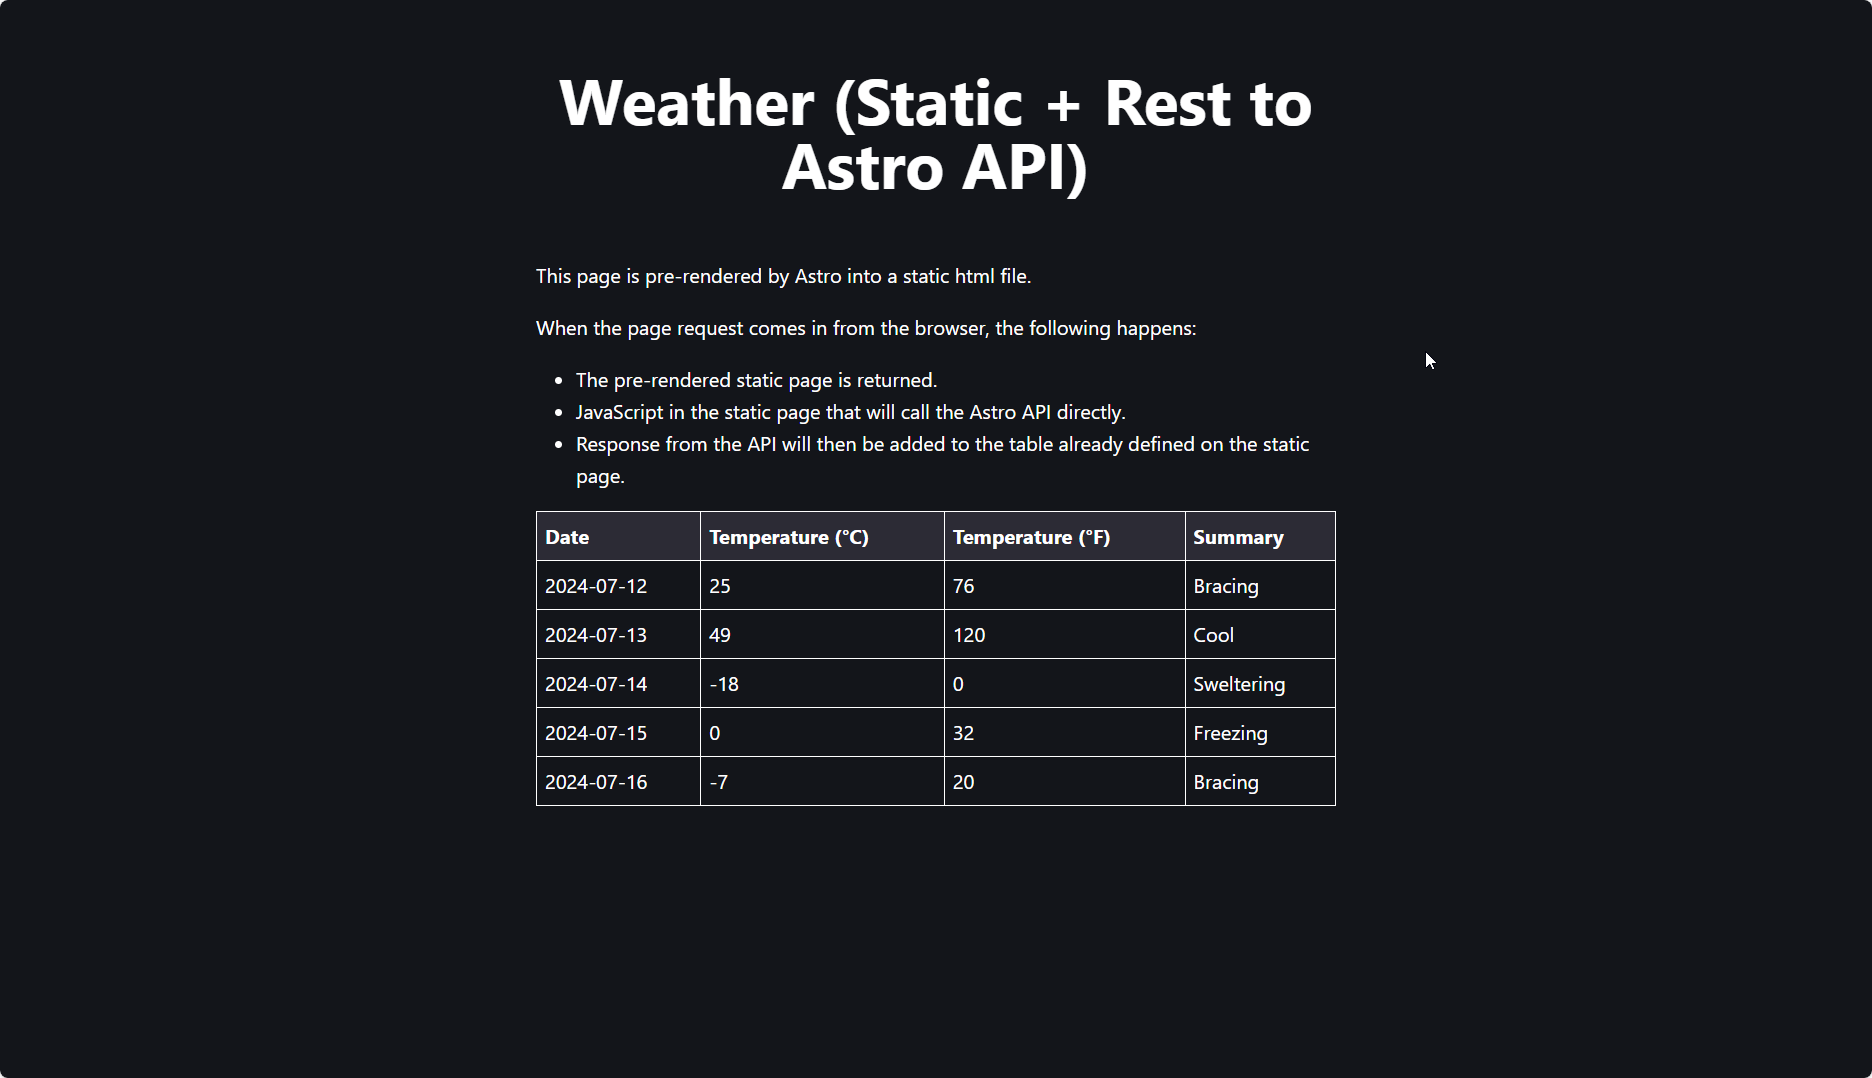
Static + Rest to AstroAspire API
This page is static and prerendered BUT calls the AstroAspire API directly using Javascript to get the weather data.
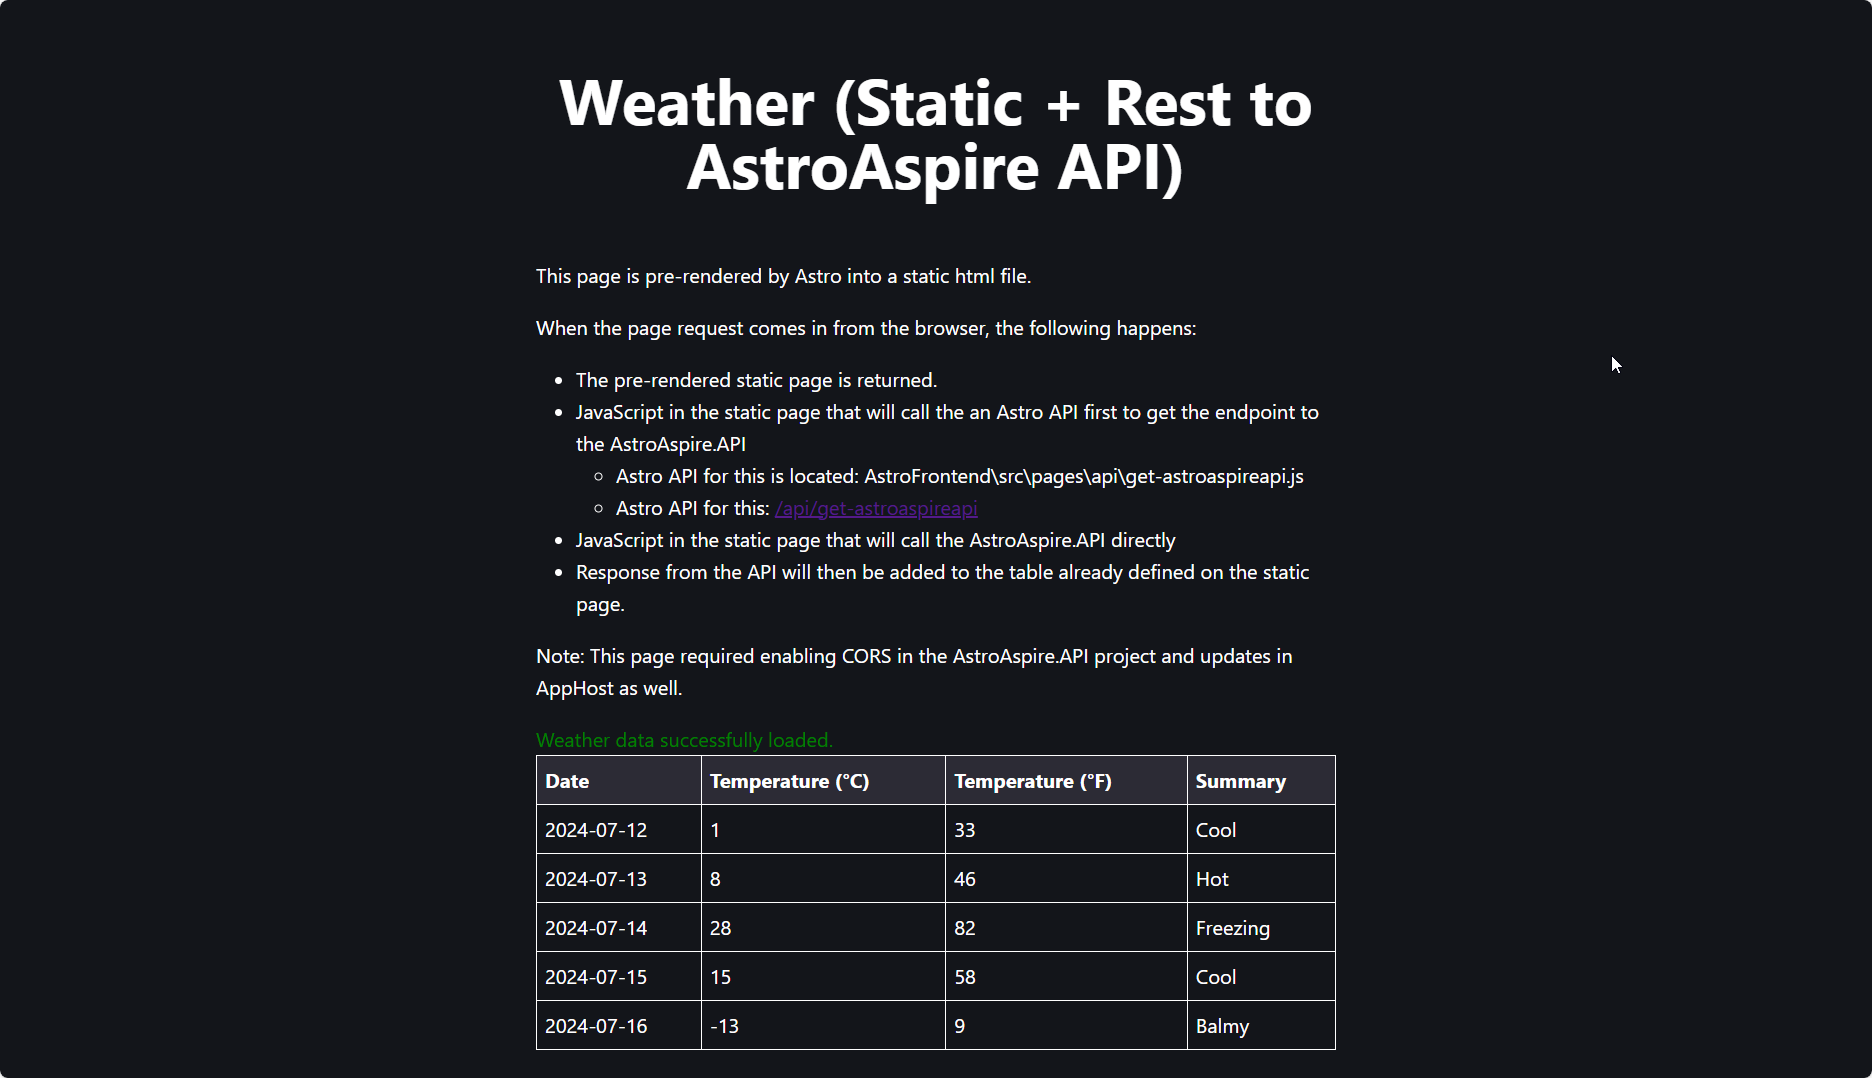
To do this, it requires handling CORS within the AstroAspire API to work locally and extra configuration in Bicep when deploying into Azure. I’ll cover this in a later post.
Static + Rest to Astro API
This page is static and prerendered BUT calls the Astro API directly using JavaScript to get the weather data. Astro API will then call the AstroAspire API to get the weather data.
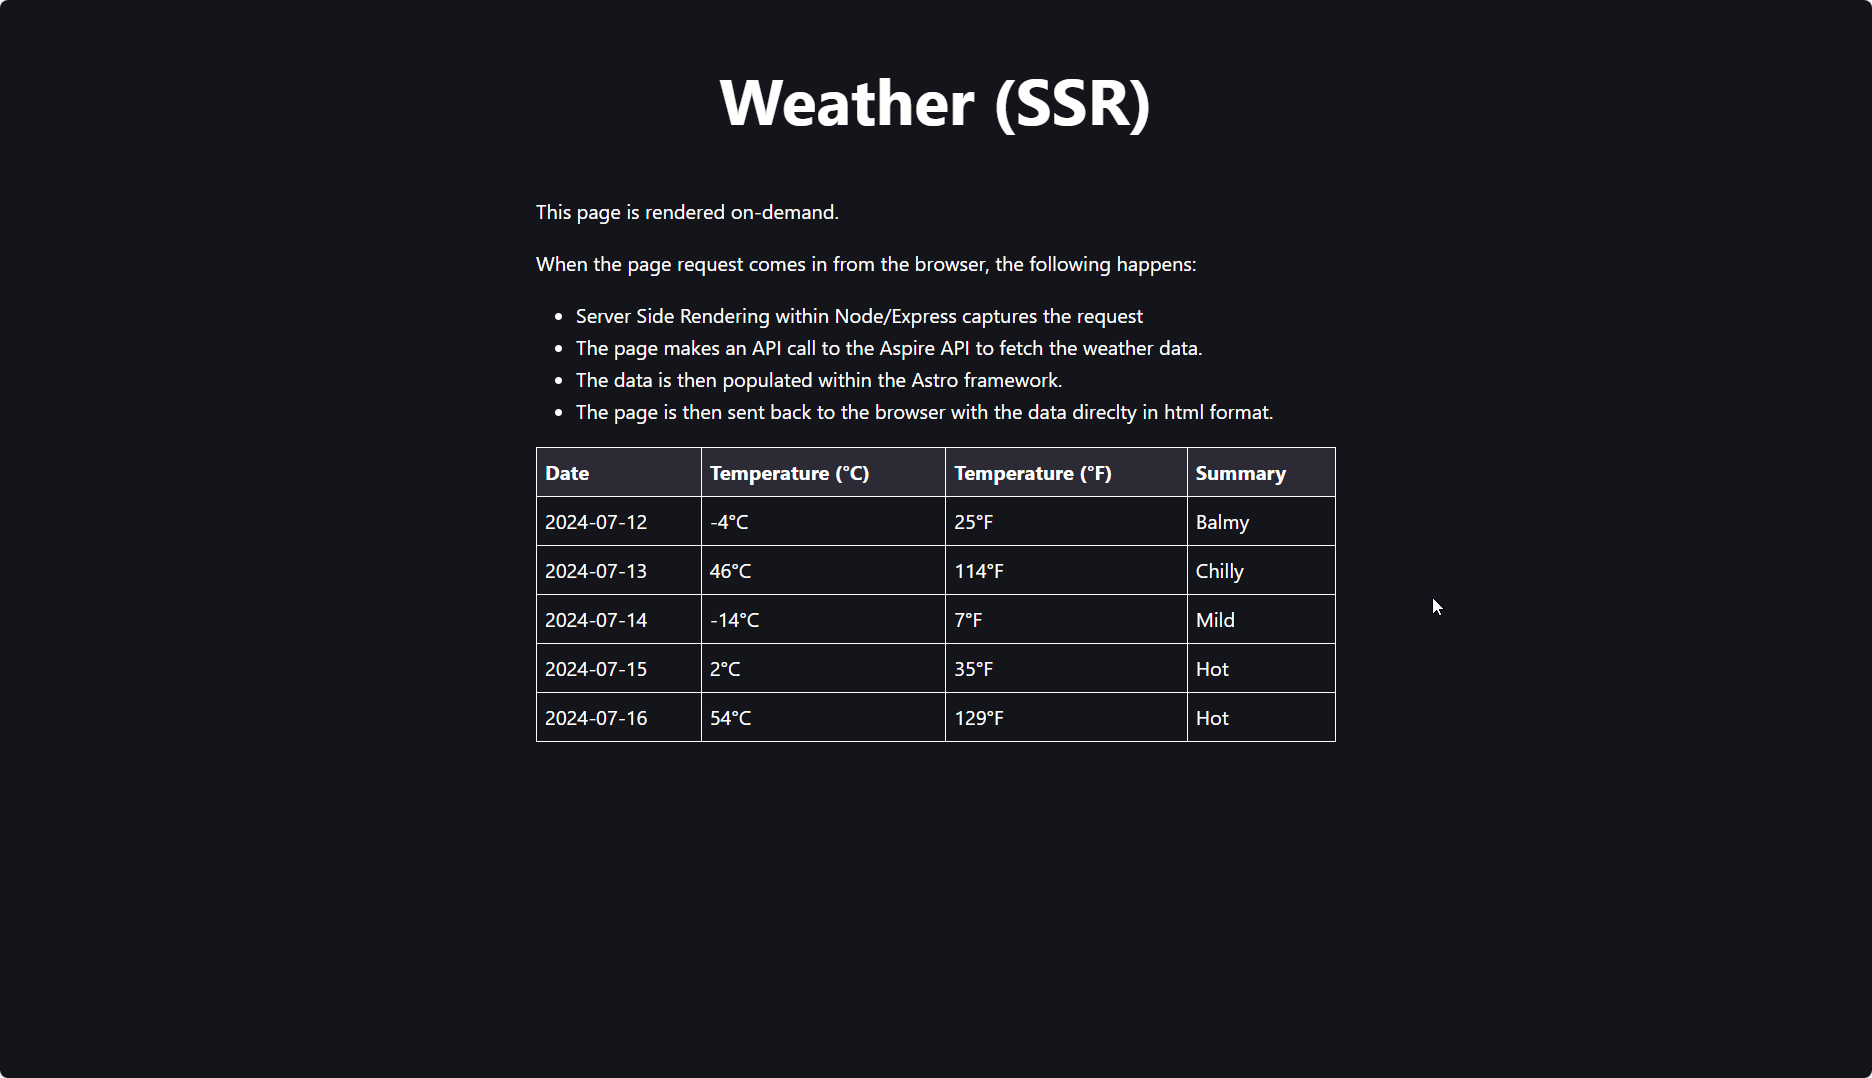
Server Side Rendering (SSR)
This page is rendered on-demand. It will call the AstroAspire API to get the weather data and render the page with the data.
.NET Aspire Dashboard (Running Locally)
One of the great things about the .NET Aspire approach is the Dashboard. Below, we’ll see what some the key pages running locally. In the following section, we’ll see the same the same .NET Aspire Dashboard but after the application has been deployed to Azure.
Resources
Here we can see the resources that are being used by the application. In our case, we have our AstroAspire API (.NET API) and the AstroAspire Frontend (Nodejs/Express) running.
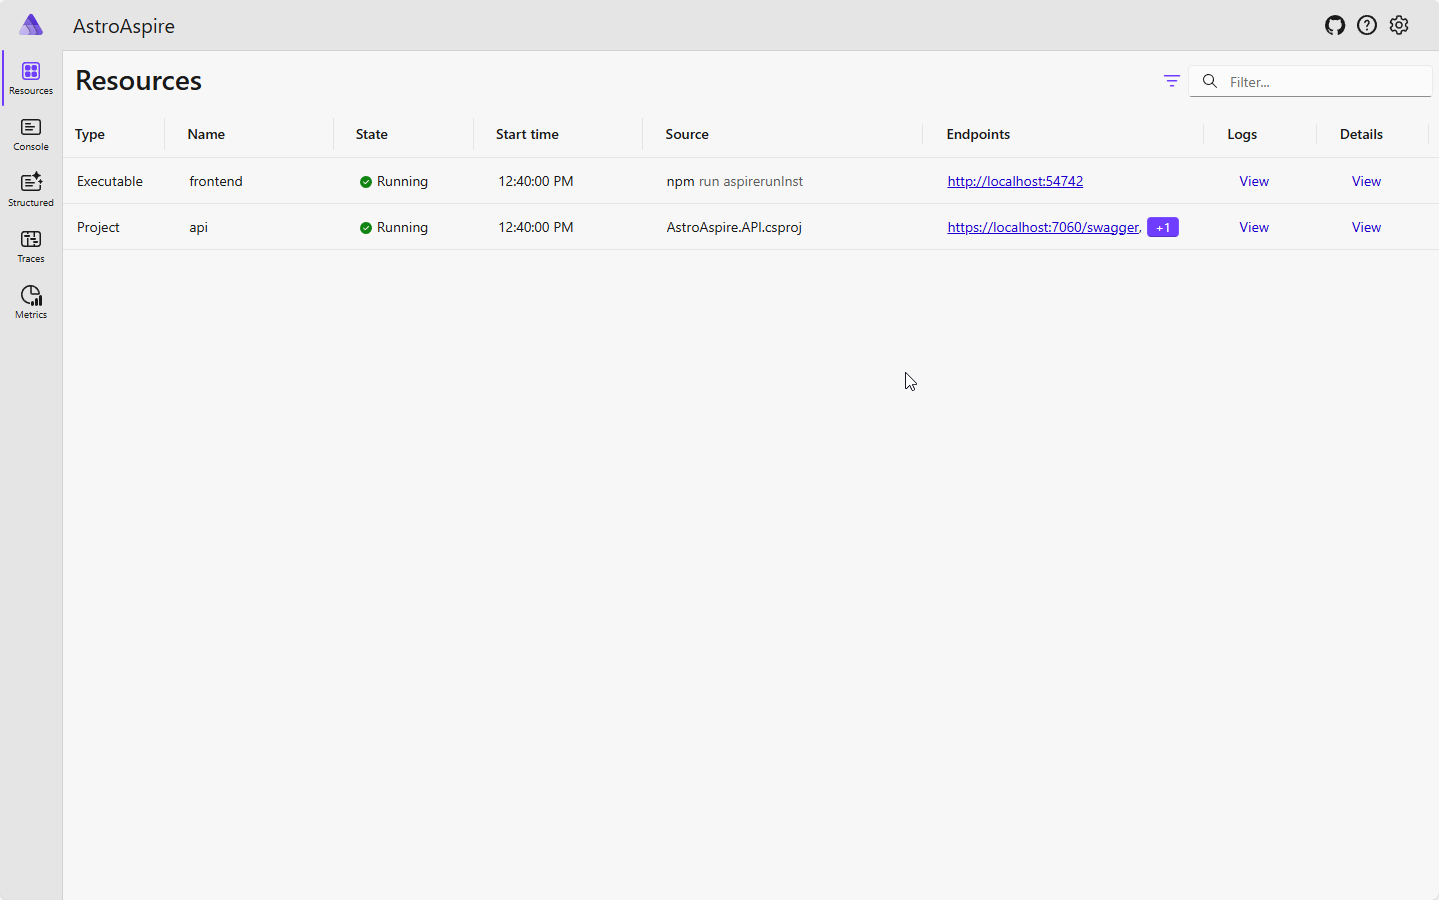
Notice how the resource type for the AstroAspire Frontend is Executable. When we run this locally, the AppHost will start this process directly as an executable. In a later post,
we’ll show and explain how this changes when we deploy to Azure as it will be converted to a docker image/container app. Thus, in deployment to Azure, the resource type will be Container.
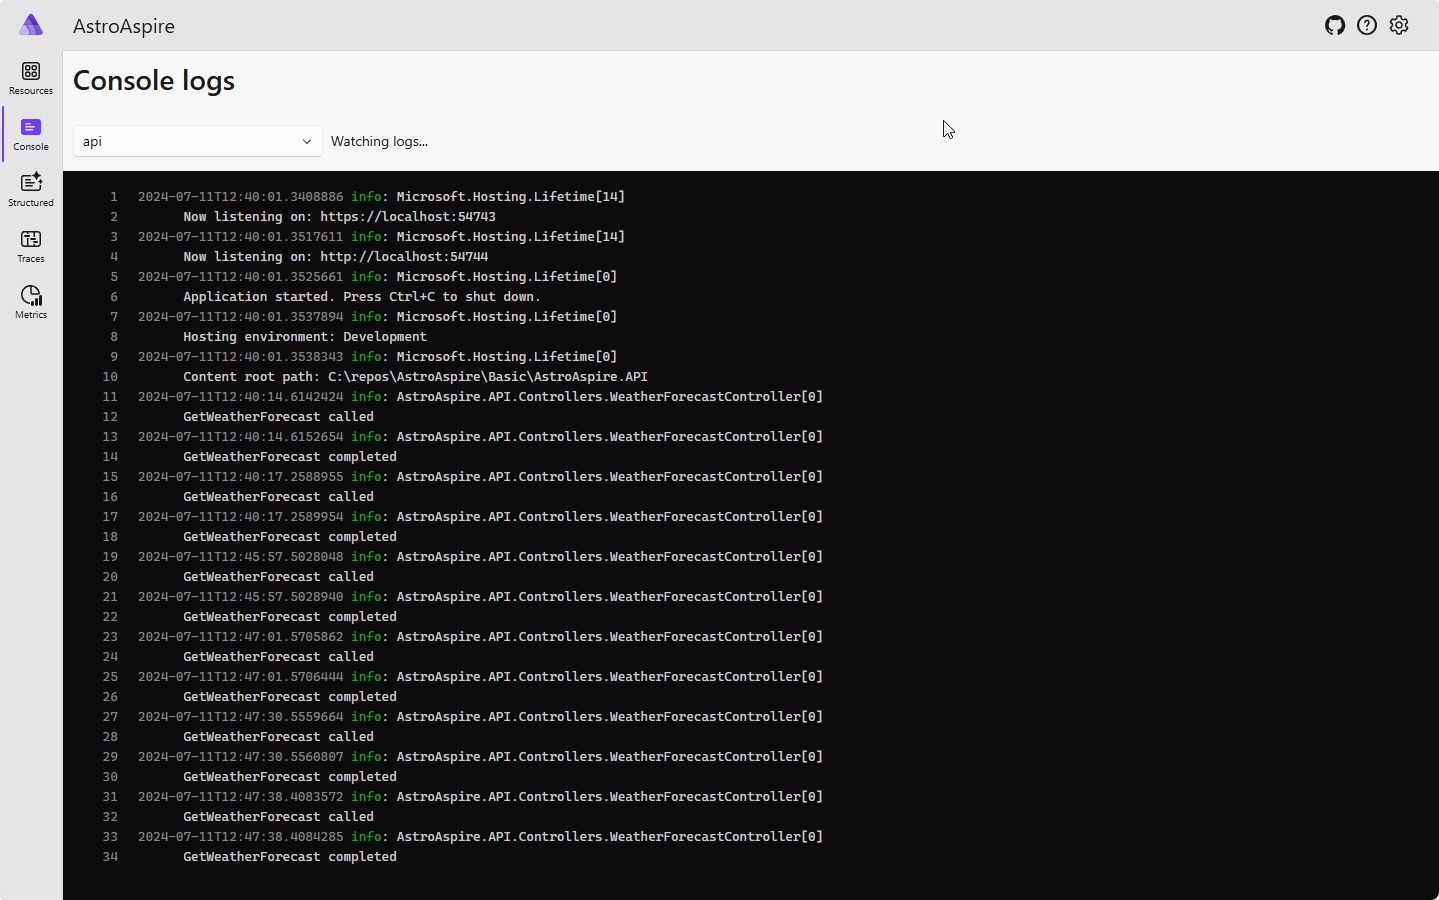
Console: API
The console view shows us what was written out to the console directly and what was written to the Logger which is defined in the .NET Aspire ServiceDefaults (we’ll get into that later).
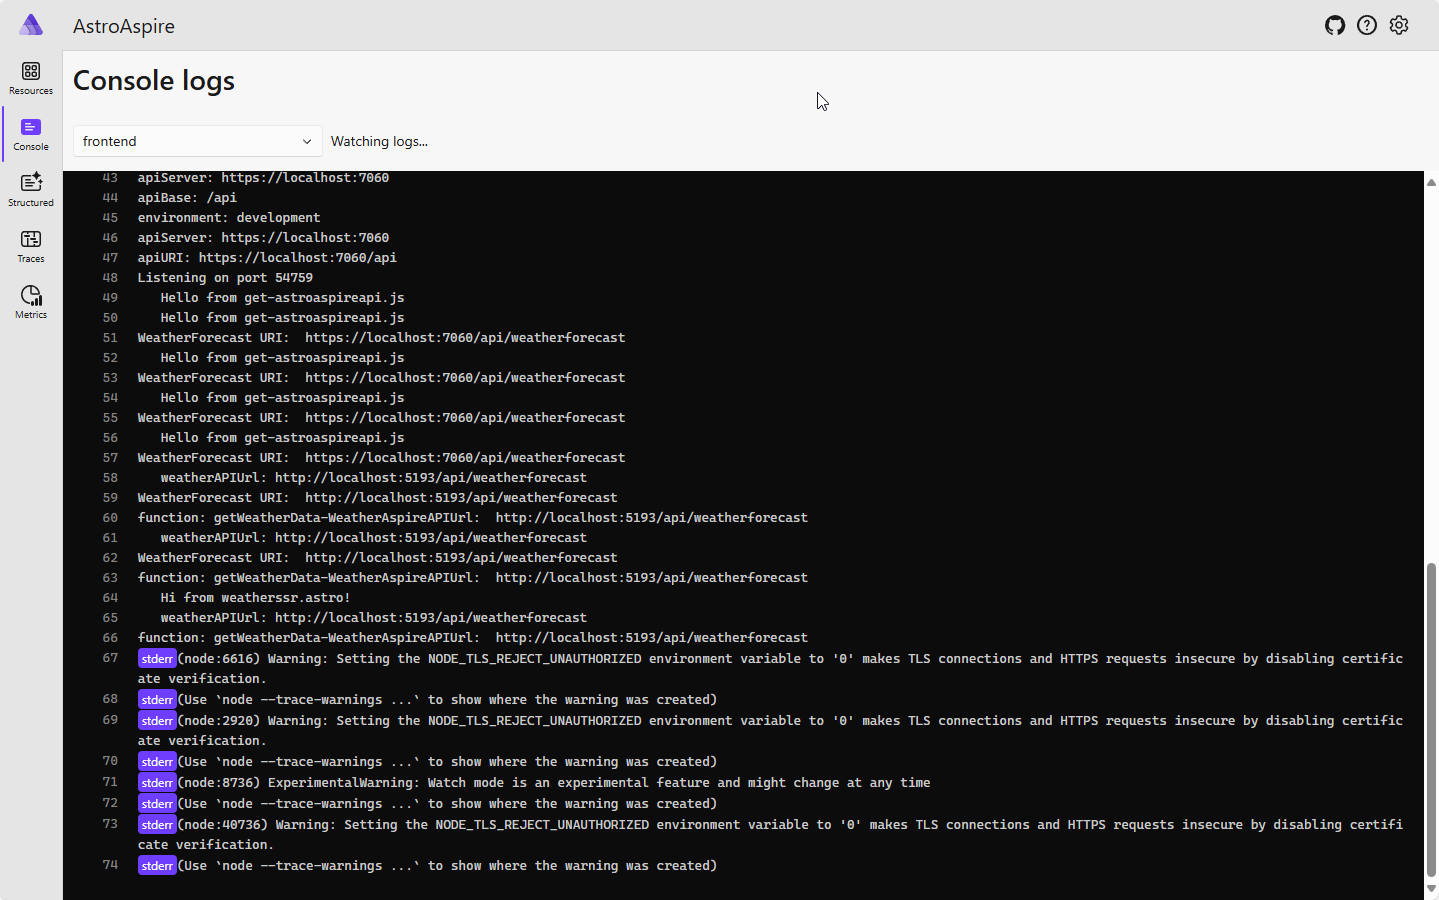
Console: Frontend
Same goes for the Frontend where we’re seeing anything that was using console.log(). We don’t get anything for the static pages. Only the SSR/API (.js) pages are generating information here.
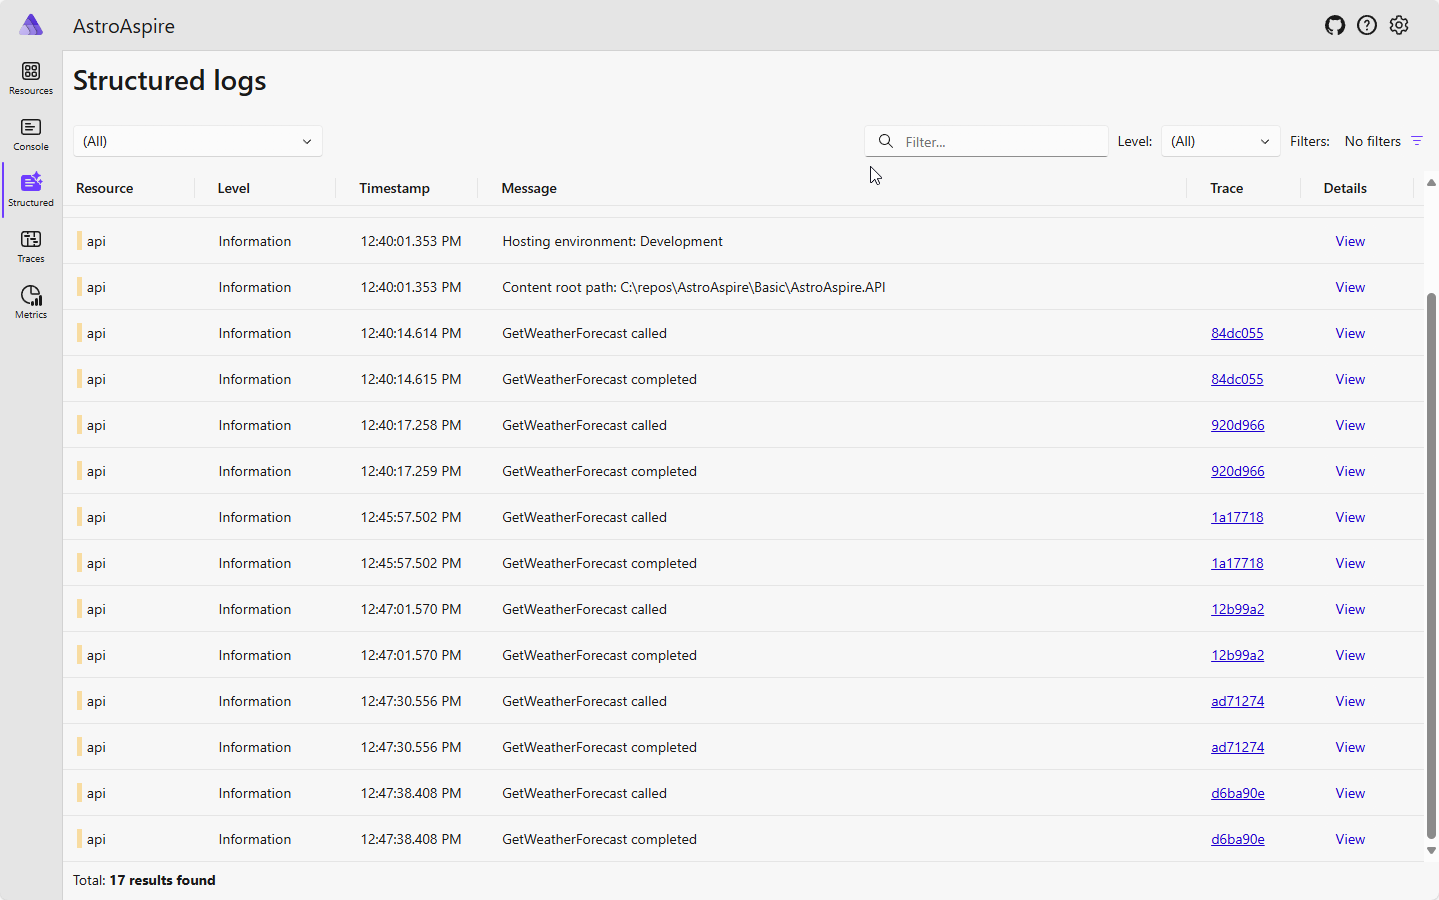
Structured
The structured view are the direct Logger outputs. For the Basic project, I didn’t get the Astro frontend to write to the Logger. Clicking on the “View” link to a given log message will take you to the trace that it was associated with. We’ll look at that next.
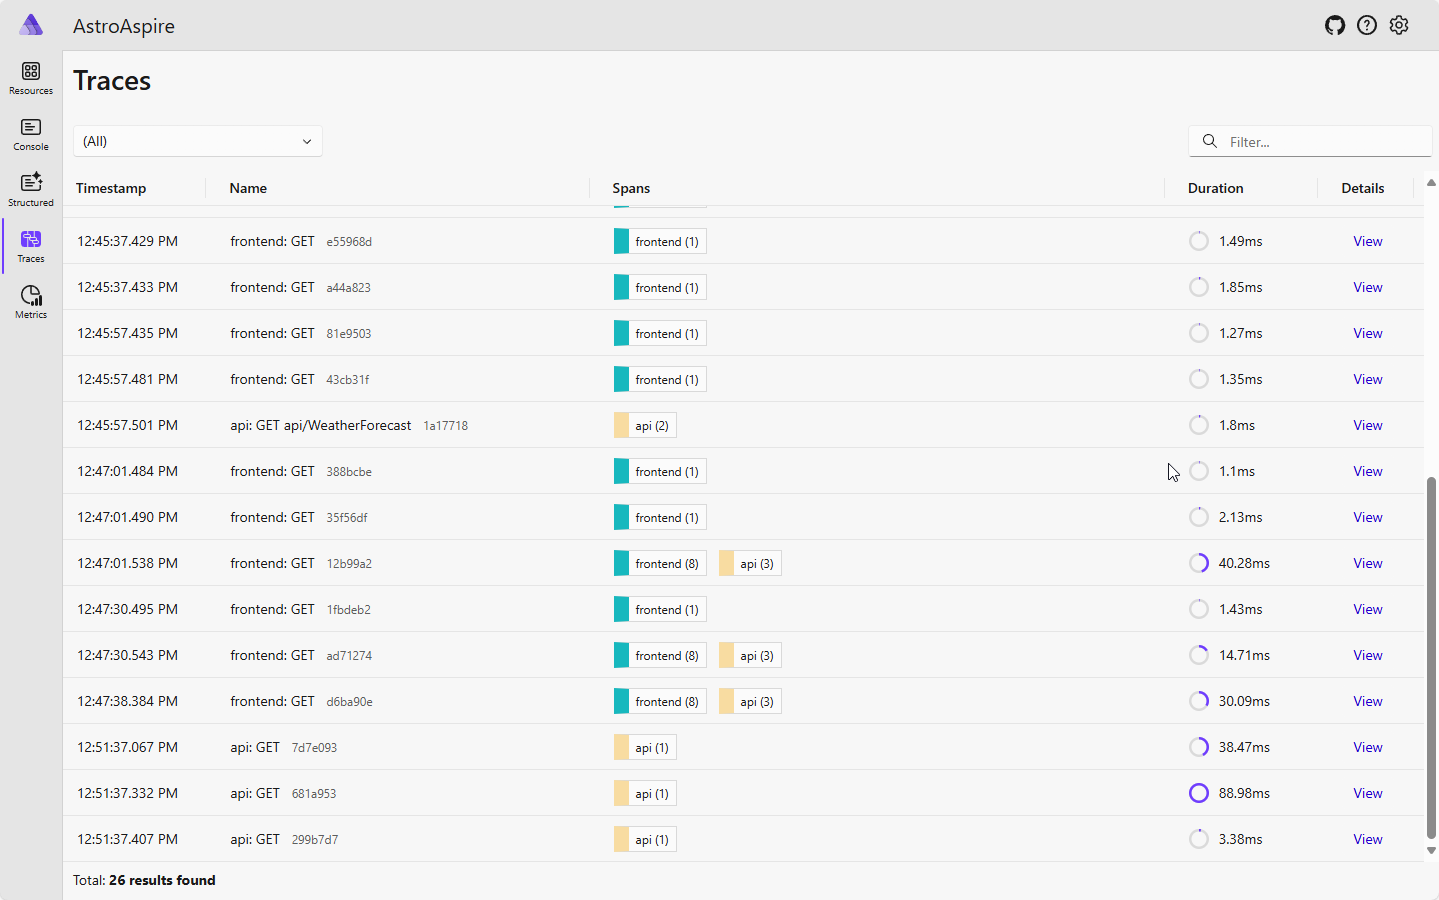
Traces
Tracing capabilities is an amazing capability to have available and coordinated across our services with very little wiring required. I’ll cover that in a later set of posts in this series.
First, we’ll see a collection of traces that show a call to the Nodejs application. Sometimes it’s a simple single action request. You’ll also see where a given trace captures details from multiple actions.
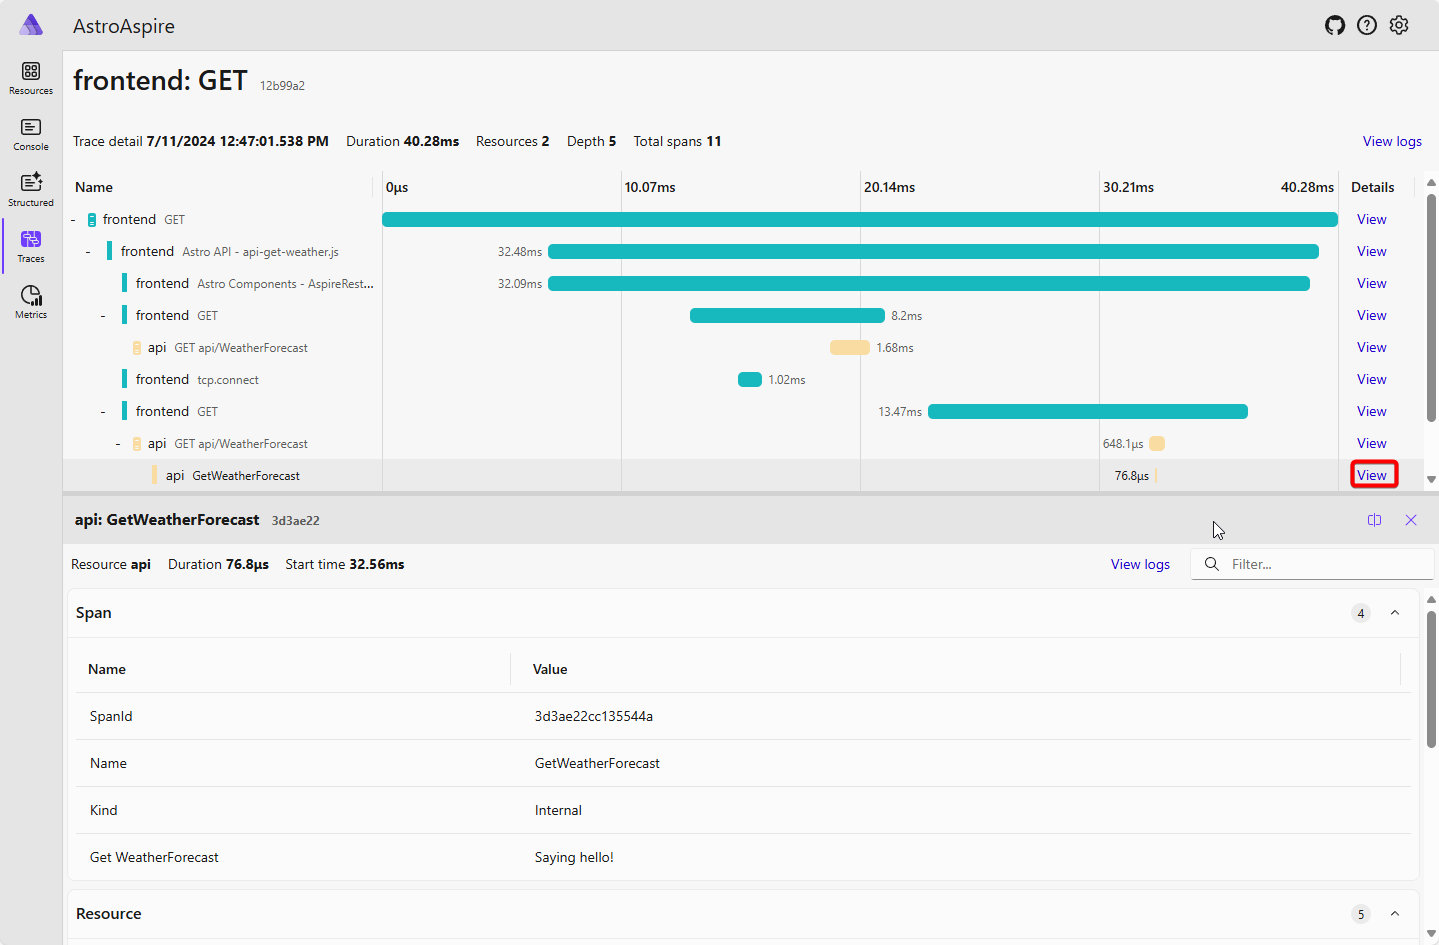
If we select one of those traces, we’ll see a collection of activities that were captured together which includes calling the .NET API.

Furthermore, we can see tracing information that the developer added to capture addition information that could be useful in diagnosing a potential issue.
 When you add in other resources within .NET Aspire, like a database, that has a .NET Aspire provider, we’ll get all that goodness together as well.
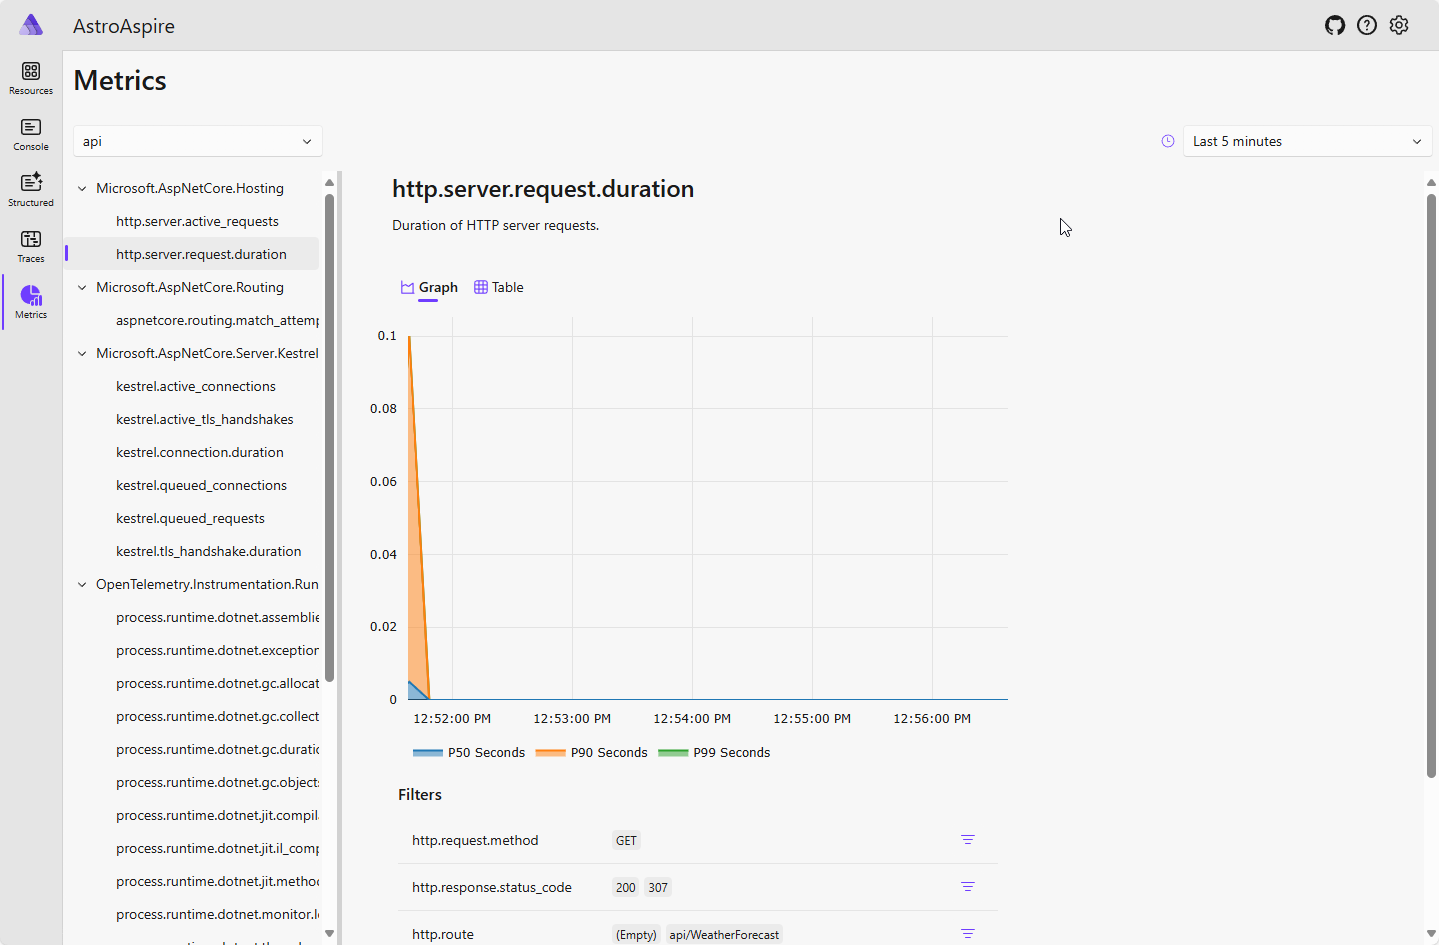
Metrics
The Metrics view within the .NET Aspire Dashboard provides real-time information useful for performance of the services we’ve defined for the application.
Below, we can see the request duration from the HTTP server associated with one of the calls made to the API service. The information can be shown in a graph or table, and the duration of time of our choosing.
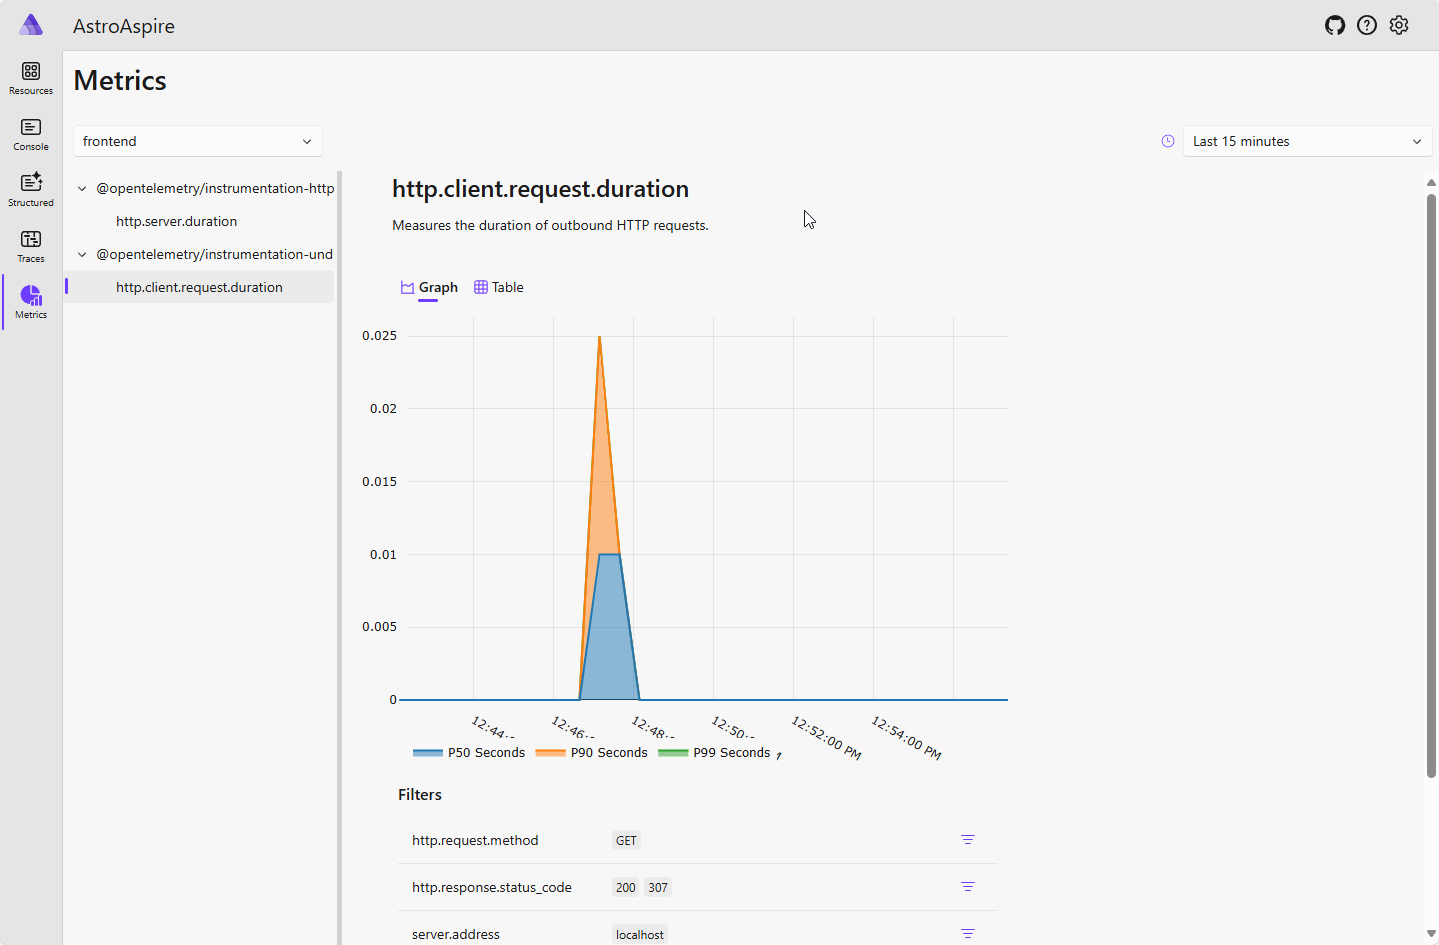
The same is available from our frontend which is provided by the Nodejs/Express implementation that we’ve defined.
.NET Aspire Dashboard (Running in Azure)
In a later post, we’ll walk through deploying the solution directly into Azure. For now, you can see the same solution has deployed an Azure Resource Group and the additional resources required. The API and Frontend of the application are deployed as a Container App for each, and the telemetry data is stored within a Log Analytics workspace.
The .NET Aspire Dashboard is enabled and hosted within the Container Apps Environment.
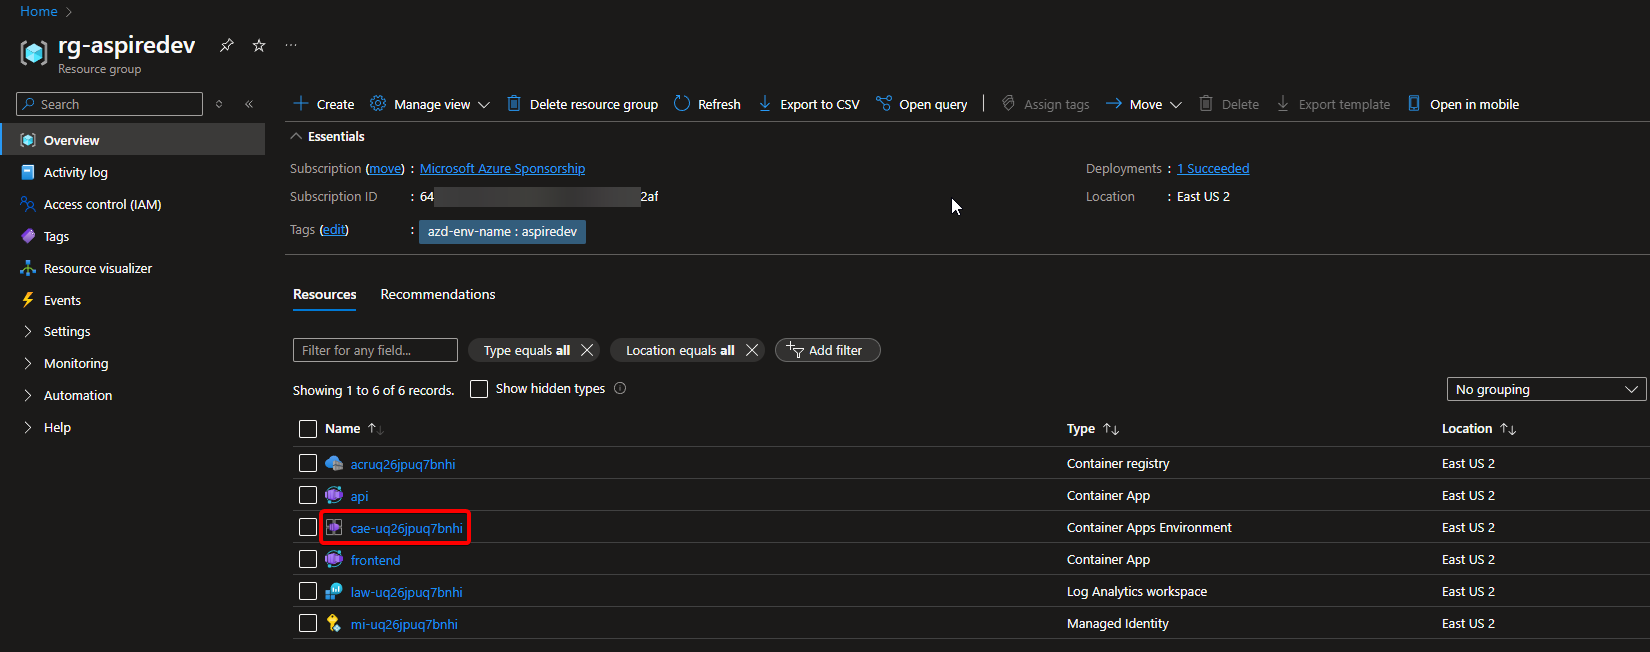
When we click on the CAE resource (highlighted by the red box in the graphic above), we’ll then see a link to the dashboard (highlighted by the red box in the graphic below).
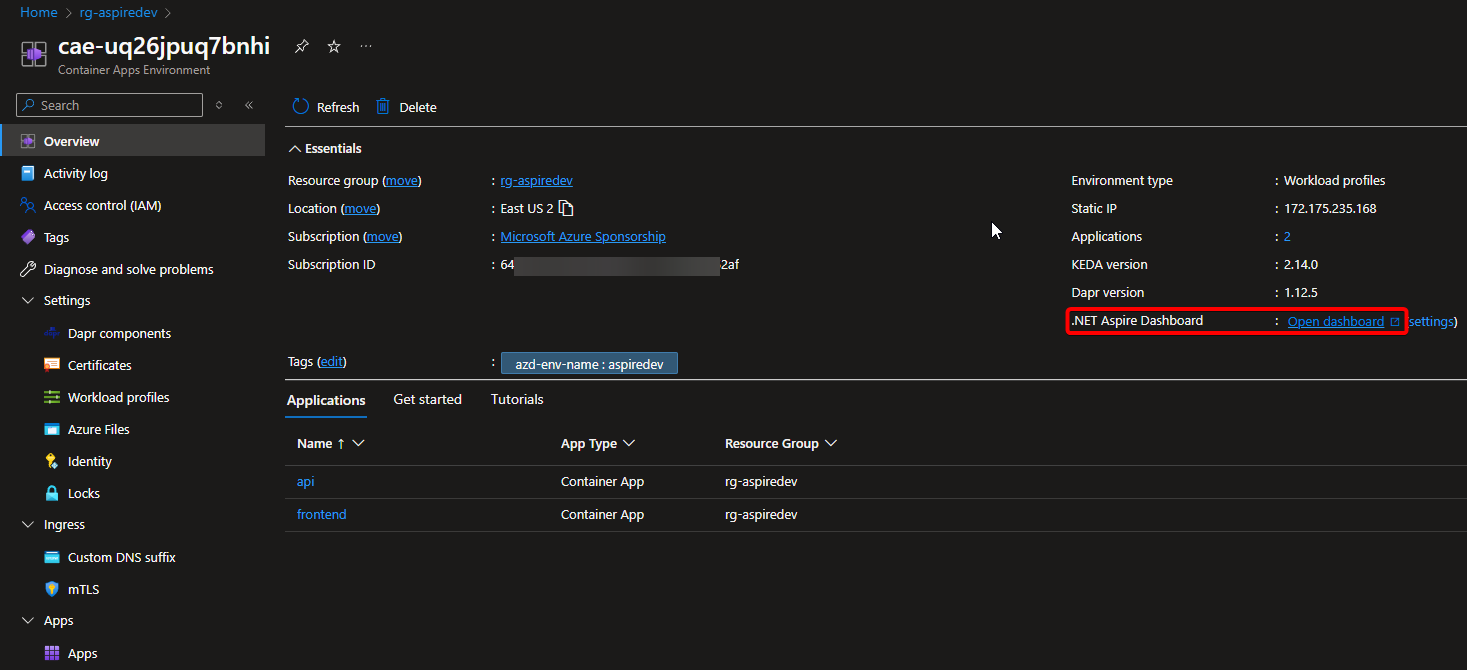
Now we can see the same .NET Aspire Dashboard that we had running locally, also available within our Azure deployment.

Defining the project
The following will help provide insight into the rest of the project as you might be wondering why the project was developed in the way that it was.
Goals
- Easy to learn from: While there is a lot covered in this little project, it’s easy to add more features and integrations that could only make learning this
first
basicapproach difficult to navigate - Be Basic: Use the most basic templates from Astro and .NET tutorials as much as possible
- Deployable: Make sure it works locally, but validate it deploys to Azure from desktop and GitHub Actions
Non-Goals
- Optimize: To make things easy to learn from, there are many places where there is code duplication. It’s not a best practice, obviously, but I wanted to make it easy to follow along for a give page
- UI/UX Goodness: Only the smallest UI tweaks beyond the basic template provided by Astro
- Security: It’s not the focus of this project. I’ll cover this in a later post.
- Testing: It’s not the focus of this project. However, that’s another key feature of .NET Aspire. I’ll cover this in a later post.
Assumptions
- You know enough about development to sort out installing and using the different aspects of the project. Or you might have a development partner that you work with to get to the end result
GitHub Repo
There is a GitHub repository where each variation of AstroAspire will be stored. The first one is called basic, which is in the folder named, “Basic” and can be found
here: GitHub: conradagramont/AstroAspire
Pre-requisites
- .NET 8 SDK
- Node.js - at least version 20.9.0
- Optional Visual Studio Code, Visual Studio 2022 17.9 Preview or any text editor
- Required for local deployment to Azure: You don’t need these for now just to run this project locally
Running the app
If using Visual Studio, open the solution file AstroAspire.sln and launch/debug the AstroAspire.AppHost project.
NOTE: The frontend folder/code will not be visible in Visual Studio. However, the app will run and you can see the output in the browser.
If using the .NET CLI, run dotnet run from the \Basic\AstroAspire.AppHost directory.
Next Steps
Now that you understand why and what AstroAspire is, the next post in the series will explain:
- How the application functions
- How a Nodejs application like Astro participates with .NET Aspire
- Where the shared telemetry information is configured (which I found to be the most exciting thing to see working)
Later posts in this series will provide additional walkthroughs on scaffolding the same components and then you can add the components you want to use. I’ll also cover specific topics that require additional details to handle such as CORS configuration.
I hope you enjoy this series and find it helpful in your journey to building applications with Astro and .NET Aspire!