We’ll use AstroAspire (basic) to show how to share resources together within a .NET Aspire solution including Astro as our Nodejs application.
Using the Basic version of AstroAspire, we’re going to see how a Nodejs application like Astro can harness the benefits of .NET Aspire.
In a previous post, I explained why I started all of this and walked through the finished goods. Now, we’re going to breakdown how it all works and why it was developed in the way that it was.
A later post in this series will explain how to start this same kind of project from the beginning. For now, we’ll breakdown the AstroAspire basic project.
GitHub Repo
There is a GitHub repository where each variation of AstroAspire will be stored. The first one is called basic, which is in the folder named, “Basic” and can be found
here: GitHub: conradagramont/AstroAspire
Pre-requisites
- .NET 8 SDK
- Node.js - at least version 20.9.0
- Optional Visual Studio Code, Visual Studio 2022 17.9 Preview or any text editor
- Required for local deployment to Azure: You don’t need these for now just to run this project locally
NOTE: While the project will open and work with Visual Studio 2022 (make sure to have the latest version), I did all of the project work using command line tools (running on Windows 11 and using PowerShell 7).
Table of Contents
- .NET Aspire Basics
- Astro Pages
- Astro Configuration
- Cross-Origin Resource Sharing (CORS)
- Tracing
- Running Locally
- Deploying to Azure
- From local workstation
- From GitHub Actions
- Recommendations & Key Takeaways
- Next Steps
.NET Aspire Basics
The .NET Aspire project is the orchestrator of all the resources. It is the main project that will be used to manage the environment variables, telemetry, and resources that will be
shared with the other projects.
There are some intrinsic connections between the .NET Aspire resources that are .NET based and even more that are .NET Aspire providers (e.g. Redis for caching).
Later, we’ll show how to connect many of those same services within the Nodejs side of our project with Astro.
If this is your first time using .NET Aspire with a .NET based project, I’d going through the Quickstart: Build your first .NET Aspire project which is close to everything in the AstroAspire API. The only difference is I used the MVC template and moved the weatherforecast.cs code and made it a controller. I’m just more familiar with it.
AppHost
The Apphost file (Basic\AstroAspire.AppHost\Program.cs) is where we describe the resources for which .NET Aspire will orchestrate the project for us. AppHost is where a developer can define what resources should be included which includes our code and resources like a MySQL database (not in this project sample at the moment).
During a deployment to Azure, the AppHost is inspected to define what resources may need to be provisioned or updated at that time. We’ll cover this more later.
Within the AppHost for this project, we define the .NET based API and our Nodejs project which is the Server-Side Rendering (SSR) of Astro. The AppHost will also handle sharing endpoints and other environment variables across all the resources that are defined to have them during run time. This includes using them in local development and adherence to them when deployed into Azure.
Below, you’ll see where we first define our API and tell .NET Aspire that we want to use external HTTP endpoints. This is so that one of the client side pages in Astro can call the API. This will eventually need some configuration for CORS, but we’ll get into that later.
You can also see below where we define the frontend project. We use the AddNpmApp method to add the frontend project. This is because the frontend project is a Nodejs
project and we want to run the aspirerun script that is defined in the package.json file. This is ONLY good for local development. When deploying to Azure, the
PublishAsDockerFile method will create a Docker image of the frontend project. This is because Azure App Services doesn’t support running Nodejs projects directly.
var builder = DistributedApplication.CreateBuilder(args);
var api = builder.AddProject<Projects.AstroAspire_API>("api")    .WithExternalHttpEndpoints();
// As a reference, we could use the AddNodeApp method to add the frontend project// However, we'll use the AddNpmApp method to add the frontend project// Below is an example if we were to use the AddNodeApp method// var frontend = builder.AddNodeApp("frontend", "../AstroFrontend/app.js")
// Add the frontend project to the builder// Let's explain the parameters of the AddNpmApp method// 1. The name of the resource that Aspire will then reference in the Dashboard: "frontend"// 2. The path to the frontend project: "../AstroFrontend"// 3. The name of the npm script to run (defined in ../AstroFrontend/package.json): "aspirerun"
var frontend = builder.AddNpmApp("frontend", "../AstroFrontend", "aaWatch")    .WithReference(api)    // Parameter is defined in the appsettings.json file    // Since the API path could change in the API project, we'll pass it as a parameter to the frontend project    .WithEnvironment("apiBasePath", "/api")    .WithEnvironment("BROWSER", "none") // Disable opening browser on npm start    .WithHttpEndpoint(env: "PORT")    .WithExternalHttpEndpoints()    //.WithEnvironment("OTEL_NODE_RESOURCE_DETECTORS", "env, host, os, process, serviceinstance, container, azure")    // Disable the fs instrumentation as it's not needed for the frontend project and sends too much to tracing    .WithEnvironment("OTEL_NODE_DISABLED_INSTRUMENTATIONS", "fs")    .PublishAsDockerFile();
// Let's pass the frontend reference so we can enable CORS to accept calls to the API.//  The frontend project will be running on a different port than the API project.//  We only need this for the /weatherapidirect page which used client side Javascript to call the AstroAspire.APIapi.WithReference(frontend);
Console.WriteLine("builder.Environment.EnvironmentName: " + builder.Environment.EnvironmentName);
// This is needed in development as we don't have a valid certificate for the frontend to call the AstroAspire.API without failingif (builder.Environment.EnvironmentName == "Development" && builder.Configuration["DOTNET_LAUNCH_PROFILE"] == "https"){    // Disable TLS certificate validation in development, see https://github.com/dotnet/aspire/issues/3324 for more details.    frontend.WithEnvironment("NODE_TLS_REJECT_UNAUTHORIZED", "0");}
builder.Build().Run();
Furthermore, we pass the frontend reference to the API which will be accessible to the frontend project as an environment variable.
Within the Basic\AstroFrontend\src\pages\weatherssr.astro page, we can see this in use with the following code:
const weatherApiServer = process.env['services__api__http__0']This value is passed to the frontend project from the AppHost. This is how we can share environment variables across all the resources that are defined in the AppHost.
Service Defaults
.NET Aspire Service Defaults (Basic\AstroAspire.ServiceDefaults\Extensions.cs) will handle common functions that will be injected to all of our .NET projects (in this case, we only have one) for shared implementations for health checks and telemetry.
In the case of our frontend running in Nodejs, we don’t get those injected for us. However, you’ll see later how it will participate.
Astro Pages
Let’s first take a look at what each pages does within the web UI.
Astro build process
When the Astro project is built, it generates static HTML files that are served by a static web server. The Astro project also generates Nodejs files that will be used by the SSR server (Nodejs/Express) to render the pages. The SSR server will use the Nodejs files to render the pages and serve them to the client.
-
Mermaid:
sequenceDiagram autonumber Astro ->> Static Page: Pre-render Note right of Astro: html files: dist/client Astro ->> SSR: Nodejs files Note left of SSR: mjs files: dist/serverAstro Pages
For pages that will be pre-rendered during the build process, Astro will generate the HTML files which will be served up by Nodejs/Express server.
For pages that will be rendered on the server (aka Server Side Rendering), Astro will generate the Nodejs files that will be used by the SSR server to render the pages.
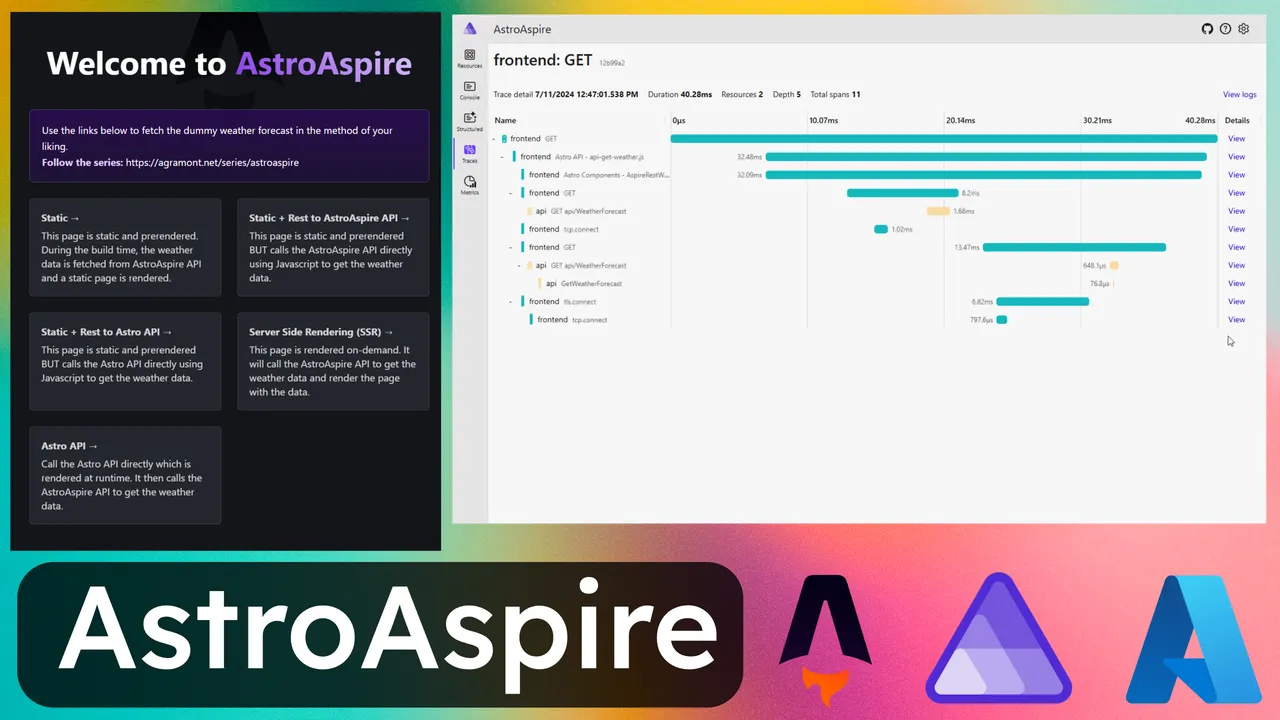
For the purposes of this project, the following pages were created to demonstrate different methods of rendering and fetching data.
- Static
- This page is static and prerendered.
- In local development, the AstroAspire API is available and I could fetch the data directly from the API.
- In deployment to Azure, the AstroAspire API is not available and thus the deployment would break.
- Thus, for now we fake our own data from json defined on the Astro page.
- Source Path:
src/pages/weatherstatic.astro
- This page is static and prerendered.
- Static + Rest to AstroAspire API
- This page is static and prerendered BUT calls the AstroAspire API directly using Javascript to get the weather data.
- However, the page needs to know what the URL is for the AstroAspire API. This is done by calling an API we have on the Astro API project that returns the URL.
- The page requires enabling CORS in the AstroAspire.API project and updates in AppHost as well. This is because the AstroAspire API is called directly from the client which is a different port.
- Source Path:
src/pages/weatherapidirect.astro
- Static + Rest to Astro API
- This page is static and prerendered BUT calls the Astro API directly using Javascript to get the weather data. Astro API will then call the AstroAspire API to get the weather data.
- Source Path:
src/pages/weatherastroapi.astro
- Server Side Rendering (SSR)
- This page is rendered on-demand. It will call the AstroAspire API to get the weather data and render the page with the data.
- Source Path:
src/pages/weatherssr.astro
Static pre-rendered pages
Astro pre-renders the pages at build time. This means that the pages are generated as static HTML files that are served by a static web server.
For pages that are statically built, Astro will generate the HTML files. The HTML files are then served as static files.
Within AstroAspire, there several pages that are statically built.
weatherstatic.astro is a static page and is pre-rendered.
-
Mermaid:
sequenceDiagram autonumber rect rgb(191, 223, 255) Note right of Static Page: Pre-render Astro Build -->>+ Astro Build: Use local json data Astro Build ->> Static Page: Create HTML endweatherapidirect.astro is a static page and is pre-rendered. When a user visits the page, the static html page is served up quickly, then the page will call the AstroAspire API directly to get the weather data. The Javascript will then update the page with the data.
-
Mermaid:
sequenceDiagram autonumber rect rgb(191, 223, 255) Note right of Static Page: Pre-render Astro Build ->> Static Page: Create HTML end rect rgb(191, 223, 255) Note right of Static Page: Fetch Data Static Page ->>+ Astro API: Get /api/get-astroaspireapi Astro API -->>+ Static Page : Returned env['services__api__https__0'] Static Page ->>+ Aspire API: Fetch Aspire API -->>+ Static Page: Return Json endNote: This page required enabling CORS in the AstroAspire.API project and updates in AppHost as well. This is because the AstroAspire API is called directly from the client which is a different port.
weatherastroapi.astro is a static page and is pre-rendered. This is the same as the weatherapidirect.astro page but the page will call the Astro API instead to get the weather data. The Astro API will then call the AstroAspire API to get the weather data. The Astro API will then return the data to the page.
-
Mermaid:
sequenceDiagram autonumber rect rgb(191, 223, 255) Note right of Static Page: Pre-render Astro Build ->> Static Page: Create HTML end rect rgb(191, 223, 255) Note right of Static Page: Fetch Data Static Page ->>+ Astro API: Fetch Astro API ->>+ Astro API: env['services__api__https__0'] Astro API ->>+ Aspire API: Fetch Aspire API -->>+ Astro API: Return Json Astro API -->>+ Static Page: Return Json endServer Side Rendering (SSR) pages
We have one special page that will be rendered on-demand. This page is rendered on the server and will call the AstroAspire API to get the weather data. The page is still rendered using the benefits of the Astro framework, but the data is fetched on-demand and so is the resulting html page.
weatherssr.astro is a page that is rendered on-demand. When the user vists the page url, the page is rendered on the server by Nodejs/Express and the data is fetched from the AstroAspire API. The page is then served to the client.
-
Mermaid:
sequenceDiagram autonumber rect rgb(191, 223, 255) Note left of Browser: Page Request Browser ->>+ Nodejs/Express: Get Page Nodejs/Express ->>+ SSR Page: Process Request Note right of SSR Page: Fetch Data SSR Page -->>+ SSR Page: env['services__api__https__0'] SSR Page ->>+ Aspire API: Fetch Aspire API -->>+ SSR Page: Return Json SSR Page -->> Nodejs/Express: Render Page Nodejs/Express -->> Browser: Return Page/HTML endAstro Configuration
Let’s focus on the configuration of the Astro project. While the focus here will be on Astro, you might find this useful for other Nodejs applications. The implementation we’ll use will be based on Expressjs and guidance from Astro’s documentation for Nodejs SSR with middleware.
Astro Config file
In the Basic\AstroFrontend\astro.config.mjs file, we’ll inform Astro that when we build, it’s to run as a using node as our middleware.
import { defineConfig } from 'astro/config';
import node from "@astrojs/node";
// https://astro.build/configexport default defineConfig({  // Hybrid will focus more on static site generation, but will still allow for server-side rendering when needed  // Reference: https://docs.astro.build/en/basics/rendering-modes/#on-demand-rendered  output: "hybrid",  // We'll use the node adapter to allow for server-side rendering  // Reference: https://docs.astro.build/en/guides/integrations-guide/node/  adapter: node({    mode: "middleware"  })});
With the hybrid as the output, we’re instructing it to build everything as a static page unless we tell it not to. If all or most of your pages will be expected to run server side, you can change that to server.
An example of this is the Basic\AstroFrontend\src\pages\weatherssr.astro where we set a value to inform Astro NOT to build this as a static page.
export const prerender = false;App.js
We’ll create a new page at the root of the Astro project (Basic\AstroFrontend\app.js) which will be the main entry point when our application runs locally AND from within the Docker image that is then pushed to Azure.
Here’s the app.js file for our project.
import express from 'express';
// This page is generated by Astro during build time.import { handler as ssrHandler } from './dist/server/entry.mjs';
// Added for Aspire specific configuration (Start) - Instrumentationimport { createTerminus, HealthCheckError } from '@godaddy/terminus';
import { env } from 'node:process';import { createServer } from 'node:http';
const environment = process.env.NODE_ENV || 'development';const app = express();// The port below will be provided to us via Aspire AppHost.  We give it a default so the build doesn't fail.const port = env.PORT ?? 8080;
// We'll get the environment variables that was injected by the Aspire AppHost in Basic\AstroAspire.AppHost\Program.csconst apiServer = process.env['services__api__https__0'];const apiBase = process.env['apiBasePath'];const apiEndpoint = apiServer + apiBase;

// console.log(`env: ${env}`);console.log(`apiServer: ${apiServer}`);console.log(`apiBase: ${apiBase}`);
// Change this based on your astro.config.mjs, `base` option.// They should match. The default value is "/".const base = '/';
// We'll use the ssrHandler as the middleware for all requests.// We'll place this first, because we'll get a static file error in the tracing if we don't.app.use(ssrHandler);app.use(base, express.static('dist/client/'));
const server = createServer(app)
console.log(`environment: ${environment}`);console.log(`apiServer: ${apiServer}`);console.log(`apiURI: ${apiEndpoint}`);
// This is to support the health check for the Aspire AppHost, yet as defined in the ServiceDefaults projectasync function healthCheck() {    const errors = [];    const apiServerHealthAddress = `${apiServer}/health`;
    console.log(`Fetching ${apiServerHealthAddress}`);
    var response = await fetch(apiServerHealthAddress);    if (!response.ok) {        throw new HealthCheckError(`Fetching ${apiServerHealthAddress} failed with HTTP status: ${response.status}`);    }}
// This is to support the health check for the Aspire AppHost, yet as defined in the ServiceDefaults projectcreateTerminus(server, {    signal: 'SIGINT',    healthChecks: {        '/health': healthCheck,        '/alive': () => { }    },    onSignal: async () => {        console.log('server is starting cleanup');
        // Not using Redis, so commenting out. Saving for later.        // console.log('closing Redis connection');        // await cache.disconnect();    },    onShutdown: () => console.log('cleanup finished, server is shutting down')});
// We're all set to go. Now we'll listen on the port.server.listen(port, () => {    console.log(`Listening on port ${port}`);});
Package.json Scripts
In the \Basic\AstroFrontend\package.json, we have a few scripts that will be helpful for local development, including nodemon. Yet, when we go to production, we still use the
default build script defined by a typical Astro install.
You’ll notice that we import ./instrumentation.js which is a file we’ll discuss later regarding health checks and telemetry.
Nodemon
For local development, we’ll use Nodemon which is included in the script aaWatch. We import Nodemon as a dev dependency, thus it will not be in our deployment into Azure.
Instrumentation
The ./instrumentation.js file we use is based on the example file
provided by Microsoft.
The instrumentation file is where we pull in capabilities from the OpenTelemetry project. This gives us the capabilities to add tracing information which the AppHost will orchestrate when a given trace spans beyond our Astro/Nodejs process.
Below is an example from the Basic\AstroFrontend\src\pages\api\get-astroaspireapi.js file which is Astro API. You see in the Highlighted code where we start a span and set attributes. Make
sure to end the span at the end of the function. This is important for the tracing to work correctly.
// Import the OpenTelemetry APIimport OpenTelemetry from '@opentelemetry/api';const tracer = OpenTelemetry.trace.getTracer('AstroAspire.Frontend');const span = tracer.startSpan('Astro API - get-astroaspireapi.js');
// We'll get the environment variables that was injected by the Aspire AppHost in Basic\AstroAspire.AppHost\Program.cs//      - <snippet from Basic\AstroAspire.AppHost\Program.cs> -> <environment variable>//      - .WithReference(api)                               ->      services__api__https__0//      - .WithEnvironment("apiBasePath", apiBasePath)      ->      apiBasePathconst weatherApiServer = process.env['services__api__https__0'];const apiBase = process.env['apiBasePath'];const apiEndpoint = weatherApiServer + apiBase;const weatherAPIUrl = `${apiEndpoint}/weatherforecast`;
console.log(`   Hello from get-astroaspireapi.js`);
export async function GET() {    span.setAttribute(`Hello from get-astroaspireapi.js`);    span.setAttribute('weatherAPIUrl', weatherAPIUrl);
    console.log(`   Hello from get-astroaspireapi.js`);    console.log("WeatherForecast URI: ", weatherAPIUrl);
    span.end();    return new Response(        // create a JSON object to return        JSON.stringify({            "weatherAspireApiUri": weatherAPIUrl        })    )}
Cross-Origin Resource Sharing (CORS)
Cross-Origin Resource Sharing (CORS) is something we need to address as we have our .NET API that we told .NET Aspire to provide an external endpoint for.
In this AstroAspire Basic project, we have one of our pages calling the .NET API directly. This could be an example where you DO want the frontend giving an HTML that maybe hits an https://api.yourdomain.com as a valid operation.
CORS by default will stop this from happening without some configuration.
In the Basic\AstroAspire.API\Program.cs file, we added code that said we allow all CORS to come in. Before you say this is bad security, which I agree with at first, be patient.
app.UseCors( x => x .AllowAnyOrigin() .AllowAnyMethod() .AllowAnyHeader());Doing this will continue to allow the development to continue as needed. When you deploy to CI/CD, production or anything else, this same rule will apply.
However, this is actually good as we don’t want to hardcode any endpoints directly into our code. I tried this by telling the App.Host to send the frontend as a reference which I could add to the policy within the API. This worked great, until I went to deploy to Azure. Since the frontend doesn’t actually exist (keep in mind that our frontend is not .NET but a NodeJS deployment which has yet to be built into an image), the deployment fails.
Here is what I did to add this as a parameter to the API. I kept it in the project so you can see how it’s done, but we don’t use it.
api.WithReference(frontend);The solution to this, which is actually better for the operations team, is that we leave the configuration of the allowed origins within the api Container App directly.
While there are many cli and scripts that can do this, I’ll give you the following two:
- Azure Portal – CORS configuration can be found in the portal within the
- Container App for your
apiunder Settings > CORS> - You can add the allowed origins there.
- Container App for your
- Allowed Origins
- Bicep – We’ll add
corsPolicy:and associated settings directly into the bicep file used for deployment. - The below steps will explain what to do and we’ll show you the updates the exported yaml file.
- Bicep – We’ll add
Here is a link to Microsoft documentation that explains this process further.
Generate Bicep from .NET Aspire project model
We’re going to shortcut and get right to it. From within the folder location of the AppHost, run the following commands
azd config set alpha.infraSynth onazd infra synthNow we’re going to add in the below highlighted section to the file Basic\AstroAspire.AppHost\infra\api.tmpl.yaml that the azd infra synth exported to us.
Because this is YAML, the order and spacing of information is vital.
api-version: 2024-02-02-previewlocation: {{ .Env.AZURE_LOCATION }}identity: type: UserAssigned userAssignedIdentities: ? "{{ .Env.AZURE_CONTAINER_REGISTRY_MANAGED_IDENTITY_ID }}" : {}properties: environmentId: {{ .Env.AZURE_CONTAINER_APPS_ENVIRONMENT_ID }} configuration: activeRevisionsMode: single runtime: dotnet: autoConfigureDataProtection: true ingress: external: true targetPort: {{ targetPortOrDefault 8080 }} transport: http allowInsecure: false corsPolicy: allowCredentials: true allowedOrigins: - https://frontend.{{ .Env.AZURE_CONTAINER_APPS_ENVIRONMENT_DEFAULT_DOMAIN }} allowedMethods: - GET registries: - server: {{ .Env.AZURE_CONTAINER_REGISTRY_ENDPOINT }} identity: {{ .Env.AZURE_CONTAINER_REGISTRY_MANAGED_IDENTITY_ID }} template: containers: - image: {{ .Image }} name: api env: - name: AZURE_CLIENT_ID value: {{ .Env.MANAGED_IDENTITY_CLIENT_ID }} - name: ASPNETCORE_FORWARDEDHEADERS_ENABLED value: "true" - name: OTEL_DOTNET_EXPERIMENTAL_OTLP_EMIT_EVENT_LOG_ATTRIBUTES value: "true" - name: OTEL_DOTNET_EXPERIMENTAL_OTLP_EMIT_EXCEPTION_LOG_ATTRIBUTES value: "true" - name: OTEL_DOTNET_EXPERIMENTAL_OTLP_RETRY value: in_memory - name: services__frontend__http__0 value: http://frontend.{{ .Env.AZURE_CONTAINER_APPS_ENVIRONMENT_DEFAULT_DOMAIN }} scale: minReplicas: 1tags: azd-service-name: api aspire-resource-name: apiTracing
Earlier, I showed where we added the “ file to allow our frontend to participate in the tracing orchestration. I also explained earlier how the ServiceDefaults injects this into all of the .NET projects that are associated with the .NET Aspire AppHost. When running things locally, everything probably works as expected. However, once deployed to Azure, you might not see tracing flowing like it did locally. What we needed to do is tell the Service Defaults of tracing source names that will be used.
Here is what this looks like in the Basic\AstroAspire.ServiceDefaults\Extensions.csfile:
.WithTracing(tracing => { tracing.AddAspNetCoreInstrumentation() // Uncomment the following line to enable gRPC instrumentation (requires the OpenTelemetry.Instrumentation.GrpcNetClient package) //.AddGrpcClientInstrumentation() .AddHttpClientInstrumentation() .AddSource("AstroAspire.API") .AddSource("AstroAspire.Frontend"); });Running Locally
When you’re doing local development and running .NET Aspire locally, our configuration tells the AppHost to run Nodejs and our service directly.
var frontend = builder.AddNpmApp("frontend", "../AstroFrontend", "aaWatch")The script we defined in Basic\AstroFrontend\package.json that the AppHost is referring to is specific to use Nodemon. We’re doing this to allow changes to our Astro file to be watched and restart the service. It’s not exactly as awesome as the fast reload that Astro does normally with npm run dev but a little browser refresh isn’t bad.
"aaWatch": "npm install && astro build && nodemon --import ./instrumentation.js app.js",To run it locally, let’s run the following command from with the Basic\AstroAspire.AppHost folder:
dotnet runThis should start up our project and show you a URL where you can open in your local browser.
Deploying to Azure
We’re going to do a deployment to Azure both directly from our desktop and via CI/CD with GitHub Actions. In either case, we need to have a docker file created that will work with our Astro Nodejs/Express configuration. While you don’t need the docker file for this sample project just to get it to run, when we deploy to Azure, it’s a must.
From local workstation
When deploying to Azure from a local workstation, or maybe a Windows server for some reason, we need to tell docker how to build our Nodejs application and finish off with the command to start it.
In our project, we already have the Basic\AstroFrontend\Dockerfile created (yes, with no extension) which is in the root level of our Nodejs application.
Here is what our dockerfile looks like and you can that we still call build and the last command is to start the node process and import the /app/instrumentation.js with /app/app.js as our main entry point to Express.
FROM node:20 AS base
WORKDIR /app
# By copying only the package.json and package-lock.json here, we ensure that the following `-deps` steps are independent of the source code.# Therefore, the `-deps` steps will be skipped if only the source code changes.COPY package.json package-lock.json ./
FROM base AS prod-depsRUN npm install --omit=dev
FROM base AS build-depsRUN npm install
FROM build-deps AS buildCOPY . .
# Build the Astro project FOR DEVELOPMENT (default)RUN npm run build
# Build the Astro project FOR PRODUCTION# RUN npm run build -mode production
FROM base AS runtimeCOPY --from=prod-deps /app/node_modules ./node_modulesCOPY --from=build /app/dist ./dist
# Since we're running Astro in Hybrid mode, we need to copy the entire project directory to the runtime image.COPY --from=build /app/ .
# ENV HOST=0.0.0.0# ENV PORT=4321# EXPOSE 80
# This is what will start our process. Making sure here to include the `--import` flag to include the instrumentation script.CMD node --import /app/instrumentation.js /app/app.js
Azure Developer Cli
First, we need to initialize our deployment. This command is tied to your locally cloned repo (or just your local folder if you don’t have it in a repository just yet).
Let’s run the following command from with the Basic\AstroAspire.AppHost folder:
# Assuming you haven’t logged in yetazd auth loginazd initLet’s assume that you followed the directions and all went well.
Let’s run the following command from with the Basic\AstroAspire.AppHost folder:
azd upYou’ll notice that during the deployment of the frontend Nodejs app, that you’ll see some docker commands execute. If all goes well, that deployment is now an Azure Container App!
If not, then we have some configuration issues to tend with.
From GitHub Actions
Much to my surprise and delight, deployment from GitHub Actions to Azure was pretty simple. Using the same process that I previously posted,
DevOps intro to deploy .NET Aspire CI/CD to Azure with GitHub Actions,
everything just worked. I didn’t have to do anything special for Docker!
The GitHub Actions workflow files is in the Basic\.github\workflows folder will need to be at the top of your repo in order for GitHub to find it. Since I plan to have other
variations of AstroAspire, I kept the workflow files in the Basic folder.
Recommendations & Key Takeaways
Here is a quick summary of key takeaways that I wish someone gave me before I started down this track:
Deploy to Azure frequently
- There are still somethings you might do in local development that you assume will work once it gets to deployment time.
- Assume nothing and deploy to Azure as part of your daily checkin and CI/CD process. Even if it’s just a direct/local do Azure deployment
- Local Deploy to Azure where each dev has their own available subscription is another great approach. This allows the dev to check integration and prevent the CI/CD process of breaking early in the process
For Astro Dev’s
- Environment Variables
- We normally look for env variables here: import.meta.env.PROD
- For env variables we expect from .NET Aspire, look here: process.env
- What works in local development might not work due to the build process and what resources are available
CORS
- Don’t hardcode your endpoints
- Configure CORS in Azure as required
Next Steps
I’m sure you’ve already checked out the code in GitHub: conradagramont/AstroAspire, and maybe already cloned it. If not, you should give it a go.
Do the following:
- Run it locally
- Deploy to Azure Direct and then via GitHub Actions
- Make some changes and mess around with the tracing spans
I do plan on a few more posts on the Basic version that I think could use more details. I’ll also see if there are any requests from others found at below or in the various
Discord and other community locations.