
If you’ve already built a site using Astro.build or maybe researching if you will, but one of the things you’re looking for is how to add authentication to your site. In this post, I’ll show you how to add authentication to your Astro site using Microsoft Entra ID EasyAuth with Azure Static Web Apps.
We’re going to base this on an existing project which I’ve shared in this GitHub Repo.
If you have Microsoft 365, you’re probably familiar with Entra ID. It’s a great way to add authentication to your site without writing any code.
It’s also a great way to secure your site and restrict access to certain pages or content.
Best of all, you get to leverage an identity service you already have (Entra ID) while maintaining your existing security and compliance policies. All while keeping your site simple and focused.
Table of Contents
- Uses Cases
- Limitations
- Prerequisites
- Our scenarios
- Files and Paths
- What is Microsoft Entra ID EasyAuth?
- Configure Azure Static Web Apps
- The Sample Project
- Local Development (Emulation)
- Deploy to Azure & Consent
- Entra ID Enterprise Application
- What’s Next?
Uses Cases
Here are some common use cases for adding authentication to your site:
- Anonymous Users: You want to allow users to access your site without logging in but want to restrict access to certain pages or content.
- User Authentication: You want to add user authentication to your site to allow users to log in and access protected content.
- Admin Authentication: You want to add admin authentication to your site to allow admins to log in and access protected content.
Here are some examples scenarios for websites where this might be useful:
- Support: You want to allow users to read support information without logging in but want to restrict access to certain pages or content.
- Internal Information: You want to allow users to log in and access internal information such as company policies, employee information, or other sensitive information.
- External Partners: You want to external partners to log in and access information such as product information, pricing, or other sensitive information.
- AI/Chat Bots: this could be used to authenticate users to access AI/Chat Bots.
If you’re like me who lives in a Microsoft 365 world, you’re probably thinking that this is a job for a SharePoint site. In some cases, that might be true, but that introduces a lot of complexity and overhead that you might not need. Plus, a focused site with a specific purpose can be more effective than a general-purpose site like SharePoint.
Limitations
There are some limitations to using Microsoft Entra ID EasyAuth with Azure Static Web Apps in the scope of this post. We’ll be using the Free tier of Azure Static Web Apps, which has some limitations on custom roles and permissions. If you need more advanced features, you may need to upgrade to a paid tier.
Prerequisites
Before you begin, you’ll need the following:
- An Azure account. If you don’t have an Azure account, you can create a free account.
- An Azure Static Web Apps resource. If you don’t have an Azure Static Web Apps resource, you can create one.
- An Astro site. If you don’t have an Astro site, you can create one.
These are the basic requirements to get started. I have another post on Creating a Static Site with Astro, Azure Static Web Apps, and GitHub if you need help with that.
If you have these, you’re ready to move on to the next steps.
Our scenarios
In our scenario, we want to have an Astro site that has a public home page and private pages. The public home page will be accessible to anyone, but the private pages will require authentication.
Here are the pages we’ll have in our site:
- Public Home Page: This is the home page of the site and will be accessible to anyone.
- path:
/
- path:
- Admin Page: This is a private page that will require admin authentication.
- path:
/admin
- path:
- Auth Page: This is a private page that will require user authentication.
- path:
/auth
- path:
- Registered Page: This is a private page that will require user authentication.
- path:
/registered
- path:
- Public Page: This is a public page that does not require authentication.
- path:
/public
- path:
Files and Paths
The following represents a subset of the files and paths in the project:
/├── public/│ └── staticwebapp.config.json└── src/ └── pages/ └── index.astro └── admin/ │ └── index.astro └── auth/ │ └── index.astro └── public/ │ └── index.astro └── registered/ └── index.astroWhat is Microsoft Entra ID EasyAuth?
Microsoft Entra ID EasyAuth is a feature of Azure Static Web Apps that allows you to add authentication to your site without writing any code. It uses the Entra ID (formerly named Azure Active Directory) to authenticate users and provides a simple way to secure your site. In this post, we’ll be using EasyAuth to add authentication to our Astro site.
While we’ll be using Entra ID, Azure Static Web Apps also supports other authentication providers such as GitHub, Facebook, Google, and Twitter. You can choose the provider that best fits your needs.
Documentation for EasyAuth can be found here.
When running an Azure SWA, there is a built-in authentication system that is accessible via the .auth endpoint. This endpoint is used to authenticate users and provide access to the site. The EasyAuth system is built on top of this.
Since we’re using the Free tier of Azure Static Web Apps, we’ll be using the built-in roles and permissions that come with the Free tier. Regardless of the tier you’re using, the approach we’re using doesn’t require any additional configuration or code. We also won’t need to create a new Entra ID application or configure any settings in the Azure portal.
Configure Azure Static Web Apps
Configuration of Azure Static Web Apps is done in the staticwebapp.config.json file. This file is used to configure the build settings, routes, and other settings for your site. Here’s a link to
the Microsoft’s [Configure Azure Static Web Apps]https://learn.microsoft.com/en-us/azure/static-web-apps/configuration) for more information.
For this to work, you’ll need to add a staticwebapp.config.json file to the public directory of your Astro site.
By default, Azure Static Web Apps allows anonymous users to access all pages of your site.
If you want to restrict access to certain pages, you can use the routes property to define the routes that require authentication.
In the example below, we created a few folders with a basic page inside which Astro will create when it builds the site. When the Azure Static Web App (SWA) is built, it will use the staticwebapp.config.json to then
controll access amongst other things.
Here’s an example of a staticwebapp.config.json file:
{ "trailingSlash": "auto", "globalHeaders": { "content-security-policy": "default-src https: 'unsafe-eval' 'unsafe-inline'; object-src 'none'" }, "mimeTypes": { ".json": "text/json" }, "routes": [ { "route": "/registered/*", "methods": ["GET"], "allowedRoles": ["registeredusers"] }, { "route": "/admin/*", "methods": ["PUT", "POST", "PATCH", "DELETE"], "allowedRoles": ["administrator"] }, { "route": "/auth/*", "allowedRoles": ["authenticated"] }, { "route": "/login", "rewrite": "/.auth/login/aad" }, { "route": "/logout", "redirect": "/.auth/logout" } ], "navigationFallback": { "rewrite": "index.html", "exclude": ["/images/*.{png,jpg,gif}", "/css/*"] }, "responseOverrides": { "400": { "rewrite": "/invalid-invitation-error.html" }, "401": { "statusCode": 302, "redirect": "/.auth/login/aad" }, "403": { "rewrite": "/custom-forbidden-page.html" }, "404": { "rewrite": "/404.html" } } }The Sample Project
Let’s go through a few areas in the sample project that are important to understand. Keep in mind that this is a basic example and you can expand on this to meet your needs. And the Astro project itself is a basic and has some redundant code that could be cleaned up, but it helps stay focused on the EasyAuth part and less about the Astro part.
The staticwebapp.config.json file
In the sample project, we have a few pages that require authentication. When a user tries to access one of these pages, the Azure Static Web Apps system will redirect the user to the login page. Once the user logs in, the system will redirect the user back to the original page.
routes property
The routes property is used to define the routes that require authentication. In the example above, we have defined three routes that require authentication:
/registered/*: This route requires theregisteredusersrole./admin/*: This route requires theadministratorrole./auth/*: This route requires theauthenticatedrole.
You’ll also notice that while we have a public folder, we don’t have a route for it. This is because the Azure SWA system allows anonymous access to all pages by default.
responseOverrides property
The responseOverrides property is used to define the response that should be returned when a request is made to a route that requires authentication. In the example above, we have defined the following responses:
400: This response is returned when an invalid invitation error occurs.401: This response is returned when a user is not authenticated.- This response is used to redirect the user to the login page.
403: This response is returned when a user is not authorized to access a route.404: This response is returned when a route is not found.
Client Side Validation
In the /auth/index.astro page, we already require authentication based on the config file. We have a simple Javascript function that reads the claim provided to us via the EasyAuth system.
<table class="py-4"> <tr> <th>Key</th> <th>Value</th> </tr> <tr> <td>Identity Provider</td> <td><code id="identityProvider"></code></td> </tr> <tr> <td>User ID</td> <td><code id="userId"></code></td> </tr> <tr> <td>User Details</td> <td><code id="userDetails"></code></td> </tr> </table>The folllowing Javascript code is used to read the claim provided to us via the EasyAuth system. This code is placed in the <script> tag in the page. Since the only way you could get
access to this page and the thus the script runs, we don’t check to see if there is a user or not. This is because the Azure SWA system has already done that for us. (This isn’t a best practice, but it’s a simple example.)
<script is:inline>  async function getUserInfo() {  const response = await fetch('/.auth/me');  const payload = await response.json();  const { clientPrincipal } = payload;  return clientPrincipal;  }
  (async () => {    const user = await getUserInfo();    document.getElementById('identityProvider').textContent = user.identityProvider;    document.getElementById('userId').textContent = user.userId;    document.getElementById('userDetails').textContent = JSON.stringify(user, null, 2);
    console.log(user);  })();
</script>
This claim is a JSON Web Token (JWT). We can use this to determine the user’s identity and roles. In this example, we’re just displaying the user’s identity provider, user ID, and the full claim.
Local Development (Emulation)
When you’re developing locally, you can emulate the Azure Static Web Apps system by using the Azure Static Web Apps CLI. This
package allows you to run the Azure Static Web Apps system locally and test your site.
Microsoft Documentation on this can be found here.
Installation instructions for Azure Static Web Apps CLI can be found here.
When you use the Azure SWA CLI (Command Line Interface), it will create a local server that will emulate the Azure SWA system. This will allow you to test your site locally and see how the EasyAuth system works. When
it’s running, you’ll get a different URL to access your site, which will be something like http://localhost:4280. You can then access your site and test the authentication system. Your site will be running as if it
were in the Azure SWA system. Actually, your site is also running like you normally do when running npm run dev. This is because the Azure SWA CLI is just a wrapper around the Astro CLI.
I’d recommend your first install it globally on your computer with this PowerShell command:
npm install -g @azure/static-web-apps-cliNow we’ll need to initialize the configuration for the Azure SWA CLI. You can do this by running this command from the root of your project:
swa initName the configuration name the best aligns with your project. Mine is astro-auth. After hitting enter, it will show you the configuration it plans to use. Select no and we’ll provide additional details.
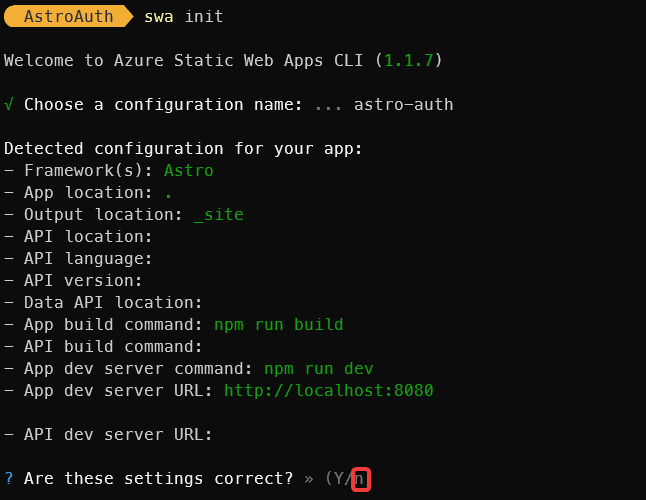
By default, when you run npm run dev, you typically get port 4321 assigned if nothing else is running. We’re going to assume we’ll be using that port.
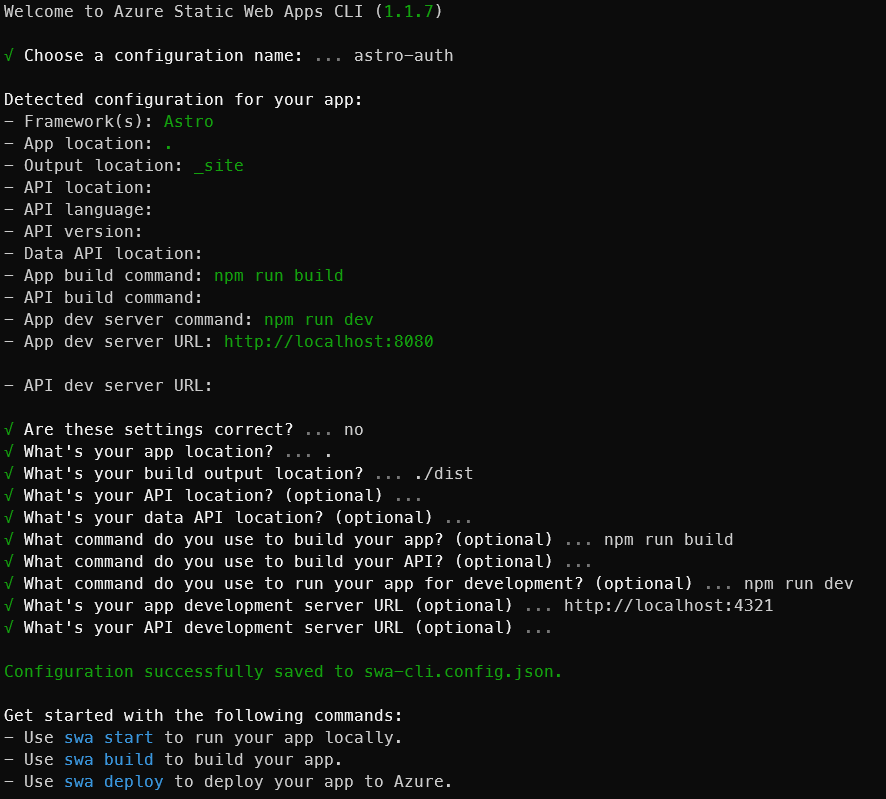
Here are the values we’ll use for the questions:
- What’s your app location?:
. - What’s your build output location?:
./dist - What’s your API location? (optional): Leave this blank
- What’s your data API location? (optional): Leave this blank
- What command do you use to build your app? (optional): npm run build
- What command do you use to build your API? (optional): Leave this blank
- What command do you use to run your app for development? (optional): npm run dev
- What’s your app development server URL (optional):
http://localhost:4321 - What’s your API development server URL (optional): Leave this blank
Here’s a screenshot of the questions and answers:
You’ll only need to do this once. It will ask you some questions about your project and create a configuration file for you. You can edit this file later if you need to change the configuration. Or you
can delete the file and run swa init again to recreate it.
Once you’ve completed the first run, you can just run swa start to start the server. The configuration is created for you and at the root of your project in a file called swa-config.json. You can edit this file
later if you need to change the configuration.
Here’s what the configuration swa-config.json file looks like that was just created for us:
{ "$schema": "https://aka.ms/azure/static-web-apps-cli/schema", "configurations": { "astro-auth": { "appLocation": ".", "outputLocation": "./dist", "appBuildCommand": "npm run build", "run": "npm run dev", "appDevserverUrl": "http://localhost:4321" } }}If you’re following along and using the sample project, you’ll need to open PowerShell and navigate to the root of the project. Then run a local NPM install to get the packages needed for the project.
npm installThen you can run it from the root of your project with this command:
swa startOnce it’s running, you can access your site at the URL it provides. You’ll get the following in your PowerShell window:
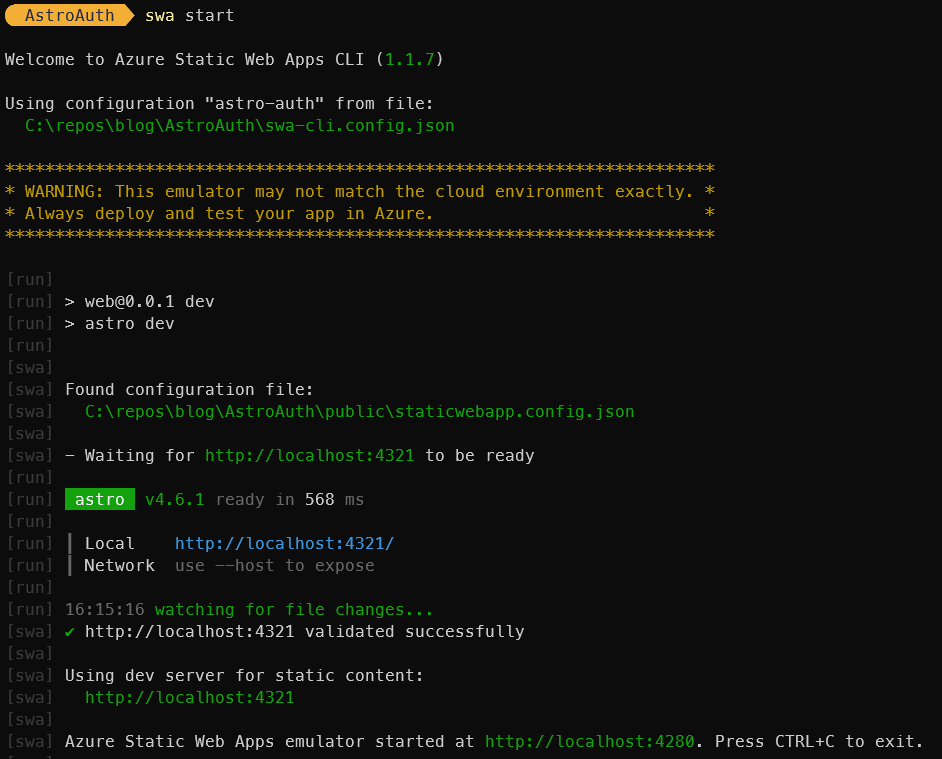
Notice that you’re seeing two URL (ports really):
- http://localhost:4321
- This is the URL you would normally use to access your site when running
npm run dev. - If you access this URL, you’ll see your site running as normal.
- However, this is not the URL you’ll use to test the authentication system.
- This is the URL you would normally use to access your site when running
- http://localhost:4280
- This is the URL you’ll use to access your site when running the Azure SWA CLI.
- This URL will allow you to test the authentication system.
🚨 If you recieve the following error, it’s most likely because you’re already running something on port 4321. Stop that process and try again.
Welcome to Azure Static Web Apps CLI (1.1.7)
Using configuration "astro-auth" from file:  C:\repos\blog\AstroAuth\swa-cli.config.json
************************************************************************ WARNING: This emulator may not match the cloud environment exactly. ** Always deploy and test your app in Azure.                           ************************************************************************
[run][run] > web@0.0.1 dev[run] > astro dev[run][run] 'astro' is not recognized as an internal or external command,[run] operable program or batch file.[run] cd "C:\repos\blog\AstroAuth" && npm run dev exited with code 1--> Sending SIGTERM to other processes..[swa] node "C:\Users\ConradAgramont\AppData\Roaming\npm\node_modules\@azure\static-web-apps-cli\dist\msha\server.js" exited with code 1✖ SWA emulator stopped because SWA emulator exited with code 1.
You can access your site at http://localhost:4280. You can then test the authentication system by accessing the private pages and seeing how the system works.
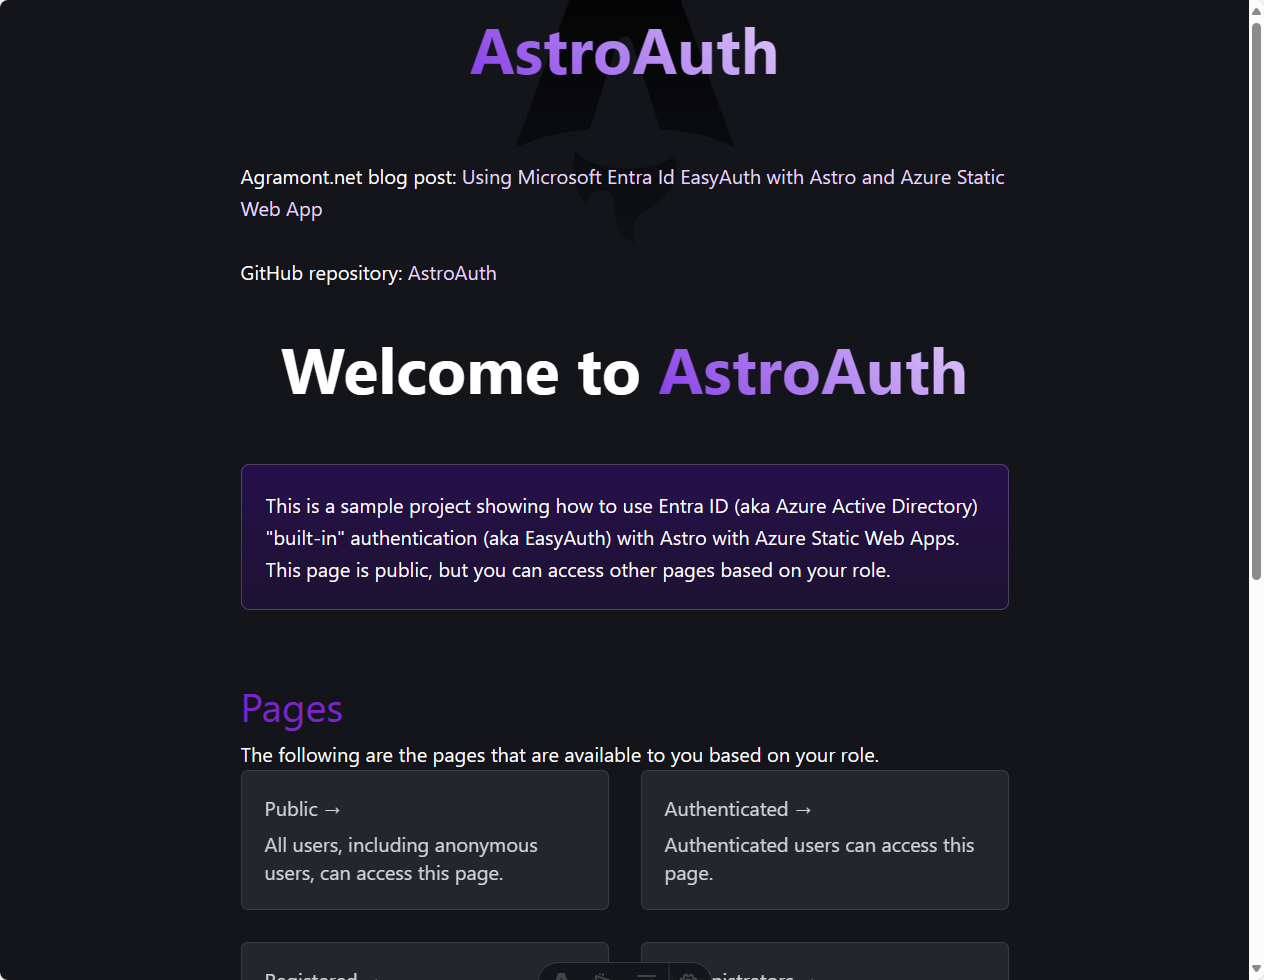
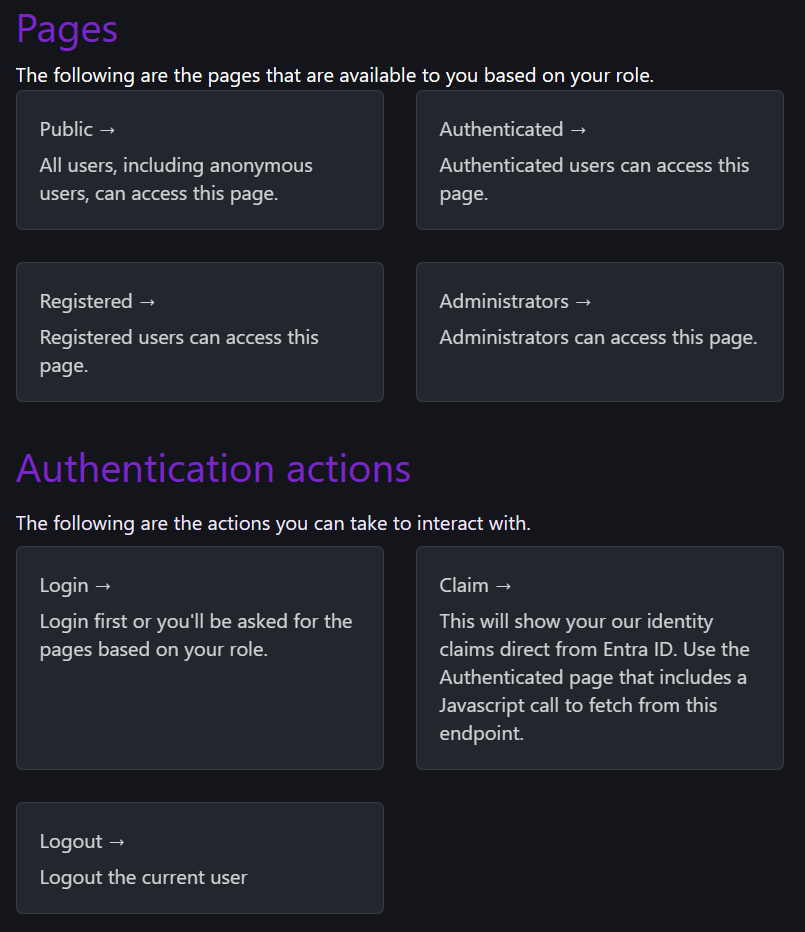
If we scroll down, we’ll see links to the key pages that we’ll authenticate or not authenticate against. And the Authentication actions section will be more direct in what it’s trying to show you.
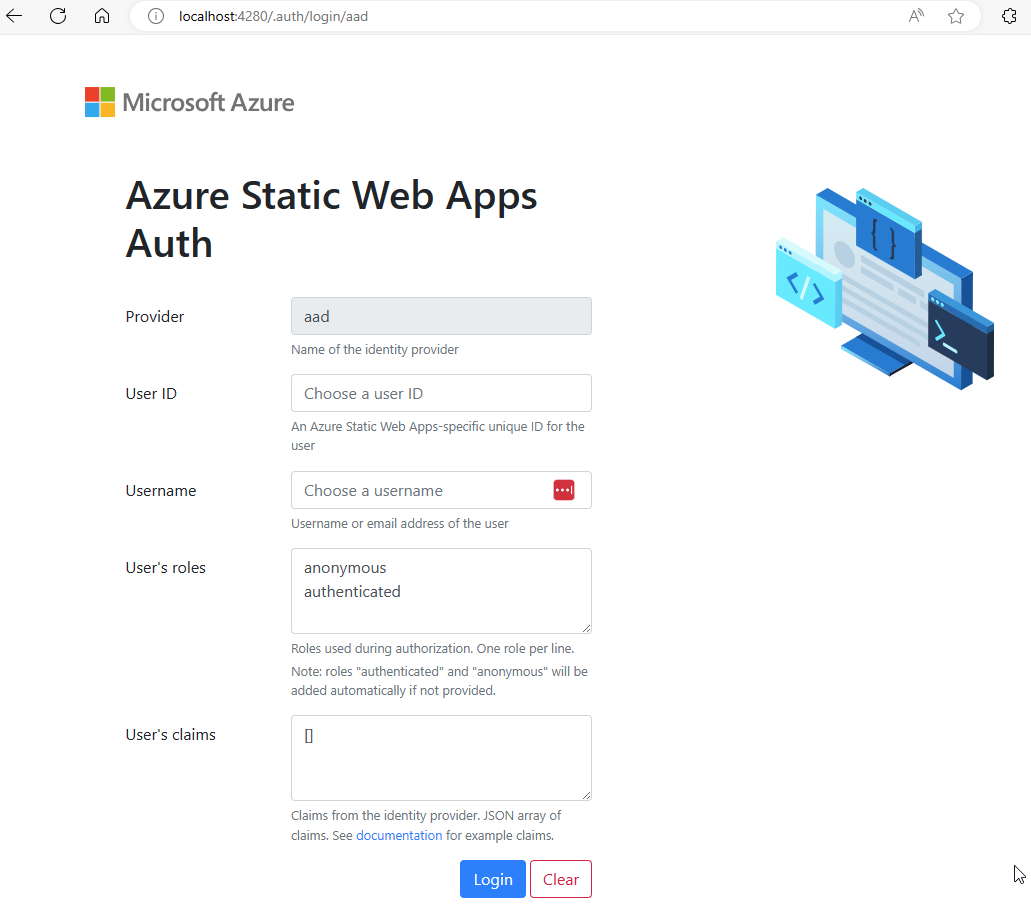
Let’s try to access the /auth page. Normally, you’ll be redirected to the login page. However, in this case the Azure SWA CLI is running and it’s emulating the Azure SWA system.
You’ll see the following page which is free for YOU to decide how you’d like to test it. Thus, you’re not really logging in, but you can see how the system works. What you’re defining is what information you expect back from the system when a user logs into Entra ID.
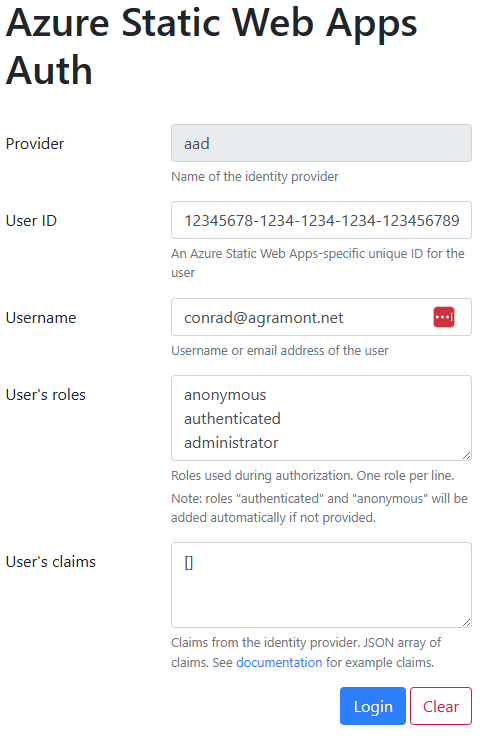
Let’s add in the following information to mimic a user logging in who is an administrator. You can use the following information:
- Identity Provider:
aad - User ID:
12345678-1234-1234-1234-123456789012 - User Name:
conrad@agramont.net - User’s roles
anonymousauthenticatedadministrator
We’ll leave User’s claims blank. Once you’ve added this information, click the Log in button. Now try that Auth link again.
This page includes the Javascript code that was detailed earlier in this post. It’s reading the claim provided to us via the EasyAuth system.
If you click on the registered link, you’ll go back to the login page again. That’s because your user doesn’t have the registeredusers role. If you want to test that, you
can add that role to the user and try again.
Deploy to Azure & Consent
Once you’ve tested your site locally and you’re happy with how the authentication system works, you can deploy your site to Azure Static Web Apps.
When we deploy this to Azure, we’ll now get a different experience.
Following the same steps as we did locally, let’s click on the “Authenticated” link on the page. You’ll now land at the Entra ID login page. You can use your Microsoft 365 credentials to log in.
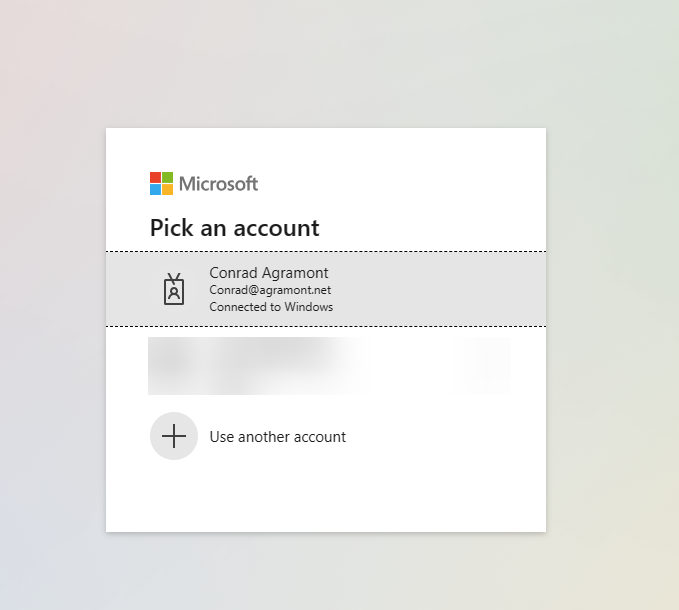
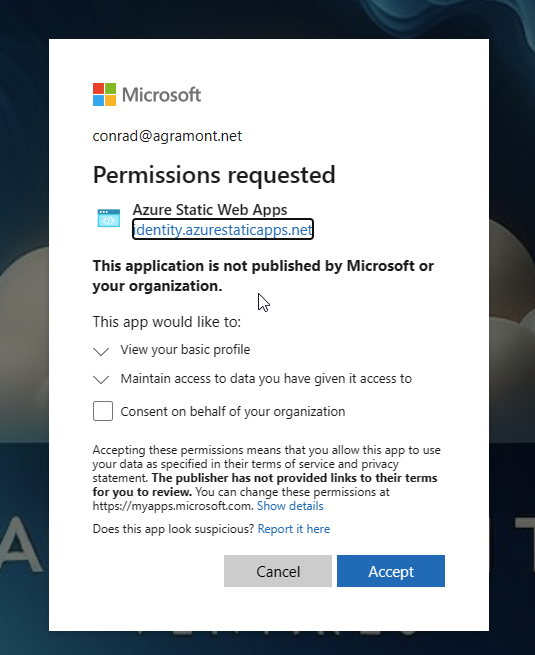
Once you’ve logged in, you’ll be prompted to allow the site to access your information. This is a standard OAuth flow. Click Accept to allow the site to access your information.
If you select Consent on behalf of your organization, you’ll need the appropriate rights to do this, but it’s not requred. For production, make sure to work with your IT department.
Later, I’ll show where this is configured in the Azure portal.
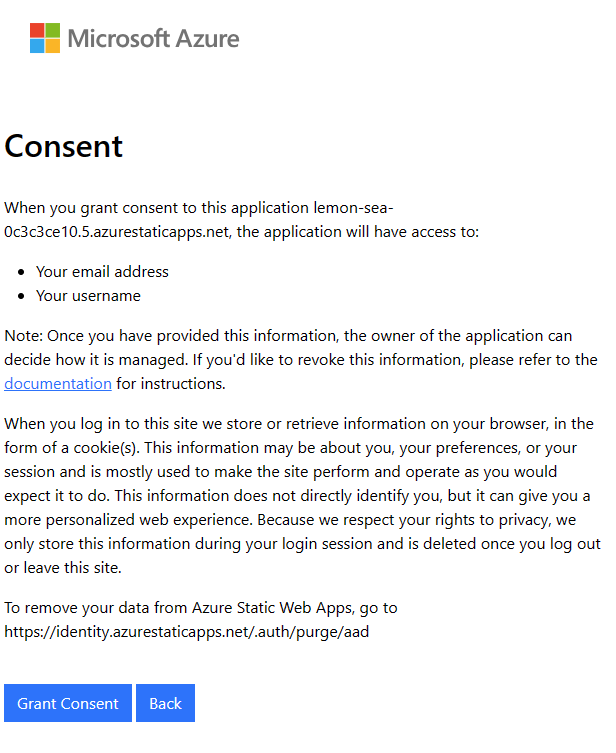
Since you’re consenting for yourself, you’ll see the following screen. Click Grant Consent to continue.
Now when you click on the Authenticated link, you’ll see the same page as you did locally. This is because the Azure SWA system is now running in the cloud and is using the same configuration as you had locally.
If you click on the “Claim” link, it will direct you to the /.auth/me endpoint which will show you the claim that was provided to the site. This is the same claim that was used in the Javascript code earlier in this post.
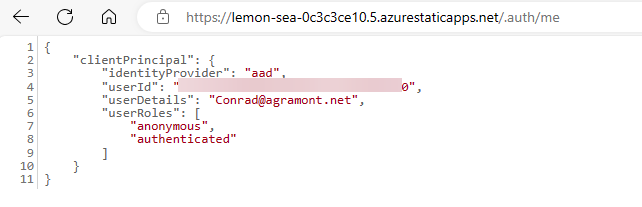
The URL you see in the image above is for reference. This site will be deleted by this posting. You’ll need to deploy your own site to see this in action.
Entra ID Enterprise Application
When you’re using EasyAuth with Azure Static Web Apps, you’re using the built-in Entra ID system. This system is managed by Azure and is used to authenticate users and provide access to your site. You don’t need to create an Entra ID application or configure any settings in the Azure portal. Everything is handled for you by Azure.
However, the Entra ID system is still an Entra ID application. You can view and manage this application in the Azure portal. This is useful if you need to manage users, roles, or other settings for the application.
To view the Entra ID application in the Azure portal, follow these steps:
- Go to the Azure portal
- Click on
Microsoft Entra IDin the left-hand menu. (You may need to search for it) - Click on
Enterprise applicationsin the left-hand menu. - Find the application with the name of your Azure Static Web Apps resource. It will be named something like
Azure Static Web Apps.
From here, you can further manage the application, view users, roles, and other settings. This includes Sign-in logs and permissions (this is where organizational consent is managed).
What’s Next?
In this post, we’ve covered how to add authentication to your Astro site using Microsoft Entra ID EasyAuth with Azure Static Web Apps. We’ve covered the basics of EasyAuth, how to configure Azure Static Web Apps, and how to test the authentication system locally and in the cloud.
If you wanted to define your own custom roles and permissions, you can do that by creating a custom Entra ID application (App Registration) and configuring it in the Azure portal. You can then use these
roles and permissions in the staticwebapp.config.json file to control access to your site. To do this, you’ll need to change your Hosting Plan to the Standard tier.