
There’s lots of good reasons to build a site for public or internal use with a static site generator (SSG). We won’t focus on the why in this post.
In an earlier post (Getting ready to use Astro), we covered getting your local Windows environment ready. We’re now going to build on that and create a new site that will be managed in GitHub and deployed to Azure Static Web App. All this for free!
Over time, you’ll find there are different ways to do all of this. As we go down this particular path, you’ll see how this will simplify downstream dependencies.
One area we won’t cover is the step by step to setup a GitHub account. It’s pretty easy (and free) to create a GitHub account for yourself. If you’re doing this within an Enterprise organization, you’ll need to reach out to your administrator for permissions if required.
Table of Contents
- Create GitHub Repository
- Clone Repo with Visual Studio Code
- Create new Astro Site with Template
- Create new Azure Static Web App
- Automate deployment with GitHub Actions
- What Now?
Create GitHub Repository
First, let’s create a new GitHub repository for this project. Navigate to your GitHub account page and then click on Repositories.
Below is an example when I go to url: https://github.com/conradagramont?tab=repositories

Click on the green button New to create a new repository.
Now on the next screen, type in the name of your repository. I’m going to name mine astroazure. You can also add a description if you like.

This is not the main repository for my other Astro projects that I’ll make public. However, for this post I’ll keep it there. I made it private as you’ll most likely want to do the same. Later, I’ll make it public.
Now you have a GitHub repository!
Clone Repo with Visual Studio Code
Our next step is to then clone that new repository to your local machine. We’ll use Visual Studio Code to do this.
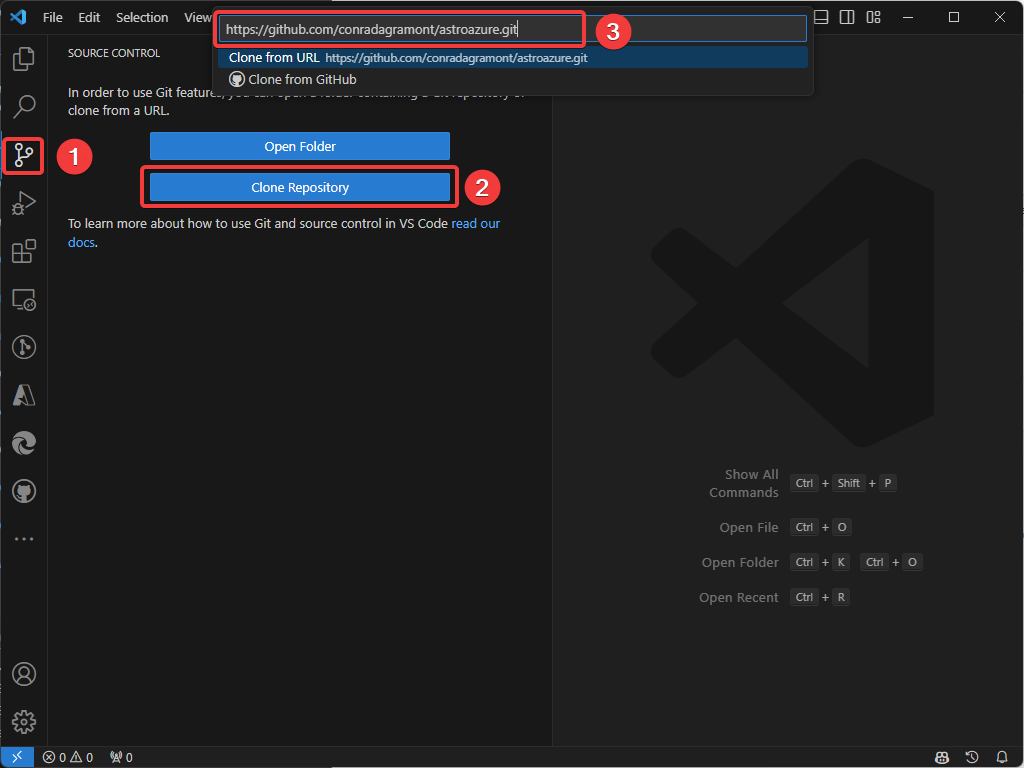
First, let’s copy the URL of the repository. Click on the green Code button and then copy the URL.

Open Visual Studio Code and then click on the Source Control icon on the left side of the screen. Then click on the Clone Repository button and then paste the URL you copied from GitHub. Hit Enter.
When asked where to place the repository, choose a location on your local machine. DO NOT put this in a synced folder like OneDrive or DropBox.
I’m going to place mine in C:\repos\. It will create a new folder with the name of the repository. You’ll then be asked, “Would you like to open the repository?”
Click “Open in New Windows” (just in case you had another folder already open. This will make it easy to follow this post).
Create new Astro Site with Template
Since our repository is now cloned to our local machine, we can now create a new Astro site. We’ll use the Astro CLI to do this.
In a previous step, we had GitHub create a ReadMe.md file for us. Empty folders are not saved in GitHub. However, when we create a new Astro site, it will create a lot of folders and files. We’ll first delete the ReadMe.md file and then create the new Astro site.
There is another folder there named .git. This is the folder that Git uses to manage the repository. The folder is hidden by default and we want to leave it alone.
Using the Explorer in Visual Studio Code, select the existing files and delete them.
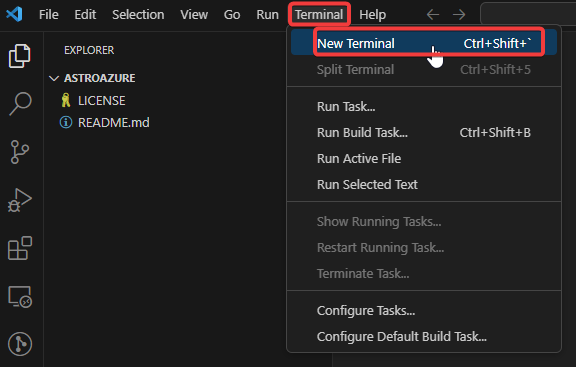
Open up a PowerShell window in Visual Studio Code. You can do this by clicking on the Terminal menu and then selecting New Terminal.
We’ll now create a new Astro site. We’re going to use an Astro Template called Astro Theme Cactus.
This is a great template to start with as it has a lot of features built in. You can decide not to use it and just remove the template parameter noted below.
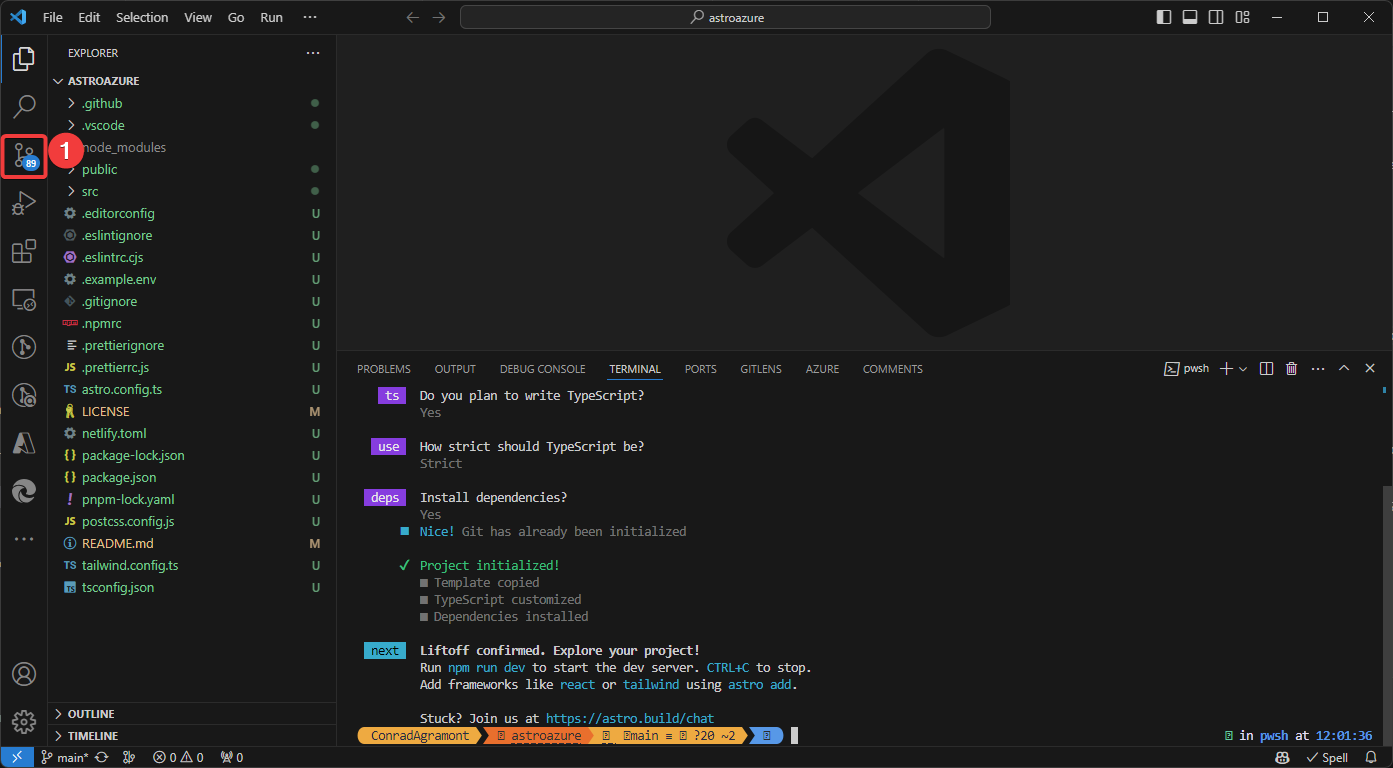
npm create astro@latest -- --template chrismwilliams/astro-theme-cactusWhen you run this command, you’ll be asked a few questions. When asked, “Where should we create your new project?” we’ll delete the suggestion and simply ./ to create the site in the current directory. You can accept the defaults for everything else.
Your site is now created locally based on the Astro Theme Cactus template. Let’s save this into GitHub. And by “save” I mean “commit” and “push”. Visual Studio Code makes this easy.
Since we started this project in GitHub with a new repository and that’s how we started this folder, we can now commit and push all the files to GitHub.
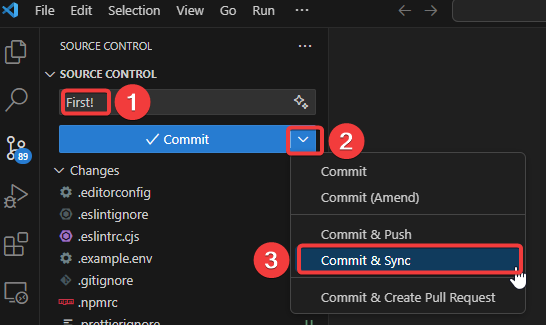
In Visual Studio Code, click on the Source Control icon on the left side of the screen.
You’ll see all the files that were created. Enter a commit message like “First!”. Then click on the three dots and then click on “Commit & Sync”.
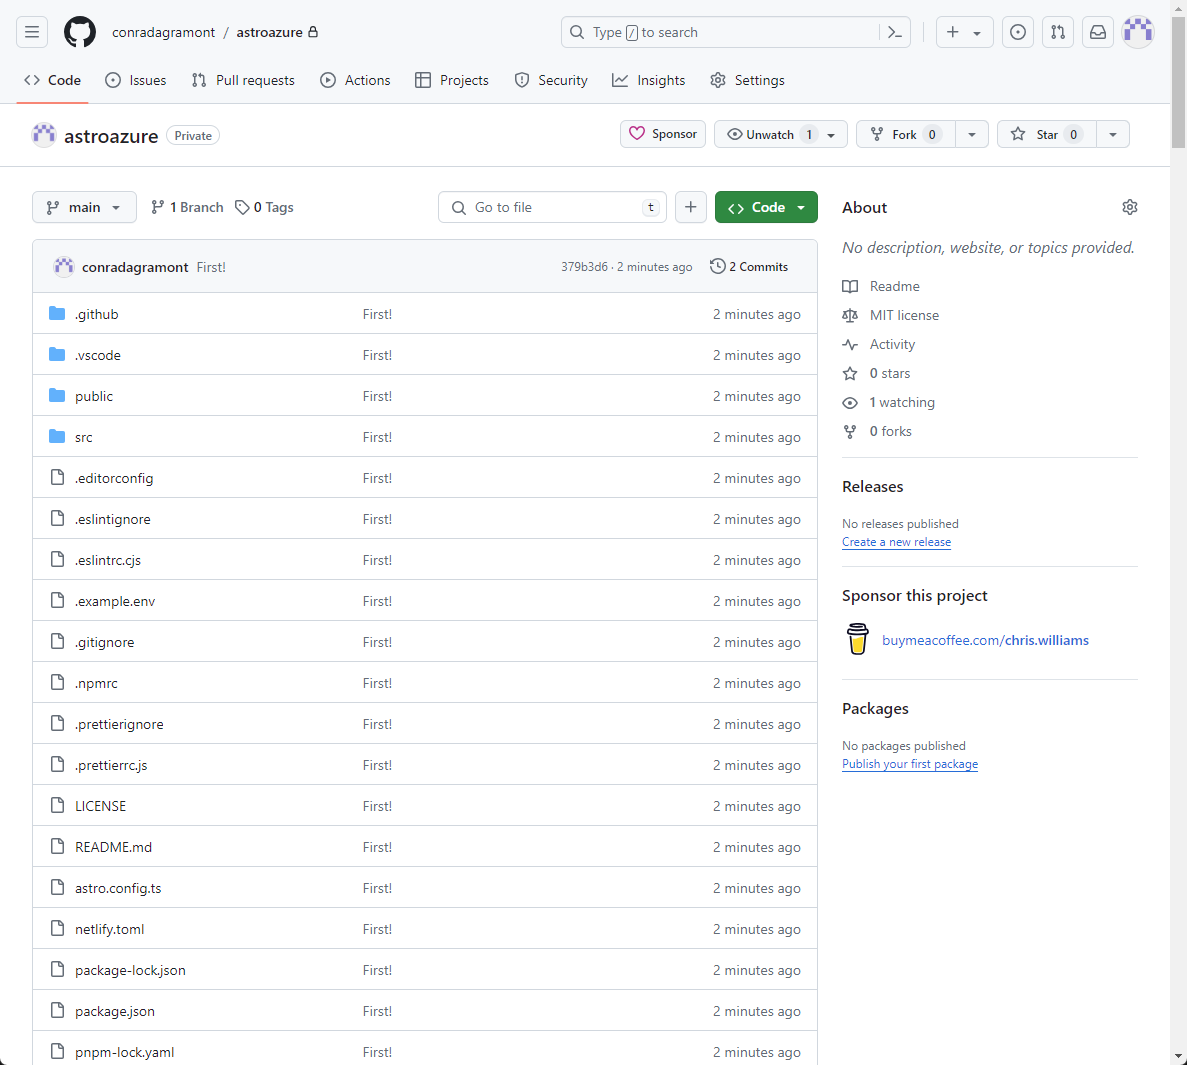
If we go back to your GitHub repository, you’ll see all the files there.
Create new Azure Static Web App
Our next step is to create a new Azure Static Web App. This is where we’ll deploy our Astro site. We’ll use the Azure Portal to do this.
If you don’t have an Azure account, you can create a free account at https://azure.microsoft.com/en-us/free/.
You’ll need a credit card to verify your identity, but you won’t be charged.
Navigate to the Azure Portal: https://portal.azure.com
Click on the search box at the top of the page and then search for Static Web Apps. Click on the Static Web Apps option.

Now click on the ”+ Create” button to create a new Static Web App.\
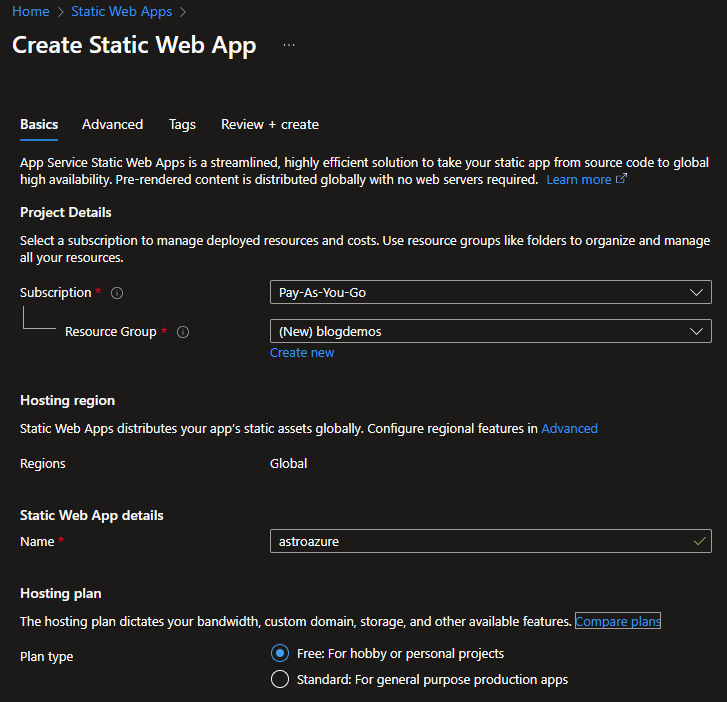
For the first part of this page, you’ll need to select the subscription you want to use. You’ll also need to create a new Resource Group. I’m going to name mine blogdemos.
The name of the Static Web App will be the name of the site. I’m going to name mine astroazure. This name is an internal references, so don’t overthink it here.
For this post, we’ll use the free option for the plan type. You can always change this later.
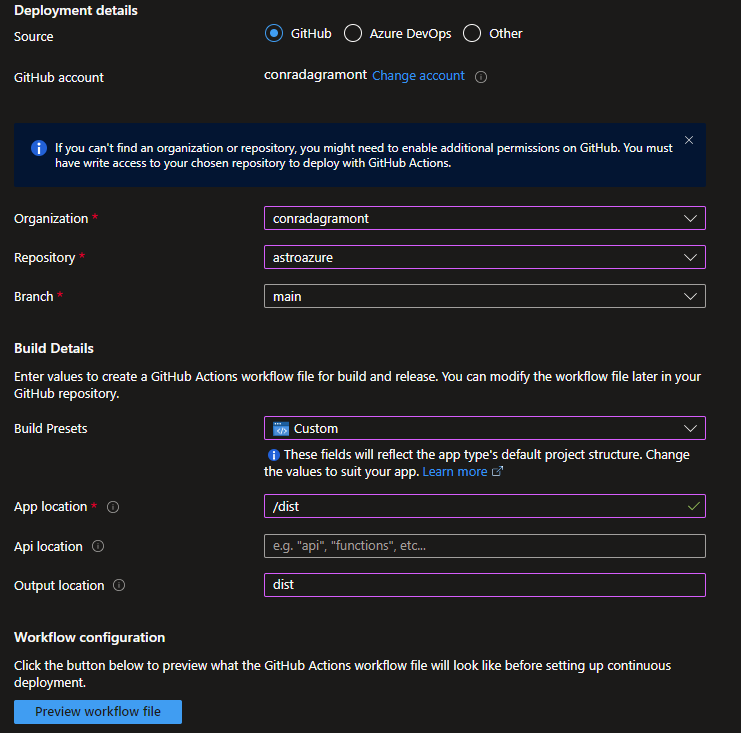
In the Deployment details section, we’ll need to select the GitHub account that we’re using. Click on the “Sign in with GitHub” button and then authorize Azure to access your GitHub account.
Once you’ve authorized Azure to access your GitHub account, you’ll need to select the repository that you want to deploy. Click on the “Select repository” button and then select the repository that you created earlier.
You’ll need to select the branch that you want to deploy. I’m going to select the main branch.
As for the build details, you’ll select other and then enter /dist app location and dist for output location. We’ll expand on this later in this post.
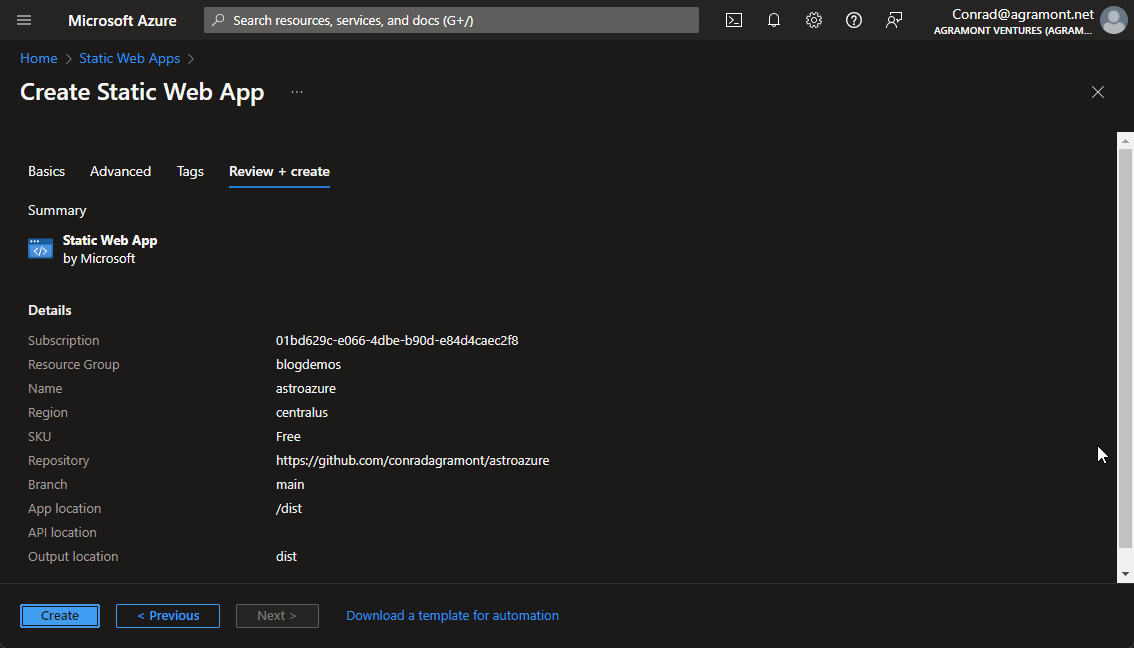
Click the “Review + Create” button and then click the “Create” button.
Once the deployment is complete, you’ll see a screen like this:

Click on the Go to resource button to see the details of the Static Web App.
You’ll see that Azure Static Web App provides a fun URL for you to use. You can also add a custom domain if you like. We’ll cover that in a future post.

You’ll also see on this page that the Source is set to the GitHub repository that you selected. This is where Azure will pull the code from to deploy the site.
If you immediately click on the URL, you’ll see the following generic page:

All things are now connected! However, your site is for sure having build and deployment issues in GitHub Actions. We’ll cover that in the next section.
Automate deployment with GitHub Actions
Our next step is to automate the deployment of the site to Azure Static Web Apps. We’ll use GitHub Actions to do this. When you created the Static Web App in Azure, it created a GitHub Actions workflow file for you. We’ll need to modify this file to work with Astro. We’ll head over to GitHub to do this and we’ll see an expected error.
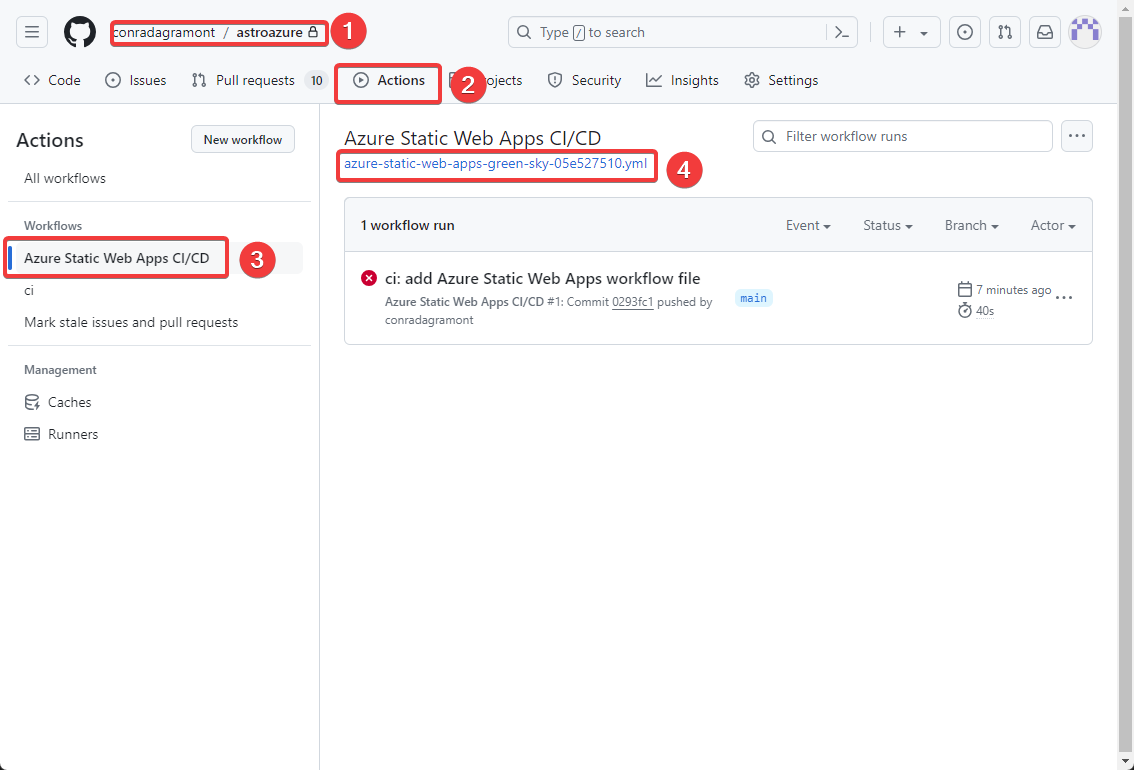
Navigate to your GitHub repository and then click on the Actions tab. You’ll see a workflow file that was created for you. Click on the file to open it.
On this page, you’ll see on the left that this YAML file, which controls the workflow, resides within your repo as well. For now, let’s click on the edit button to edit the file.
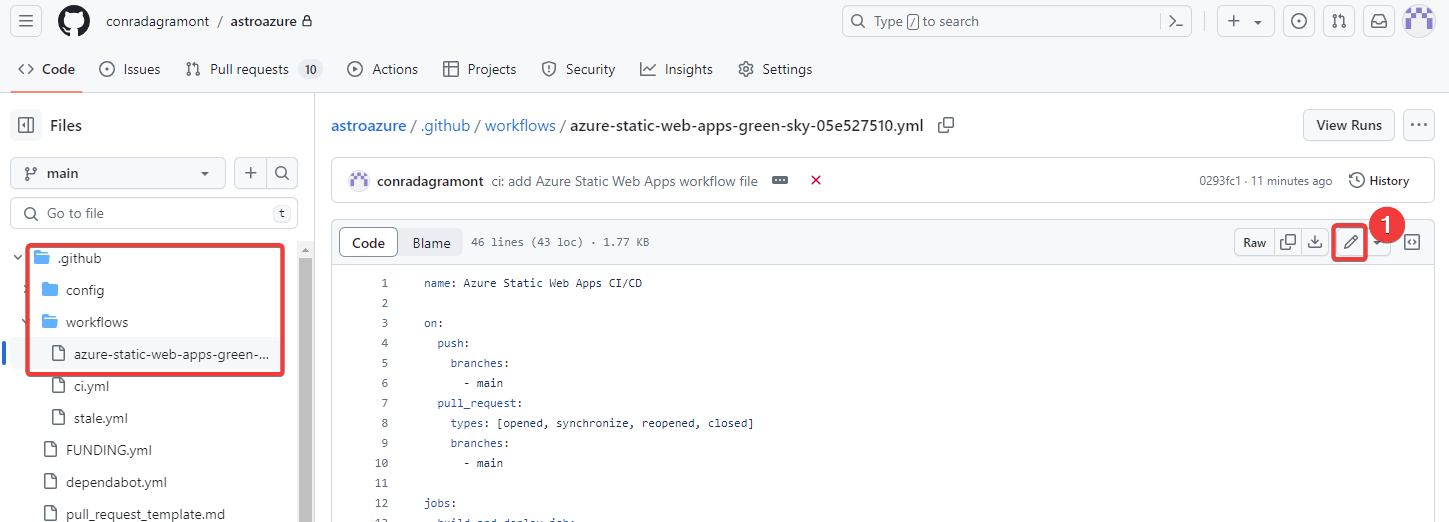
You’ll see the contents of the file. We’ll need to modify this file to work with Astro. We’ll need to add a few steps to build the site and then deploy it to Azure.
Edit YAML
The following is the contents of the file that was created during the Azure Static Web App creation. Make special note of the variable secrets.AZURE_STATIC_WEB_APPS_API_TOKEN_GREEN_SKY_05E527510 which we’ll cover later.
name: Azure Static Web Apps CI/CD
on:  push:    branches:      - main  pull_request:    types: [opened, synchronize, reopened, closed]    branches:      - main
jobs:  build_and_deploy_job:    if: github.event_name == 'push' || (github.event_name == 'pull_request' && github.event.action != 'closed')    runs-on: ubuntu-latest    name: Build and Deploy Job    steps:      - uses: actions/checkout@v3        with:          submodules: true          lfs: false      - name: Build And Deploy        id: builddeploy        uses: Azure/static-web-apps-deploy@v1        with:          azure_static_web_apps_api_token: ${{ secrets.AZURE_STATIC_WEB_APPS_API_TOKEN_GREEN_SKY_05E527510 }}          repo_token: ${{ secrets.GITHUB_TOKEN }} # Used for Github integrations (i.e. PR comments)          action: "upload"          ###### Repository/Build Configurations - These values can be configured to match your app requirements. ######          # For more information regarding Static Web App workflow configurations, please visit: https://aka.ms/swaworkflowconfig          app_location: "/dist" # App source code path          api_location: "" # Api source code path - optional          output_location: "dist" # Built app content directory - optional          ###### End of Repository/Build Configurations ######
  close_pull_request_job:    if: github.event_name == 'pull_request' && github.event.action == 'closed'    runs-on: ubuntu-latest    name: Close Pull Request Job    steps:      - name: Close Pull Request        id: closepullrequest        uses: Azure/static-web-apps-deploy@v1        with:          azure_static_web_apps_api_token: ${{ secrets.AZURE_STATIC_WEB_APPS_API_TOKEN_GREEN_SKY_05E527510 }}          action: "close"
We’ll need to modify this file to work with Astro. We’ll need to add a few steps to build the site and then deploy it to Azure.
The following is the modified file. Make sure to replace AZURE_STATIC_WEB_APPS_API_TOKEN_GREEN_SKY_05E527510 with the one from the original file. I’ll show you where this is defined later.
# This workflow will build and push a web application to an Azure Static Web App when you change your code.## This workflow assumes you have already created the target Azure Static Web App.# For instructions see https://docs.microsoft.com/azure/static-web-apps/get-started-portal?tabs=vanilla-javascript## To configure this workflow:## 1. Set up a secret in your repository named AZURE_STATIC_WEB_APPS_API_TOKEN with the value of your Static Web Apps deployment token.# For instructions on obtaining the deployment token see: https://docs.microsoft.com/azure/static-web-apps/deployment-token-management## 3. Change the values for the APP_LOCATION, API_LOCATION and APP_ARTIFACT_LOCATION, AZURE_STATIC_WEB_APPS_API_TOKEN environment variables (below).# For instructions on setting up the appropriate configuration values go to https://docs.microsoft.com/azure/static-web-apps/front-end-frameworksname: Deploy web app to Azure Static Web Apps
on: push: branches: [ "main" ] pull_request: types: [opened, synchronize, reopened, closed] branches: [ "main" ]
# Environment variables available to all jobs and steps in this workflowenv: APP_LOCATION: "/dist" # location of your client code # API_LOCATION: "api" # location of your api source code - optional APP_ARTIFACT_LOCATION: "dist" # location of client code build output OUTPUT_LOCATION: "dist" # location of client code build output AZURE_STATIC_WEB_APPS_API_TOKEN: ${{ secrets.AZURE_STATIC_WEB_APPS_API_TOKEN_GREEN_SKY_05E527510 }} # secret containing deployment token for your static web app
permissions: contents: read
jobs: build_and_deploy_job: permissions: contents: read # for actions/checkout to fetch code pull-requests: write # for Azure/static-web-apps-deploy to comment on PRs if: github.event_name == 'push' || (github.event_name == 'pull_request' && github.event.action != 'closed') runs-on: ubuntu-latest name: Build and Deploy Job steps: - uses: actions/checkout@v3 with: submodules: true - uses: actions/setup-node@v3 with: node-version: 18.17.x cache: 'npm' - run: npm install - run: npm run build -mode production - name: Build And Deploy id: builddeploy uses: Azure/static-web-apps-deploy@v1 with: azure_static_web_apps_api_token: ${{ env.AZURE_STATIC_WEB_APPS_API_TOKEN}} # secret containing api token for app repo_token: ${{ secrets.GITHUB_TOKEN }} # Used for Github integrations (i.e. PR comments) action: "upload" ###### Repository/Build Configurations - These values can be configured to match you app requirements. ###### # For more information regarding Static Web App workflow configurations, please visit: https://aka.ms/swaworkflowconfig app_location: ${{ env.APP_LOCATION }} # api_location: ${{ env.API_LOCATION }} skip_app_build: true skip_api_build: true app_artifact_location: ${{ env.APP_ARTIFACT_LOCATION }} output_location: ${{ env.OUTPUT_LOCATION }} ###### End of Repository/Build Configurations ######
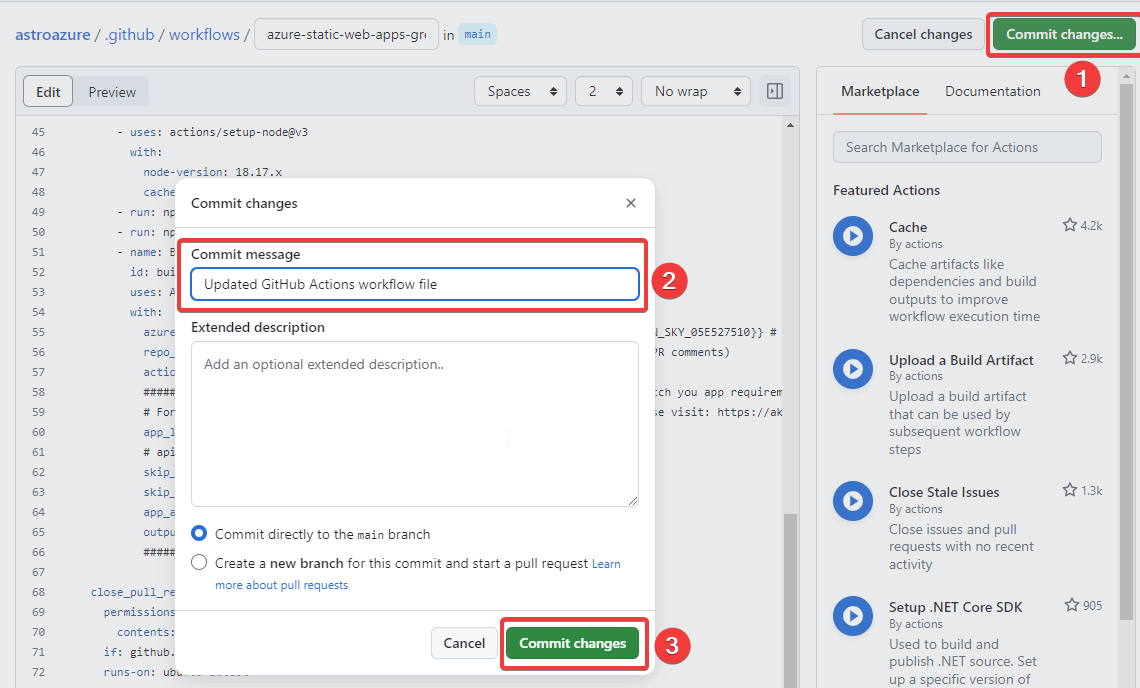
close_pull_request_job: permissions: contents: none if: github.event_name == 'pull_request' && github.event.action == 'closed' runs-on: ubuntu-latest name: Close Pull Request Job steps: - name: Close Pull Request id: closepullrequest uses: Azure/static-web-apps-deploy@v1 with: azure_static_web_apps_api_token: ${{ env.AZURE_STATIC_WEB_APPS_API_TOKEN }} # secret containing api token for app action: "close"Once you’ve modified the file, click on the “Commit changes…” button and then enter a commit message like “Updated GitHub Actions workflow file”. Click on the “Commit changes” button.
Since this workflow is intented to run whenever there is a push to the main branch, you can push a change to the main branch to see it run. Go back to the Actions tab, you’ll see that the workflow is running.
You can click on the workflow to see the details.

Once the workflow is complete, you can go back to your Azure Static Web App and click on the URL. You’ll see your site!
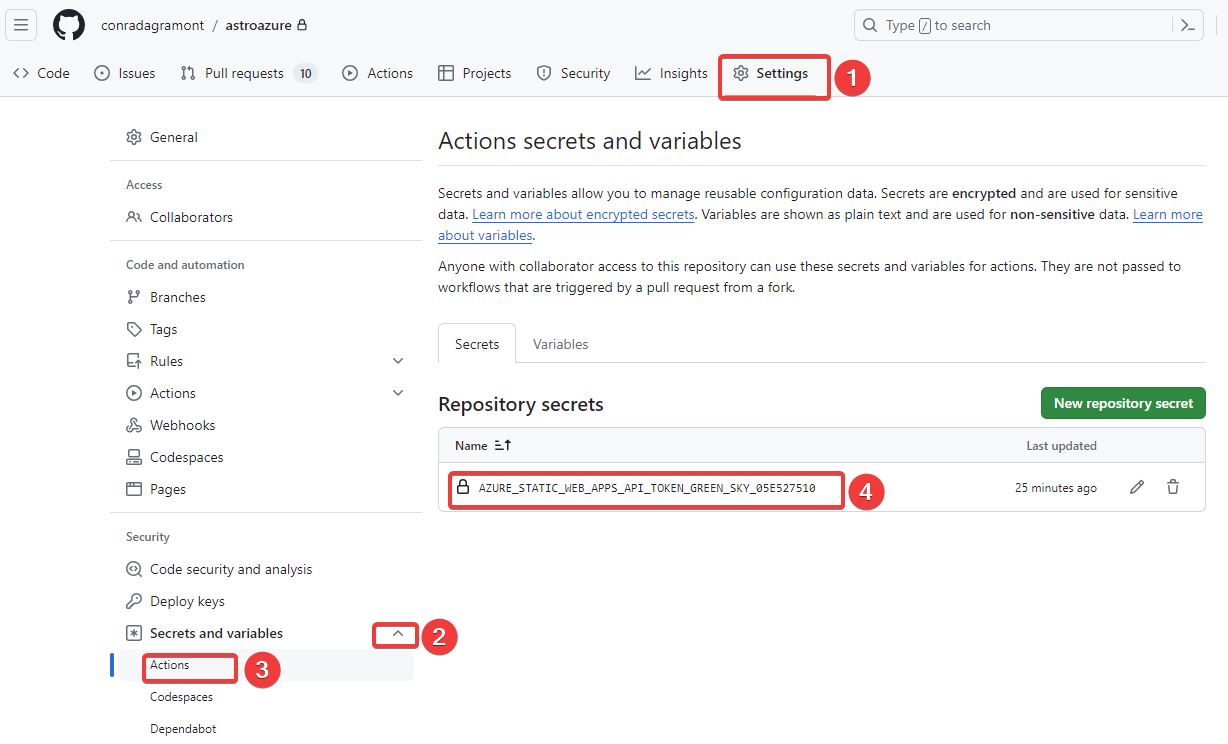
Action secrets
When you created the Static Web App in Azure, it created a GitHub Actions workflow file for you. This file contains a secret that is used to deploy the site.
This secret is stored in GitHub and is used by the workflow to authenticate with Azure.
Within your repo, click on the Settings tab, expand ‘Secrets and variables’, and then click on ‘Actions secrets’. You’ll see the secret that was created for you.
What Now?
You’ve now created a new Astro site, saved it to GitHub, created a new Azure Static Web App, and then automated the deployment of the site to Azure using GitHub Actions.
There is a lot more that you can do with this setup. You can add a custom domain to your site. You can also add a custom domain to your Azure Static Web App. But that’s a later post.
As you build out your site, you can continue to push changes to your GitHub repository and then see those changes deployed to Azure.
The Azure Static Web App we created here will not be available, but the code is available in the this GitHub repository: https://github.com/conradagramont/astroazure.